Tuesday, December 16, 2014

WIP: Prepping for Fairisle February!

This past month, I've been working on a fairisle pattern and accompanying hand-out for a class I'm teaching on traditional fairisle techniques.  I've taught the class twice before, but I was taking over someone else's class after they were too sick to teach.  The orginal instructor had chosen a very thin yarn to do the colorwork, but now that I'm teaching it again I asked to switch to a thicker yarn.  Here is where Rowan Fine Tweed steps in.  It's pre-felted, slubby, thick/thin colorful yarn, and best of all, it's tweedy!!  I love tweedy yarns.

I'm getting back into the knitted swing of things, and warming up by writing a new fairisle pattern replete with oodles of simple motifs and steeks!

So far, here's my progress with this little vest...

First my swatch using the least used colors (two of the contrasting colors)...


Then once I configured my numbers, I designed the schematic for the vest and cast-on.  Since this one is steeked, I cast on in the round with extra steek sts at the center front...


Halfway through, I realized my row gauge had relaxed and I re-configured my numbers to be sure that the lengths would work out.


Then, after washing/blocking, I steeked the center sts! 


 The tweedy felted yarn won't just unravel, so I knew it would be okay to knit from the steeked edges.  I'll post photos when I get the photos onto the computer...

...and if you're in Munich in February, and are interested in learning fairisle techniques, be sure to sign up for my class at die Mercerie!


Tuesday, November 11, 2014

A Change of Pace

I'm writing from Texas today.  We're on the second leg of a pretty long tour of the U.S. while we introduce our baby boy to the extended family.  This long trip is forcing me to explore other facets of my work, and I think it's to my benefit.  Since my sewing and knitting machines stayed in Germany, I've focused more on knitting, illustration, and fonts...

In the knitting world, I'm working on a fairisle design for babies.  Here's my swatch:


If you're in Munich in February, I'll be teaching a class on fairisle knitting at the local yarn shop (contact me for details if you're interested!).

I've also been taking online classes on surface pattern design.  My most recent class was through CreativeLive and was the Pattern Design: From Hand to Screen to Surface with Molly Hatch. It was a refresher course for me since I remember learning one of these techniques when I did ceramics at University of Miami.  We learned some of these techniques when we were making tiles... like physical tiles from clay!  It's great to know that these age-old techniques can be translated to digital form.

Here's the rough from the class...

And a more refined version I worked on via Photoshop:

And, in the fonts world, I've been learning more about kerning.  It's a weakness of mine.  When I first ventured into typography and designing fonts, I didn't know much about kerning and it shows in my early fonts.  So, my goal whilst traveling is to re-kern my old fonts.  Wish me luck!  It's quite a tedious task to say the least.

Monday, November 3, 2014

Half Circle Skirt, Oktoberfest 2014


At the end of September, I was scrambling to make an outfit for Oktoberfest that fit.  A friend graciously gave me an extra "miede" (bodice) and I made the skirt and apron out of some beautiful trachten fabric.  The skirt is a super-crisp Trevira wool blend that is cool when you need it to be and warm when you need it to be.  I lined the side-seam pockets with a bit of nylon lining fabric so the pockets wouldn't stick to any leggings, stockings, or petticoat I might wear.


Project Details
Skirt Pattern: Burda Dirndl 09/2011
Apron was self-drafted

Wednesday, October 15, 2014

Upcycling for Baby

We're slowly running out of the really small baby clothes, and after noticing a few gaps in the little dude's wardrobe, I decided to supplement with hand-sewn items.

A beautiful cashmere blend Christmas sweater that was mistakenly felted in the wash + scrap hemp fabric from cloth diapers + an Ottobre pajama pattern = a really warm romper for the baby!

I just placed the pattern pieces over the old sweater and added the gusset.  The ribbed knit provides a nice trim and a place to attach open-ring snaps for closure at the shoulders.

patches for the knees even though the little guy just learned to turn over

detail shot: crotch gusset and cowboy socks just because


An old favorite polo shirt that's too small + scrap jersey + Ottobre romper pattern = a new romper for baby!  This used the same principle.  I just traced the pattern over the old shirt at the shoulder level, and then filled in the missing elements with scrap fabric.  It worked out pretty well!  The scale of the collar is a bit silly, but it's nice to see my old shirt back in action.

polo shirt collar and placket saved

bottom hem conserved, ribbed knit and open-ring snaps added for closure


Wednesday, October 8, 2014

Want to know more about Stitchin Knit and Stitchin Crochet?

(Image from the Underground Crafter site)
I was interviewed last month for a Hispanic Heritage Month by Marie Segares, the crochet & knitting blogger and designer.  She blogs at the Underground Crafter and is also the host of the podcast the "Creative Yarn Entrepreneur Show".  If you'd like to read her interview of me for her Hispanic Heritage series that happened in September, you can read it here (http://undergroundcrafter.com/blog/2014/09/18/interview-with-adriana-hernandez-hispanic-heritage-month-series/)

And, for the podcast, she asked me some great questions about how I got into the business of making fonts for knit and crochet. So, if you're interested in listening to the podcast interview you can find it here (http://creativeyarnentrepreneur.com/episode-8-affordable-crochet-and-knitting-fonts-with-adriana-hernandez/) or below.

Thanks for asking me to participate, Marie!


And, if you'd like to see the fonts, you can find them here.

Thursday, October 2, 2014

Sewing for Baby, Ottobre's Spring Bird

Pattern: Ottobre 01/2014 Spring Bird
Fabric: double knit stripe from Stoff & Co. and double knit giraffe from another sewist
Modifications: truly double sided, buttons are on both sides of the fabric and snaps are too.


And, the LD finally wore it last week!


Wednesday, September 10, 2014

Adventures in AIO's (all-in-ones)

My latest experiments with cloth diapers have been with sewing all-in-ones (AIO's).  The advantage to this style of diaper is that you don't have a separate insert- the cover and insert are actually "all in one".


The disadvantage is that AIO's typically take a long time to dry.  This AIO is based on the TotsBots "BOB" (best of both) Easy Fit model here.  I love their diapers, but the latest version 4.0 only comes with velcro waist adjusters...


Why snaps?  Now that I've been cloth diapering for a few months, I have come to dislike sorting out anything with velcro (hook & loop) in the laundry.  So I went with snaps (poppers).  I've already had two separate incidents where super-strong velcros from baby's bibs snagged onto clothes and diapers. It's very sad to see scuffed and pilled clothing just because of an errant piece of velcro in the wash.  Grr.

After using these for a month I can say they work!  They also dry fairly quickly - not as quick as the TotsBots, but much faster than some of the other AIO's I have.

How these were made...
before sewing the outer/inner together... don't use pins

Pattern:

  • This video from Little Bundas for general techniques.
  • This pattern, 3x3 AIO round tab from Arfy of Prefold2fitted Blog
  • These written instructions from Tutu Mafia/Cloth Revolution's Sewn-In Diaper here.  These instructions plus the video above were crucial for me to get a good end result.  I also had the TotsBots diaper to look at for help.

Improvements for next time...
I need to fold over the edge where the suede cloth and the PUL edge overlap.  I left the PUL edge raw and it's stretching a bit thin.  I also think I'm just gonna do suede cloth and the insert inside (instead of PUL on the inside).  And, lastly, I've got to better reinforce the sizing snaps at the front center with more PUL.


Materials:

  • outer is Eco-PUL from Diaper Sewing Supplies this pack here.
  • Alova suede cloth for the back flap also from Diaper Sewing Supplies
  • the built-in insert is 1 layer velour (closest to the baby butt), 1 layer bamboo terry, 1 layer hemp with PUL at the front

chalk markings for centering snaps


Saturday, August 30, 2014

Nursing Top from Ottobre 2009


With my post-partum body changing so quickly, and the baby growing so quickly, I debated whether to sew anything for me for a while.  I started eyeing that red maternity/nursing top I made in the spring which was too big for me now.  I stared at it for weeks.  Then, a sewing buddy of mine offered to lend me a nursing top pattern she had in one of her older Ottobre magazines, and that was the clincher.  Chop-chop went the too-big nursing top!

I'm glad I decided to cut it up... I used up every bit of that tee, and finished off the rest of that thick red jersey fabric.  I didn't have enough for the inner panel, so I used a bit of this lovely stripe jersey I bought from a fabric store closing sale.  Glad I bought 2.5 m of it!  It's so soft!


Do I look maybe a bit tired in these pics? That would be because I am.  Hee hee. Somehow, the LD (little dude) started teething at 12 weeks and I've been coping with all that entails.  He's generally the sweetest little sweety, but when he's teething he turns into a puddle of moaning sadness.  It's heartbreaking and so I can't help but comfort him... at 2am... at 3am... at 3:30am.. etc...

So yeah, a bit tired, but it's getting better, and LD is learning to cope better.  I also have many more tricks up my sleeve now that it's been a few weeks!

---
Anyway, about the project:
PatternOttobre 2009, #6 "Loving" Nursing Top
Fabric: recycled red jersey from maternity/nursing tee made in May 2014
Modifications: shortened the sleeves 1", but I think I just need a smaller size on top
Recommendations: instructions for the innermost panel say to turn over the nursing edges and stitch, but I think this reduces the stretch of the fabric.  I'd overlock this edge instead.  I turned over the bottom edges and used a rolled hem foot... this is not a good application for it.  The jersey loves to roll, and it made for a curly half-lettuce bottom hem.

The pattern is a very straightforward 7 piece pattern (you cut the binding, elastic, etc. based on given measurements).  I made an EU size 40 using my full bust measurement.  Next time, I'll cut a 38 top, maybe even a 36 for the shoulders and sleeves, and keep the bottom 40.  It's easy to adjust since there's a separate waist section.  On me, though, this is more of a nursing tunic dress. I'll be making some adjustments, but I like the dress aspect of it.


The trickiest part of this pattern was the clear elastic!  My machine loves it to the point of squishing it all together and creating these teensy, tight gathers which I did not need for this particular pattern.  In the end, I found the solution to be paper!  Once I put the thin pattern paper between the foot and the elastic, everything went swimmingly... okay, not quite - that binding went a bit wonky, but I can live with it. 


This went so quickly after figuring out the best way to sew with clear elastic!

Overall, I'm happy with it - it's wearable, but the shoulders/neck are wide for me... it's tough to choose a size with such a variable bust measurement, but the jersey should be forgiving enough to allow me to make a smaller size top.  I will definitely make another!

Saturday, August 16, 2014

Knittin' for Baby: Striped Coverall

And, another project completed just fast enough to wear once.  Ah well.  At the very least, it made for some nice photos.


Can I also recommend a little something to knitters who follow in my footsteps and think that open-ring snaps are the way to go?  Here's my advice... reinforce the knitted fabric with some kind of backing.  Either a thin strip of jersey or something.  The prongs are kind of ripping into the button bands.  Argh.  What was I thinking?!  Oh... I wasn't.  I just wanted to "get 'er done."  And so it goes...


Project: Striped Coveralls for the little dude
Pattern:  All-In-One in Deramores Baby DK (1009) by Deramores Retail Ltd
Yarn: Debbie Bliss, Baby Cashmerino in Dark Green and Grey (1.5 skeins of both colors)

Modifications:

  • Solid color sleeves
  • Shortened sleeves to prevent the LD from eating the cuffs.
  • Added a crotch gusset as seen below... because there was no way they would fit over cloth diapers or at 3 months... and the LD is kind of an average sized 3 month old.


Wednesday, August 13, 2014

Quickie Illustrations

From mid-July to this past Friday, there was a draw-along challenge kind of thing leading up to an art opening with the local Munich Artist's Group.  I dedicated a meager 15 to 20 minutes of time to these illustrations and I sadly couldn't keep up with the full 30 days.  But, I was happy to be illustrating again, and I did have a few really nice ones at the end of it.

Here is my favorite...

illustrate a place

And these were alright, too...

self portrait

favorite animal - chameleon 
a word - lackadaisical

Saturday, August 9, 2014

Two-Part Nappies Revisited: Part 2

A quick tutorial on how to make your own diaper inserts using my pattern (or your own drafted pattern).
These diaper inserts require an outer waterproof cover of some kind, and will fit from newborn to 6kg+ (at least they're still working for us!).

the absorbent inserts inner flannel / outer terry cloth
Materials
  • Absorbent fabric (German term in parentheses) such as flannel (Flanell/Molton), terry cloth (Frottier), hemp fleece (Henf), or jersey, etc...  Feel free to recycle materials you already have; like an old flannel blanket, an old sweatshirt, or a towel.  I use terry-cloth on one side because I like to use Snappis and avoid hook & loop closures, but feel free to use whatever closure method you want.
  • Elastic (I used 1/4" wide elastic that is resistant to high heat)
Instructions
1- Place the paper pattern on the fold, and cut your materials for the diaper insert.  Don't forget to transfer all markings to your fabric.


2- Cut fabric for center pad (it's that center rectangle with the dotted line in the pattern).  I cut 2 layers of bamboo terry-cloth.
3- Layer the 3 elements as follows: absorbent material #1, pad rectangle(s), absorbent material #2.


Center the pad, and secure all three layers with pins.


4- With the smoothest fabric facing up, sew 1/8" to 1/4" within the four edges and across the center of the pad to secure it in place.


5- Measure the elastic band for the sides and top, then cut elastic 2-3” shorter than the measured length.
6- Tack both ends of the elastic where indicated and pin at the center.  Make sure to leave a little space on the outer edge for finishing the fabric.
7- Use a zig-zag stitch to attach the elastic on the back of the insert and the leg openings, stretching the elastic between the two outer layers as you go.


8- Use a zig zag stitch or overlock around all the outer edges to finish.  I stretch out the back and sides while feeding it through the overlocker.  I do not serge over the crinkled/gathered edges.

Wash a few times, and then let baby poo all over your work! Hahah!

Friday, August 8, 2014

Two-Part Nappies Revisited: Part 1

This post covers lessons learned in making diaper covers at home.  In cloth diapering, the outer cover is a waterproof barrier that prevents leakage.  These can also be used over regular disposables to prevent leaks, or just because they're really cute.


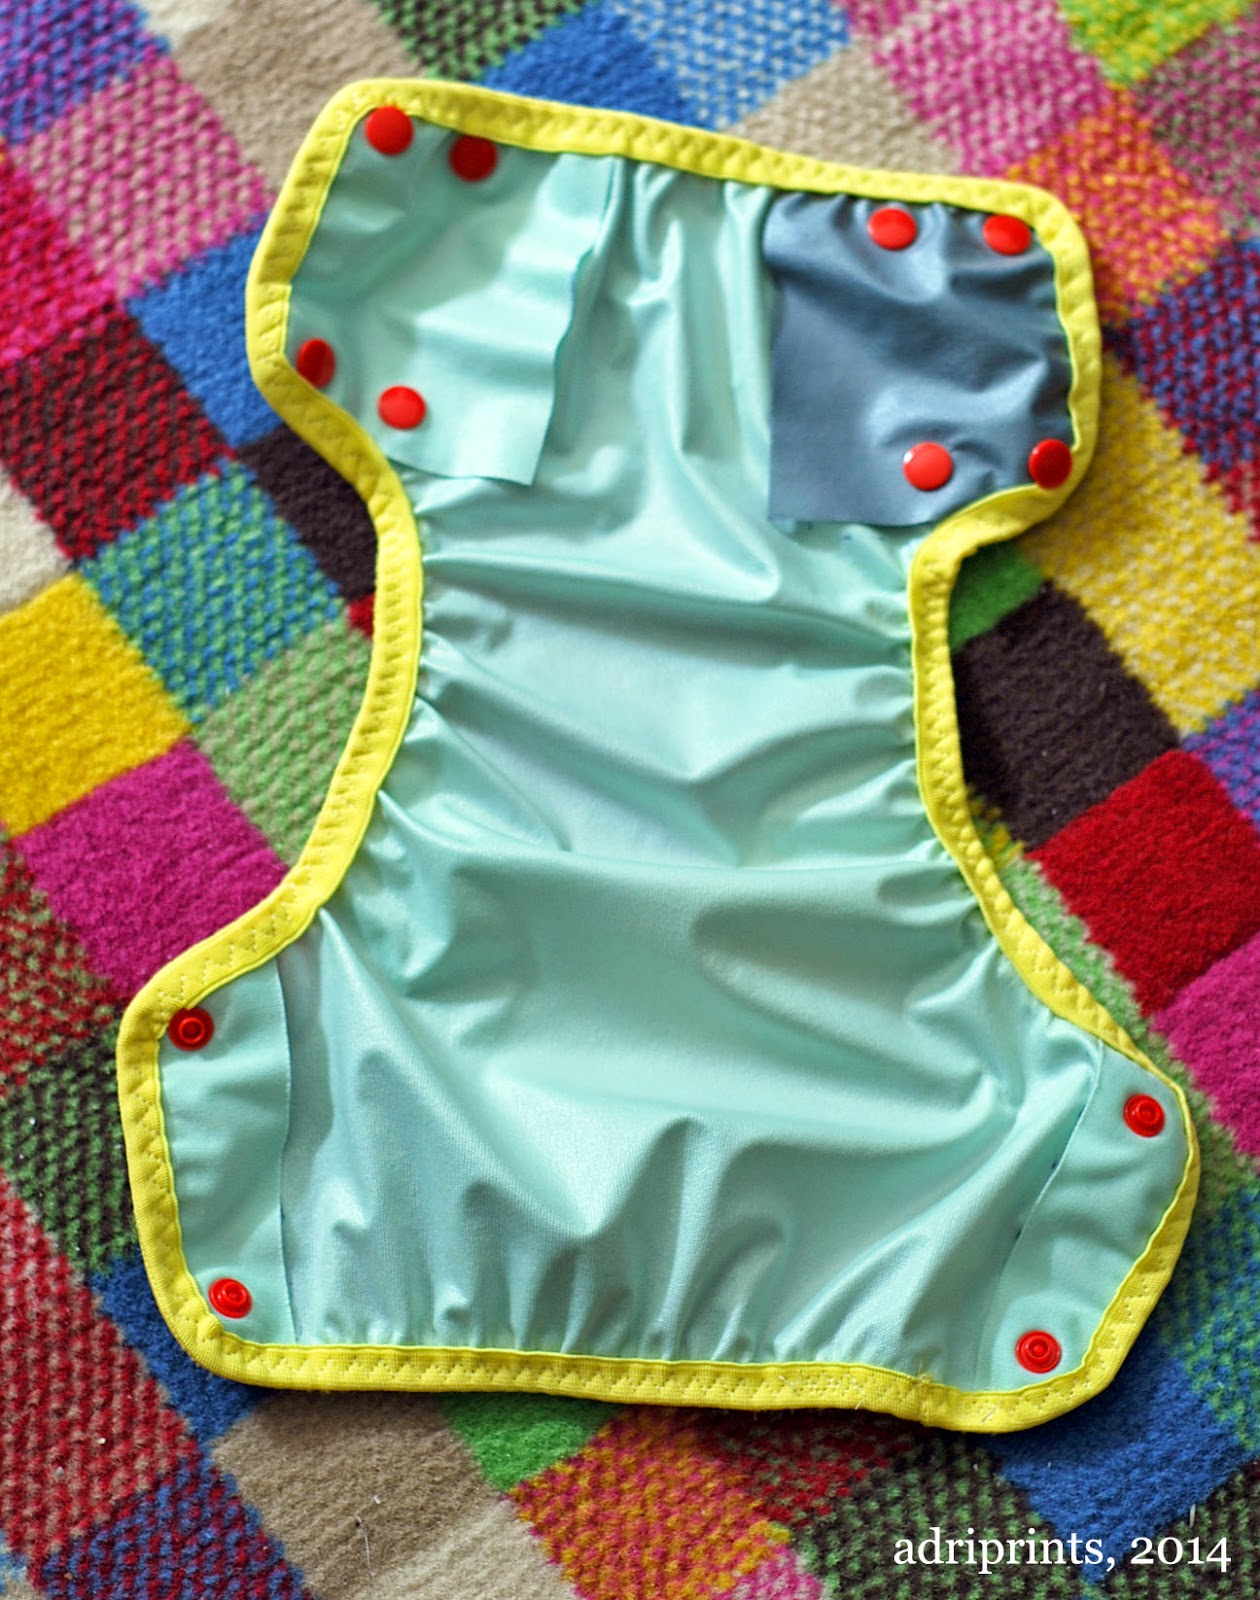
After a few mishaps and lots of leaks, re-purposing PUL, and studying more cloth diapers, I think I've found a few types of cloth diaper systems that work for the little dude.  This particular diaper cover is a homemade version of Motherease's diaper cover the Air Flow.  It works really well with the diaper inserts I make at home (more on that later).  These are not easy to come by here in Germany, so to me it's worth the effort of making more of them.

What I've learned so far:
FOE - fold over elastic goes on a LOT easier if you use a triple zig-zag stitch.  This video was key.
detailed photo of the inner wing of the diaper cover


KAM snaps - these snaps make a better seal with the Eco-PUL I bought from Diaper Sewing Supplies when there are 3 layers, and it's been exposed to warmth (i.e. it's been through a 60* wash and tumble dry).  That's it!  That is what was missing last time.  I didn't wash/dry the cover before trying out the snaps, and it was too thin.  Now I'm kind of sad I chopped up the grey & yellow cover before washing/drying.  It may have been salvageable.  Oh well.


With my latest effort, I went with a retro color combination!  Aesthetics aside, they work really well.  No leaks or poo-splosions yet!


As for the diaper inserts (the absorbing inner part of these two-part systems), I've drafted a pattern for anyone who wanted to try it on their own!  You can download it from the Google-Drive link here.

Come back this weekend to see the photo-tutorial on making your own diaper inserts!

Thursday, July 24, 2014

Just in time!

Pattern: "Indian Elephant" from Ottobre 06/2014

Yikes!  This baby really is growing fast!  I finished the all-in-one pattern "Indian Elephant" from Ottobre 06/2014 just in time for the little dude to wear it.  It only took me two weeks to make it, but now I know that may be too slow!  Whoah!


This baby is making me a much faster sewist.  Even a week can be too slow in the world of baby growth.  I'm going to have to plan projects for the far future to keep up!  The pattern "Indian Elephant" is pretty straightforward.  It's actually a lot easier than the onesie pattern "Warmly Wrapped" that I finished last week.


The toughest part is applying the binding and, once again, the snaps!!  What in the world is up with these ring snaps and why don't they install correctly!?  This is with the special pliers, too.  The prongs often don't align with the center of the snap and then stick out... possibly with the end result of scratching baby. Not nice.


If he's in hefty stuff-in cloth diapers like today, the crotch gusset is a bit revealing shall we say, but if he's in a trimmer model diaper, it'll fit just fine.  I may still add two more snaps.  Maybe.


Pattern: Indian Elephant, Ottobre 06/2014
Fabric: organic cotton jersey from Lillestoff in print "Pirates" by BORA
Notions: fine ribbing in red, a bunch of snaps, stretchy interfacing G785 from Vlieseline/Vilene, and Vliesofix (two-sided fusible interfacing)
Special Tools: twin needle, snap pliers, walking foot, stretch needle