Wednesday, February 29, 2012

Leap Year Update

So far, I've been keeping to my 2012 Seamless pledge without a hitch.  I have not purchased a single item I could make myself.  In the meantime, I've been working toward my goals of finishing a bed-sized quilt, a pair of trousers that fit, and a lined jacket.

On the jacket front, I quickly put together the muslin for the fitted, lined jacket project. It's been really handy that Gertie's Starlet Jacket course came along as soon as it did!  I've started working with her pattern.  I tried the muslin on with clothing underneath as I plan to wear it in real life.  So far so good!  Modifications so far: I adjusted the waist of piece #2 and piece #4 so that it's size 6's waist, but the bust and hips of size 4.  It fits great!  I'm thinking I may want longer sleeves... that will come later.


me + lots of layers + muslin
hasty muslin, but it works!

This weekend, I used my scraps to make a sleeve roll to help with pressing in the upcoming lessons.  I made it out of my heavyweight muslin and some soft cotton scraps layered several times.  The roll was stuffed with quilting scraps.  It's not as firm as I'd like it, but it's a great starter sleeve roll.


Then, I pieced together my quilting squares and now have many long strips waiting for sashing and borders.  Sadly, I don't have enough of the brown cotton sateen jelly roll to sash the whole thing.  I'll be on the hunt for it.  Any hints on where to find some?


Oh yes, and you see that lovely floral ironing board?  That's new!  I finally broke down and bought a full-sized ironing board.  It was on sale, too!  This model has a lovely iron holding thingy at the end.  It's very handy.  Ironing quilting pieces is fine, but it's really tough to do larger sections on the small table-top ironing board. It's also a real challenge to steam large pieces of wool.

Clover Update:  I've cut the muslin pieces for the Clover trousers, but haven't yet sewn them together since I want to add jeans-like pockets... a Frankenstein pattern awaits methinks.

Yeah for progress!  Happy leap-year day!

Thursday, February 16, 2012

JJ Blouse Tutorial - Part 3

This final installment of the JJ Blouse tutorial covers steps 10 through 12 which is basically the sleeve and finishing.  Try on that cuff piece first and make sure it fits around your upper arm (minus the 5/8" seam allowances).

If it doesn't fit, then consider adjusting the cuff seam allowances.  If it still doesn't fit consider redrafting the sleeve (slash in the middle and add some width to the piece) if you think the gathering isn't enough to work for your arms.  Then adjust the cuffs/interfacing and the marking lines accordingly.

Step 10:

Step 10A - Double stitch like you did with the ruffle on the top bell curve of the sleeve between the two asterisks.  If your machine has a large stitch length use it!  I used 4mm which is as long as mine goes.  Try to keep the two lines of stitching evenly separated... try not to let your stitch line go toward and away from the first stitch line because it makes gathering the fabric more difficult.  So, Step 10A is pretty straightforward.

Step 10B - Then comes Step 10B, and the abstract origami illustration.  Here's what it's trying to tell you...

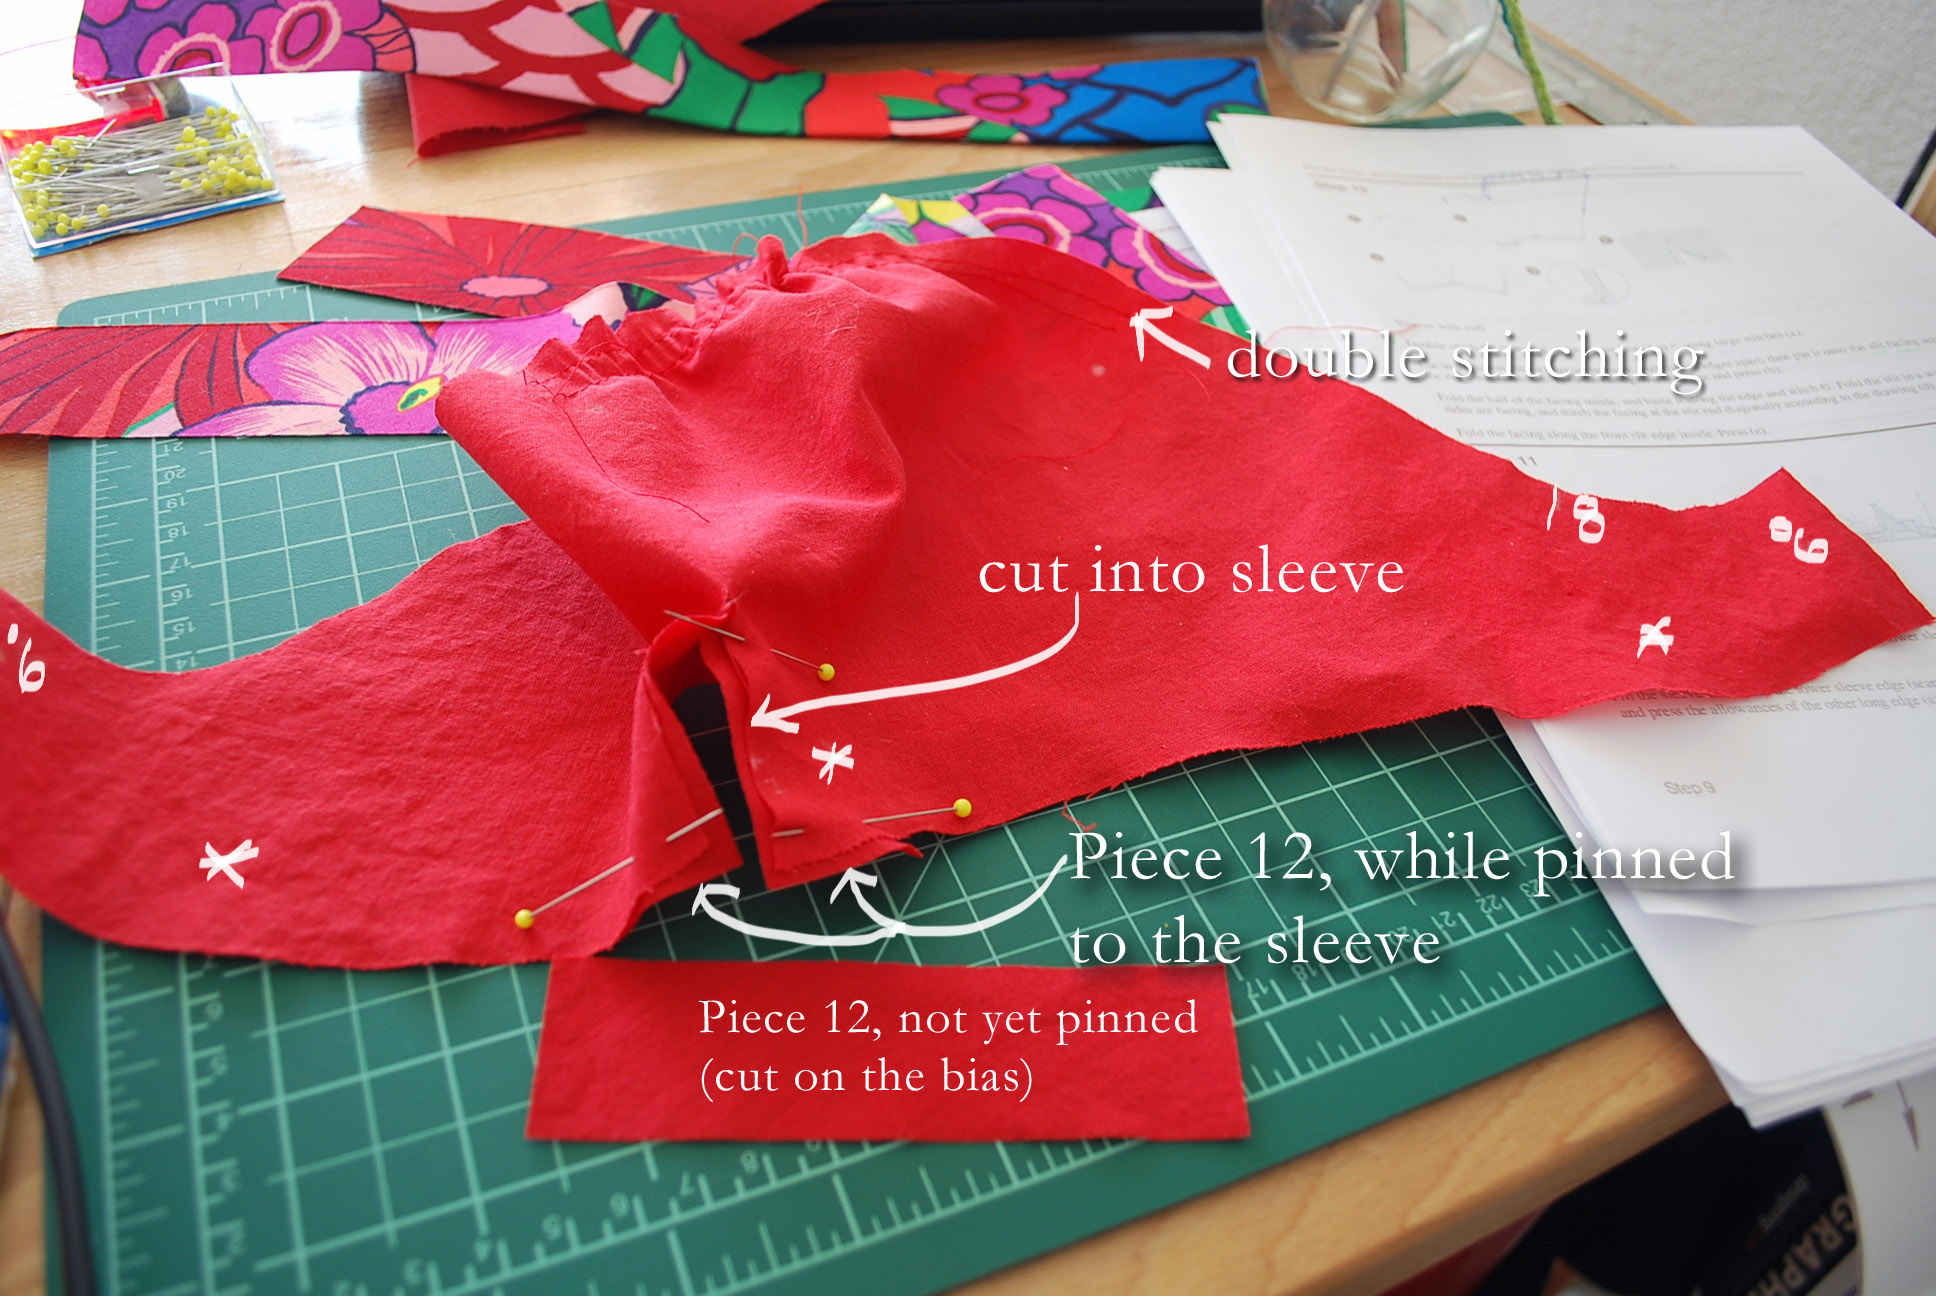
After you cut into the bottom of the sleeve, you're going to need to seal that edge.  So, pull the cut edges apart and pin piece 12 to the newly cut opening like this:

Step 10B, Close-up

Another view of the situation...

Step 10B, A larger-picture view
Step 10C - You are creating a sealed edge here, so be ready to fold piece 12 into itself a couple of times.  First baste that edge, though.  Then, press, fold, press.
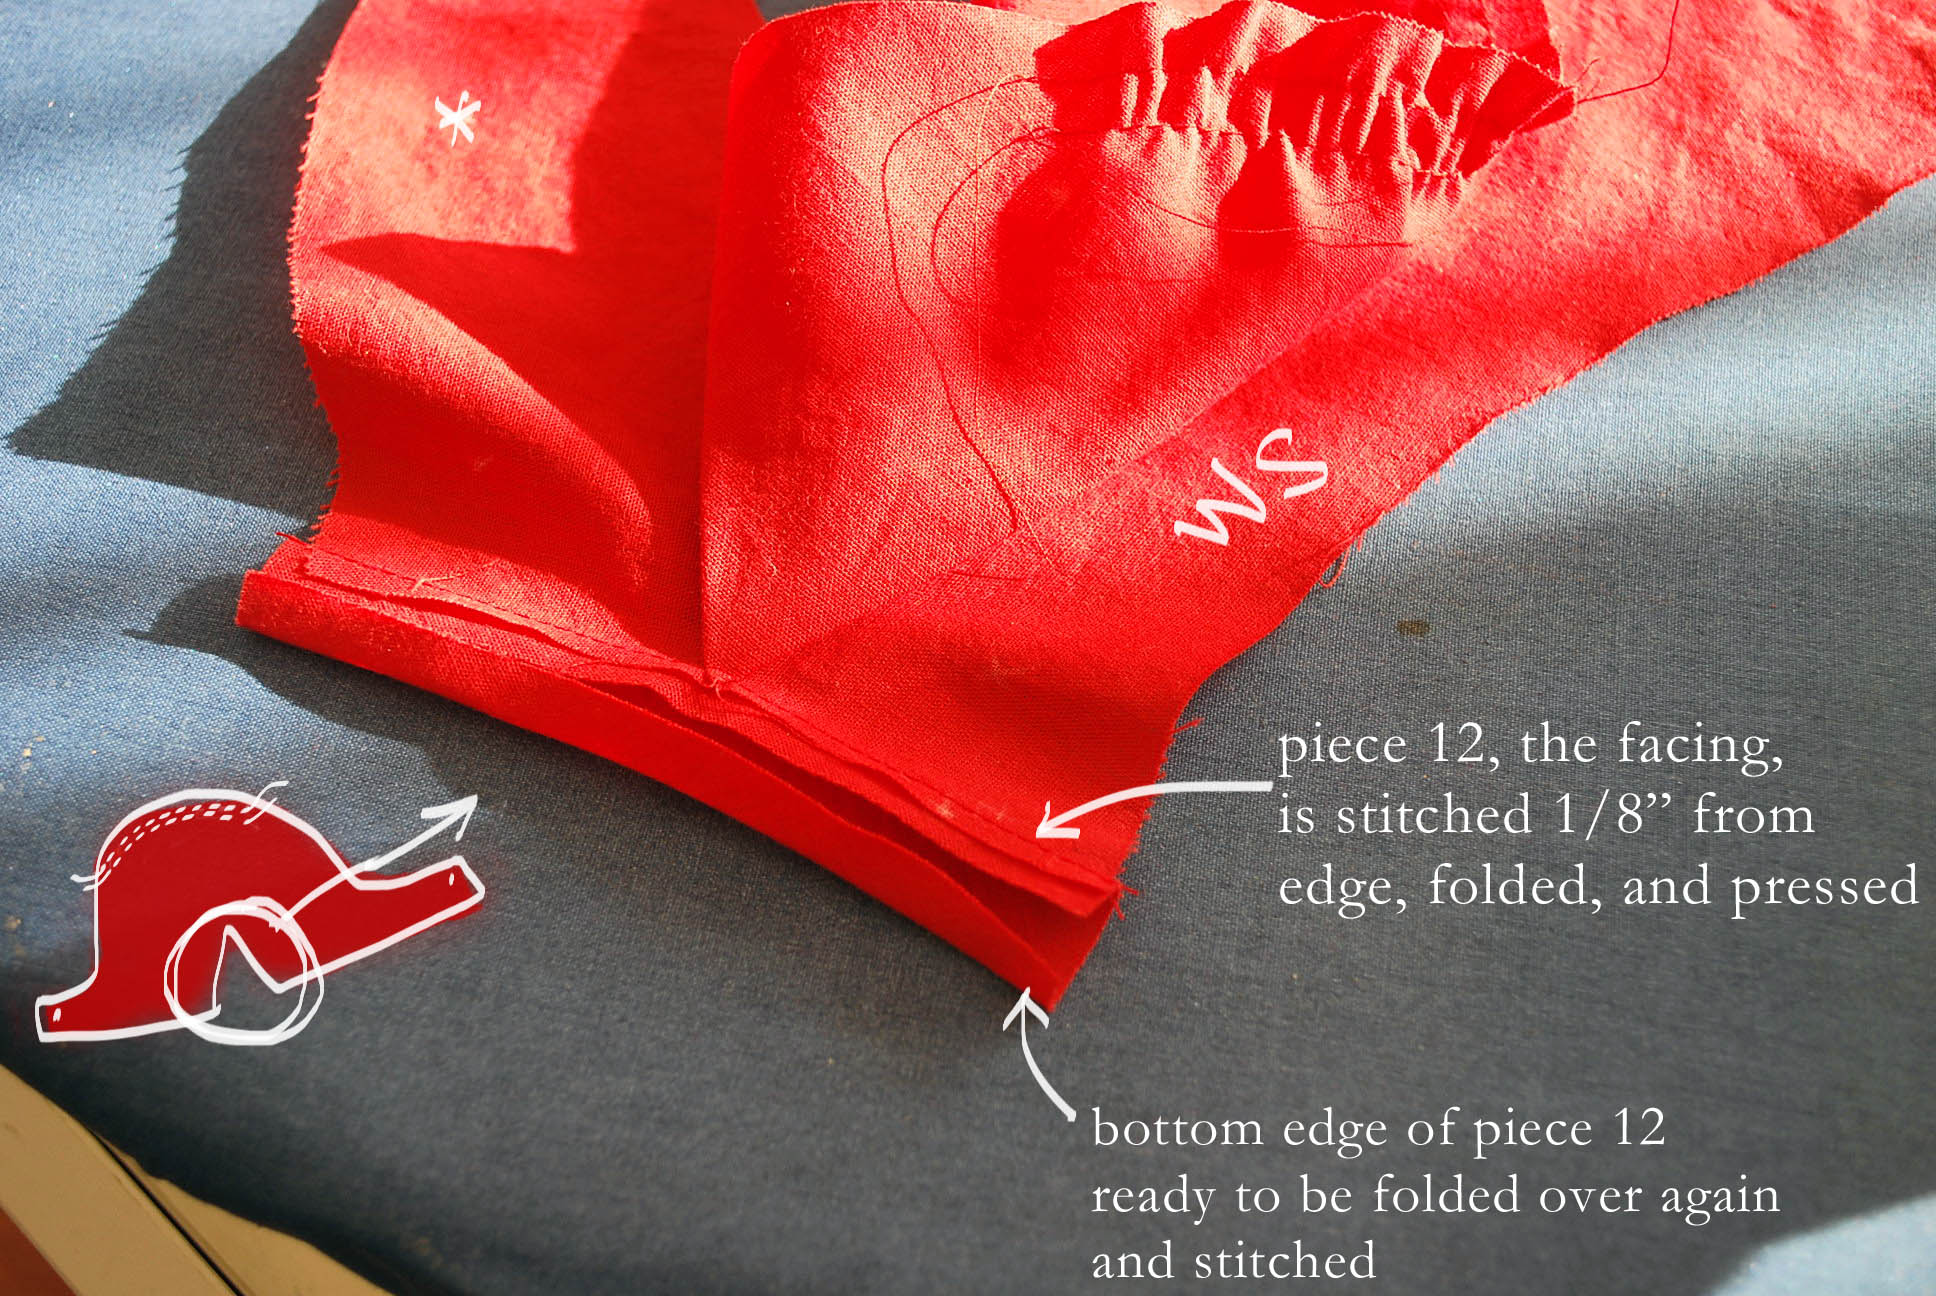
Step 10C, folding and pressing piece 12

After folding piece 12 back onto the sleeve, baste stitch along the edge to seal that bias facing and create a non-fraying, finished edge.

Step 10D and 10E - Next, stitch a diagonal line from the sleeve edge to the outer edge of the bias facing we just completed.  This creates a folding pivot for the slit and allows it to close easier and be pressed.  Press!
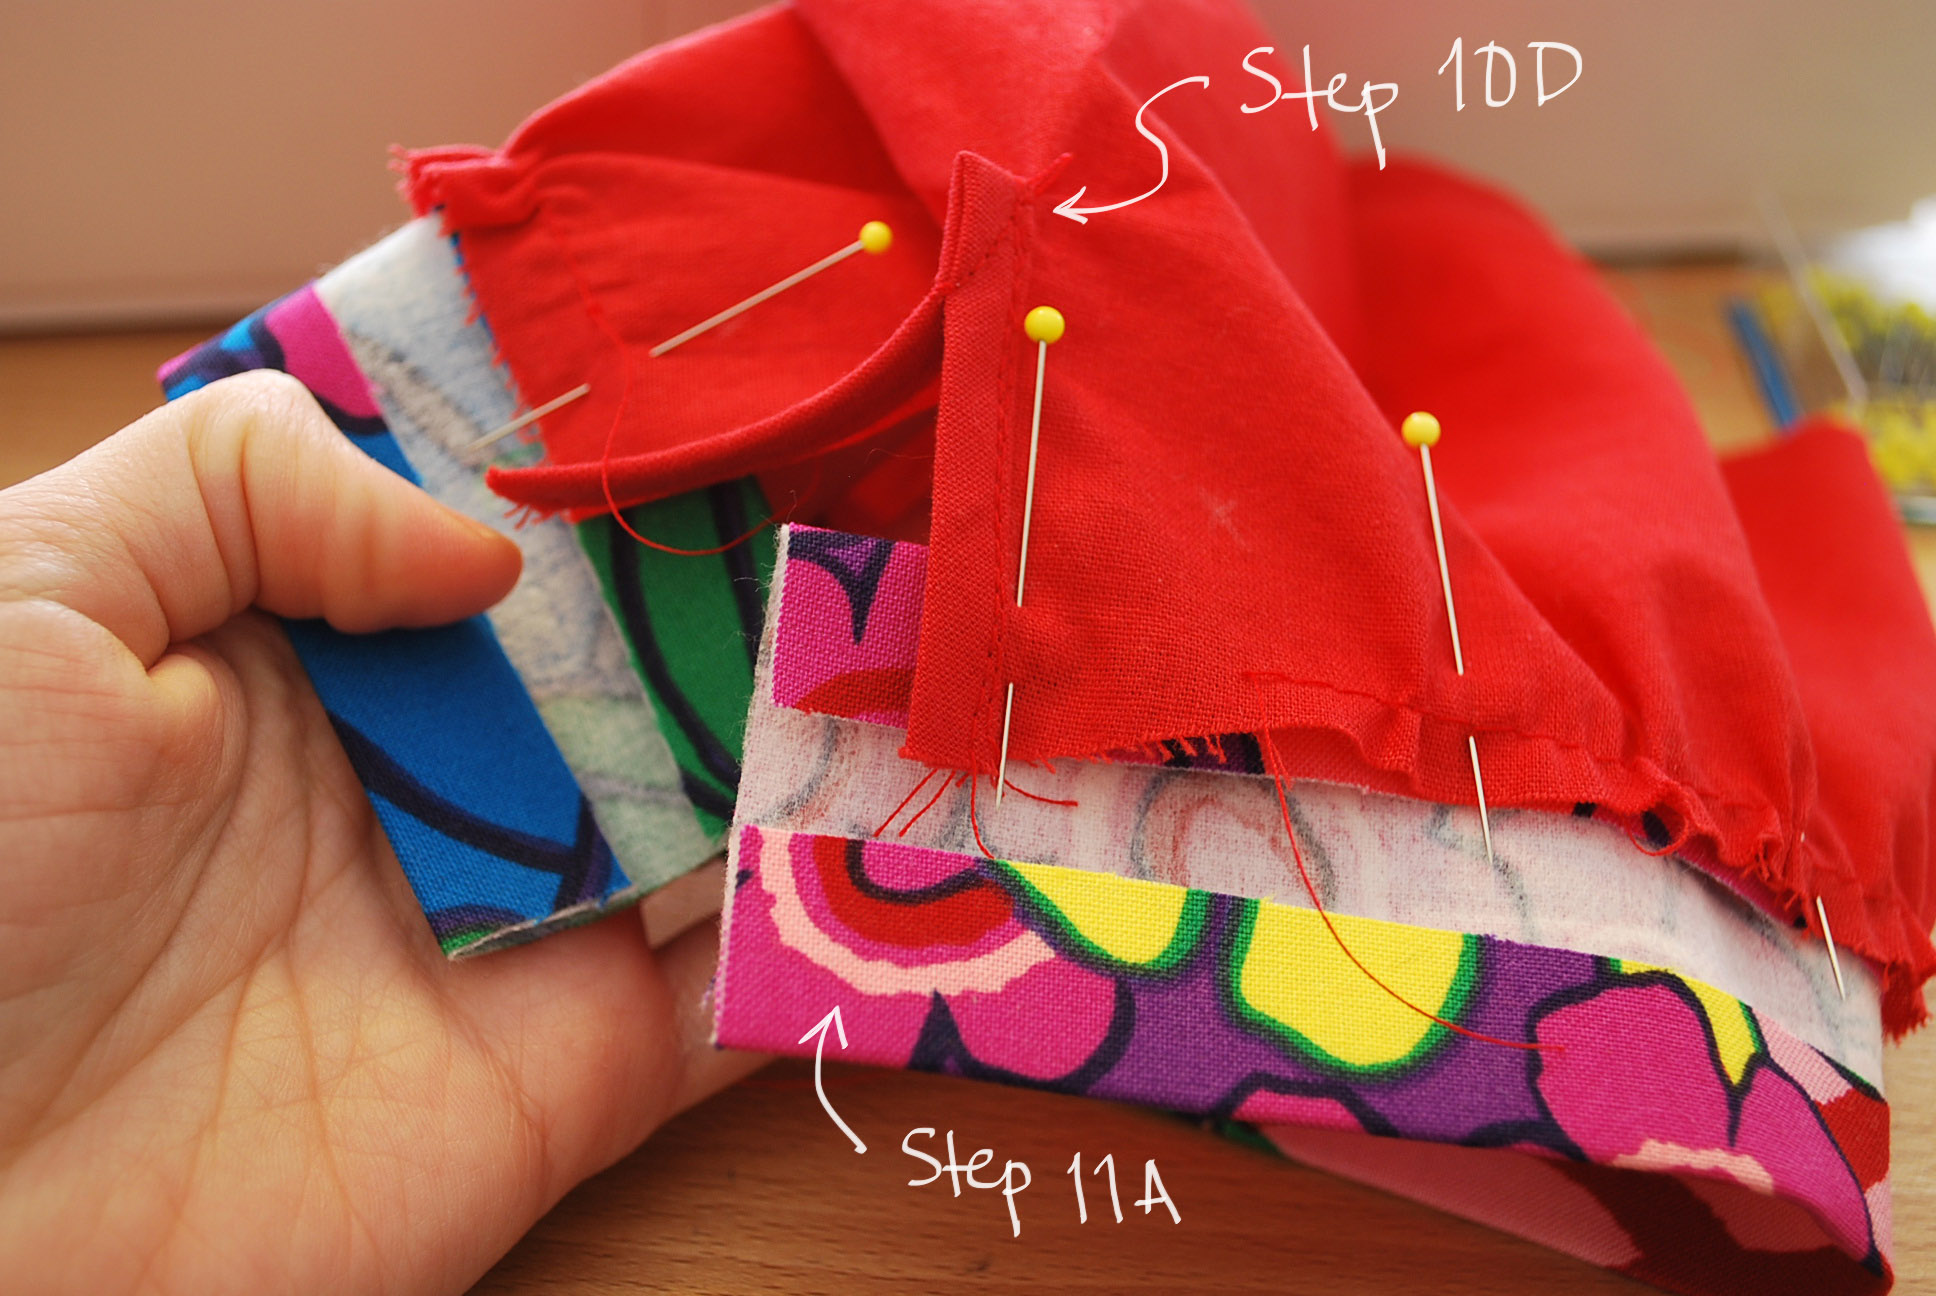
Step 10D, E, and Step 11A


Step 11:

Sew seam 6.  I did a flat-felled seam again for 6 and made sure it would match up with the side seams.  See seam treatment tutorials here from Coletterie!  After stitching seam 6 which is the underarm part of the sleeve (see here for photo), do a quick hand baste between the asterisks at the bottom of the sleeve, gather and align with the the cuff piece (be sure you already interfaced it). 

Step 11A - (photo above) Note that the sleeve has already been gathered between the asterisks and the cuff piece has been folded at the seam allowances (5/8") and pressed.  Then, it was pinned (right sides facing) securing the alignment of the sleeve piece and the placement marks of the cuff.

Step 11B -  Sew a straight line down the cuff ends as you see below (marked Step 11B in red thread).  Then, trim the excesses and prepare the corners for turning inside out. 


Step 11C - Both ends of the cuff are sewn and trimmed, and when you turn them inside out, they should be flush with the edge of the slit opening.  If not, you can redo it or make it a design feature.
Next press the cuff edge as you want to see it in the end.  Sew 1/8" or near the RS top edge of the sleeve securing the cuff.  Top-stitch at will!  Sorry for the outburst, I'm a longtime fan of top-stitching.

Step 12:

Step 12A - Don't hate me.  I did not photograph this.  The illustration was pretty good, and I'll highlight the key points.  Also, here's where your pattern marking skills come in handy.  I hope you marked all those stars and dots!  Gather the top bell of the sleeve between the asterisks.  Remember to hold the bottom threads and push the fabric away... brute force = damaged fabric.

Take note of the dots and lines where your sleeve piece is marked and pin them onto the body with RS facing.  The sleeve should be kind of nested inside the body.

All the markings should align.  For example, the side seam should match your underarm seam (dot 6), and there's a center mark at the top of the sleeve bell that should match your shoulder seam. You want to pin from the sleeve side (not the body side).  You also want to stitch on this side of your sleeve.

From my Simply the Best Sewing Techniques book, page 178:
"With the sleeve side up, begin at the underarm seam and stitch along the seamline... As you stitch, place your forefingers on either side of the presser foot, to keep the eased area from puckering under the needle.  When you reach the underarm again, overlap the stitches.  Seam a second row 1/8" away from the first, but still within the seam allowance."
I didn't know how to flat-fell seam a gathered sleeve so I just trimmed/graded the edges and zig-zagged. Then, I pressed the sleeve seam allowances into the sleeve, setting in the sleeve.

Step 12B -  This one's easy.  Fold and finger-press or pin a 1/4" (or 1/8" if you're a really good hem-person).  Fold it over once more, press, pin, stitch.
Presto-change-o! You have a JJ Blouse!


Buttons:
For instructions and some really detailed information on how to measure for buttonholes, making them by hand, and buttonhole placement, I found this PDF from New Mexico State University really helpful.


For part 1 see here.
For part 2 see here.


Wednesday, February 15, 2012

JJ Blouse Tutorial - Part 2

Ruffles!  In the previous part (part 1) of this tutorial, we cut out all the pieces, worked on the buttonhole band, and briefly mentioned that the center back piece was attached to the back side pieces using your preferred seaming method.

In this portion of the tutorial, we cover Steps 7 through 9 of the JJ Blouse, a free pattern from BurdaStyle.  Note: I actually skipped Step 9 which is the belt loops.  I chose not to include them.

Step 7:

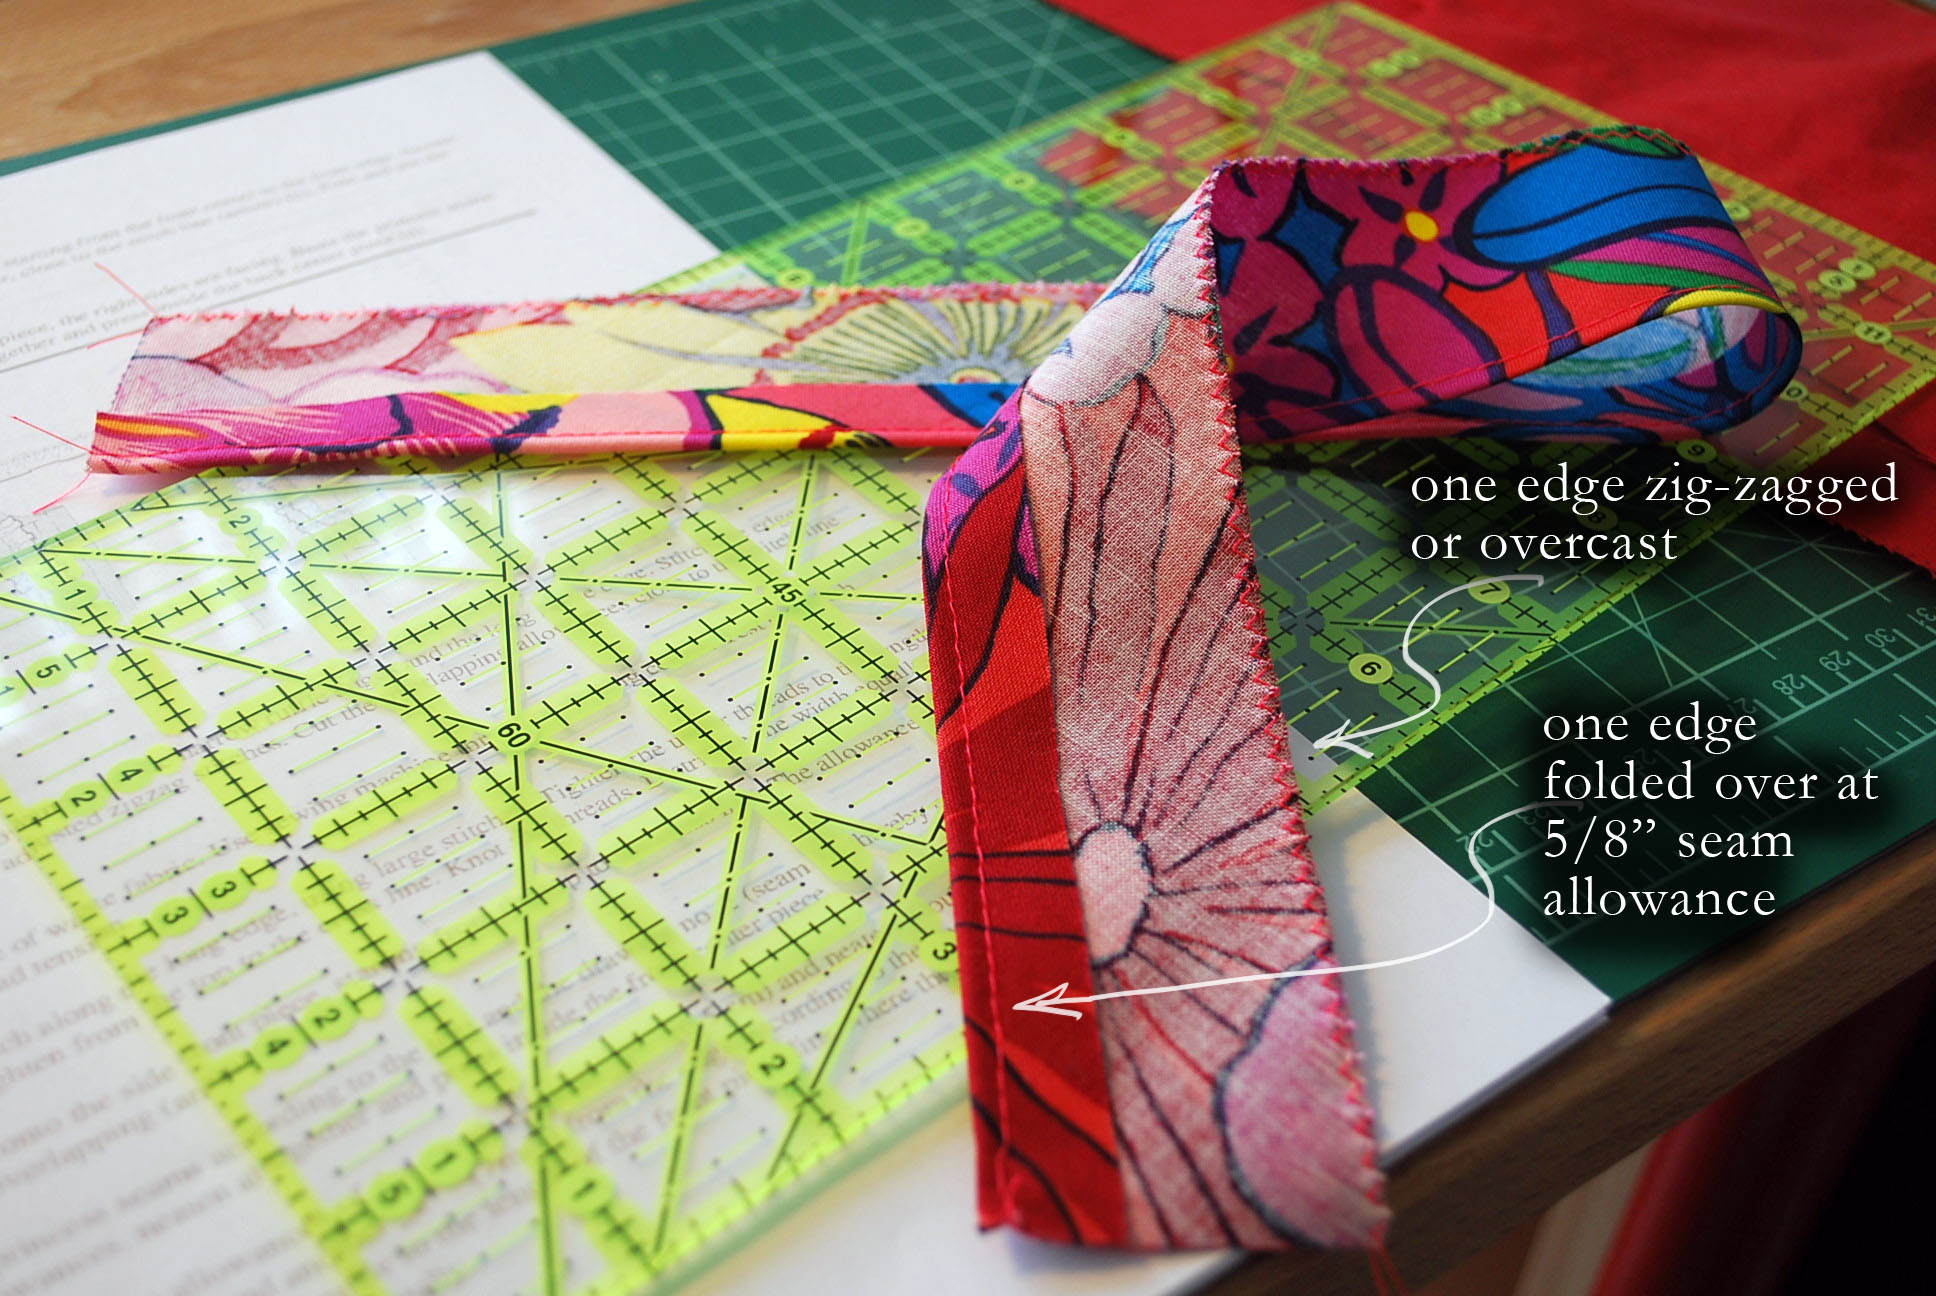
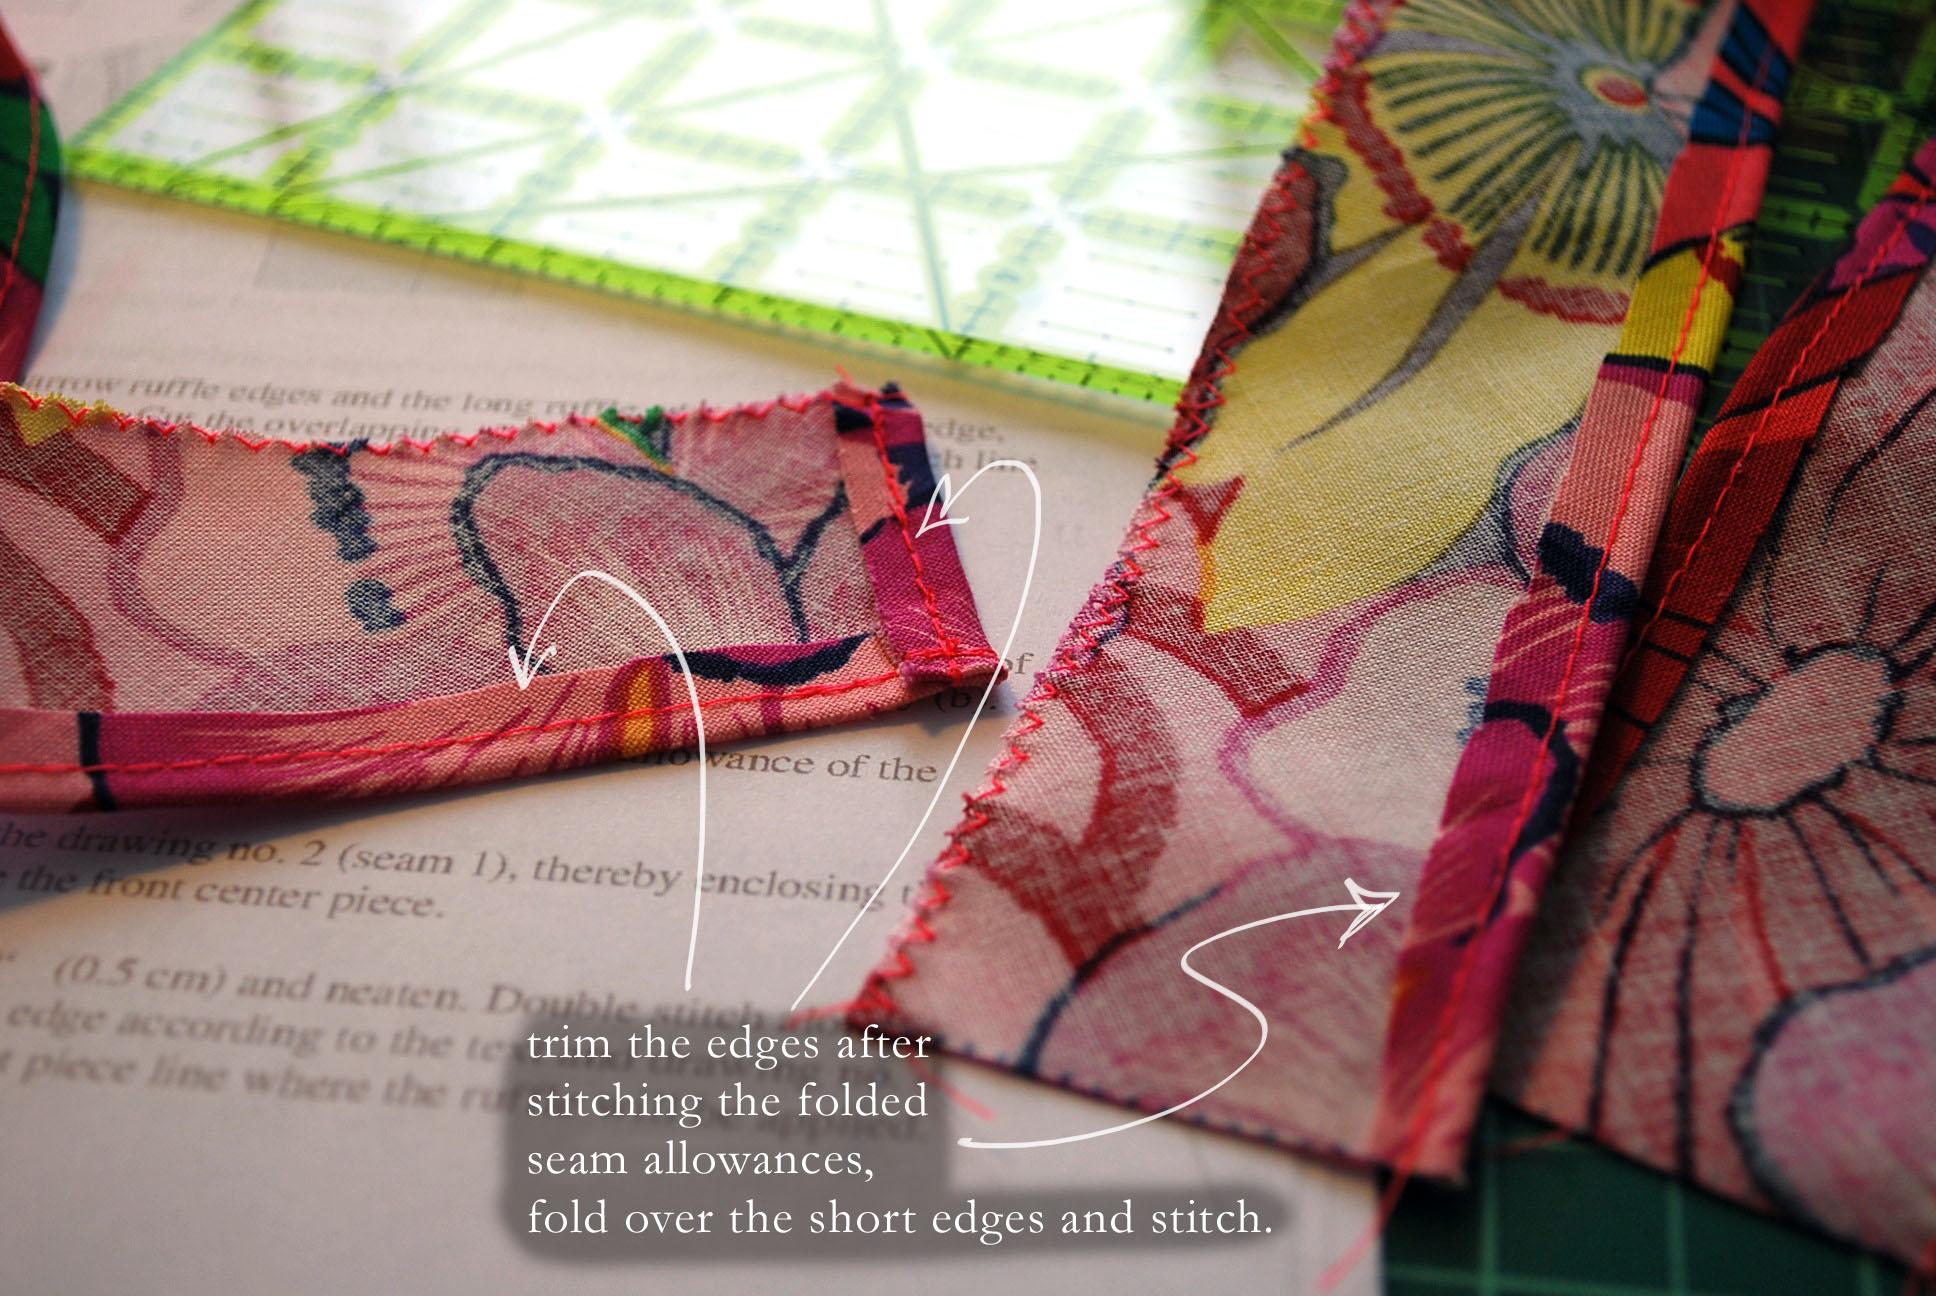
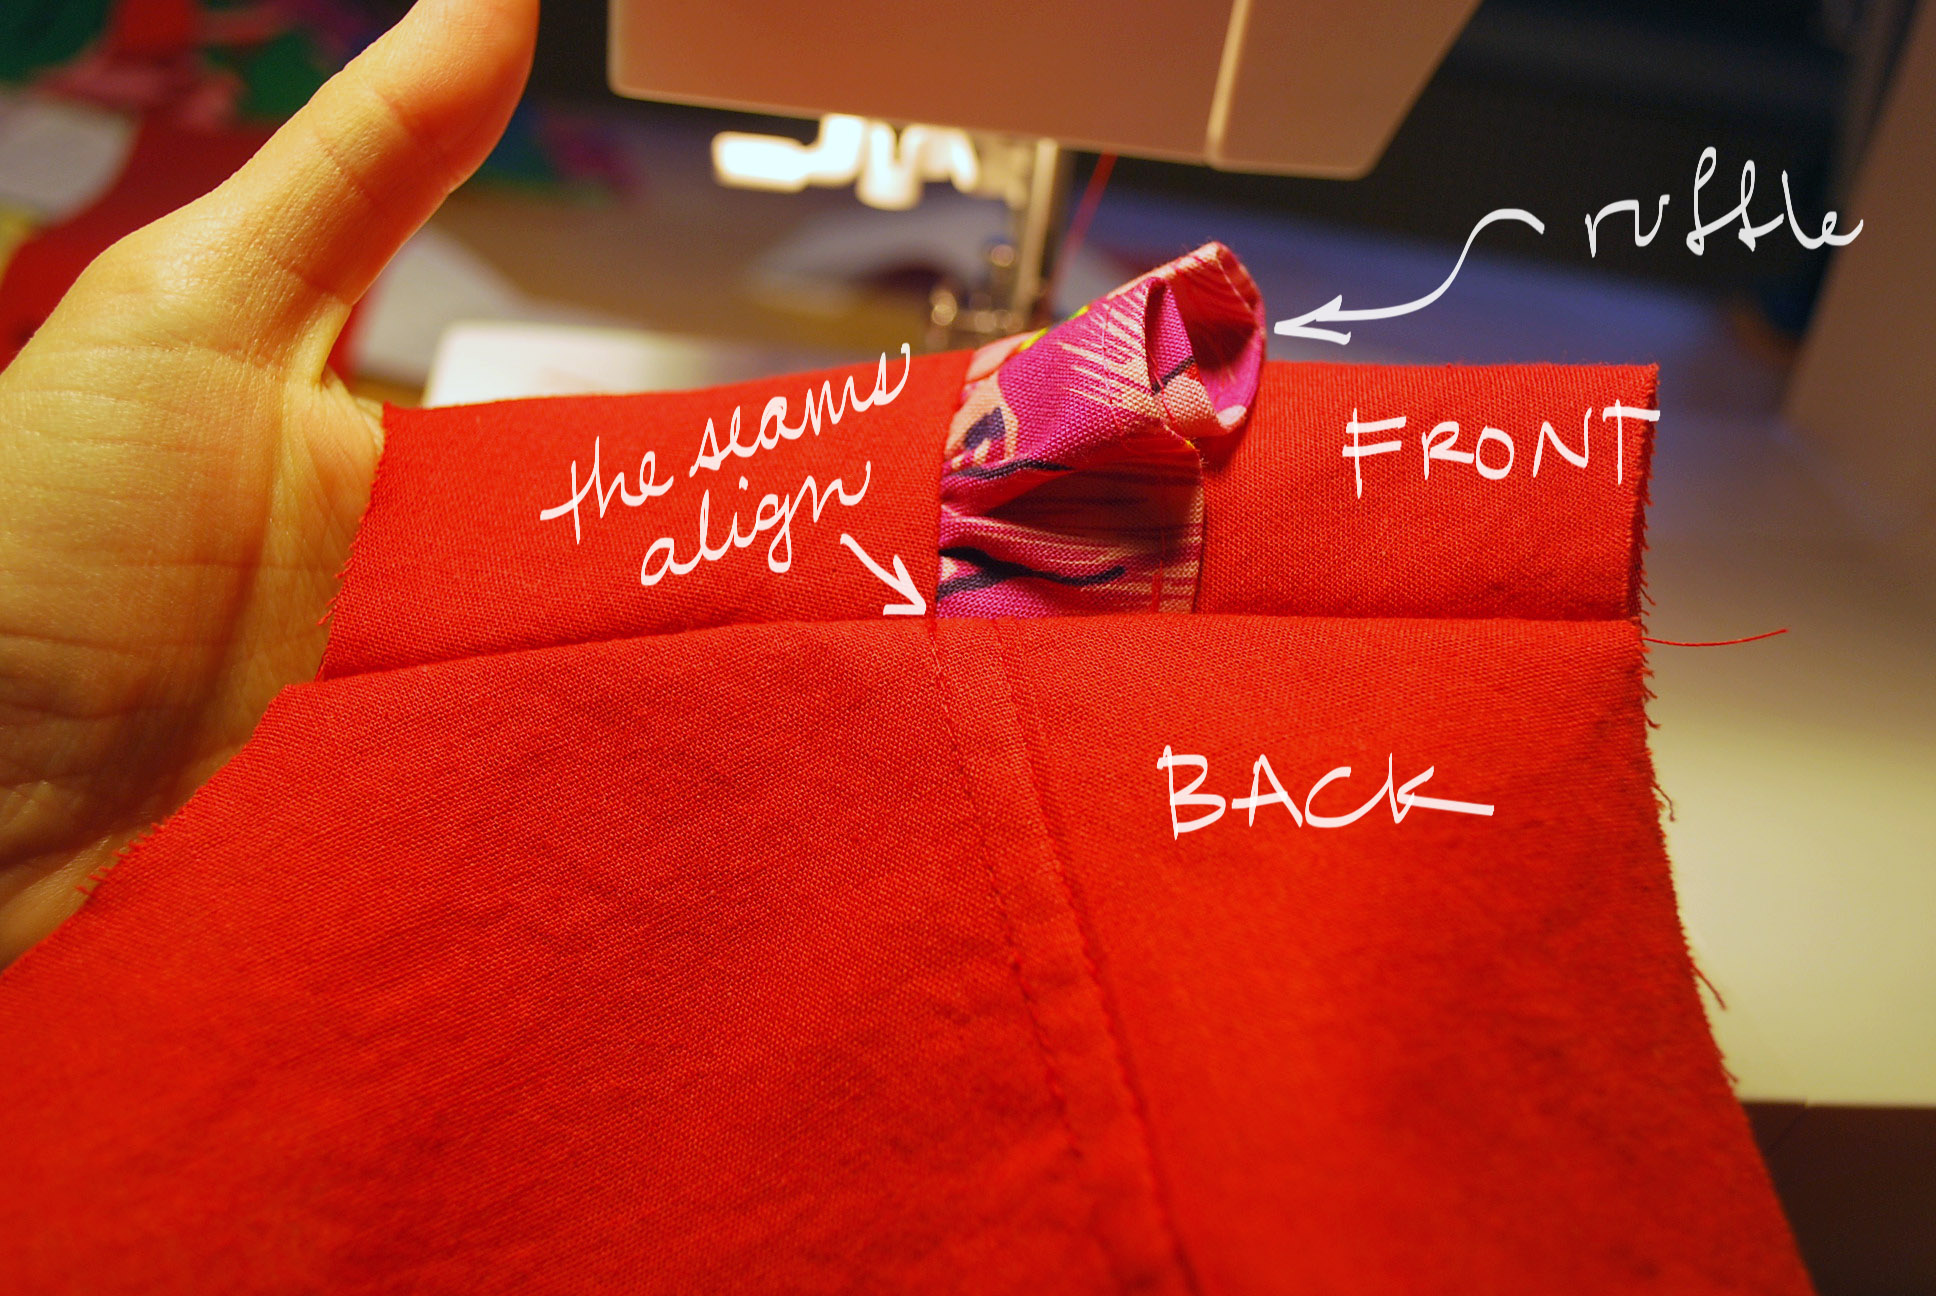
(A) The ruffles begin as flat pieces.  First the seam allowances on the longest side are folded up, pressed, stitched about 1/8" away from the edge, then trimmed down on the wrong side.  Then fold the side edges over and stitch 1/8" away from the edge.  The untreated edge should be zig-zag stitched to keep the fabric from fraying.

Step 7A

Step 7A

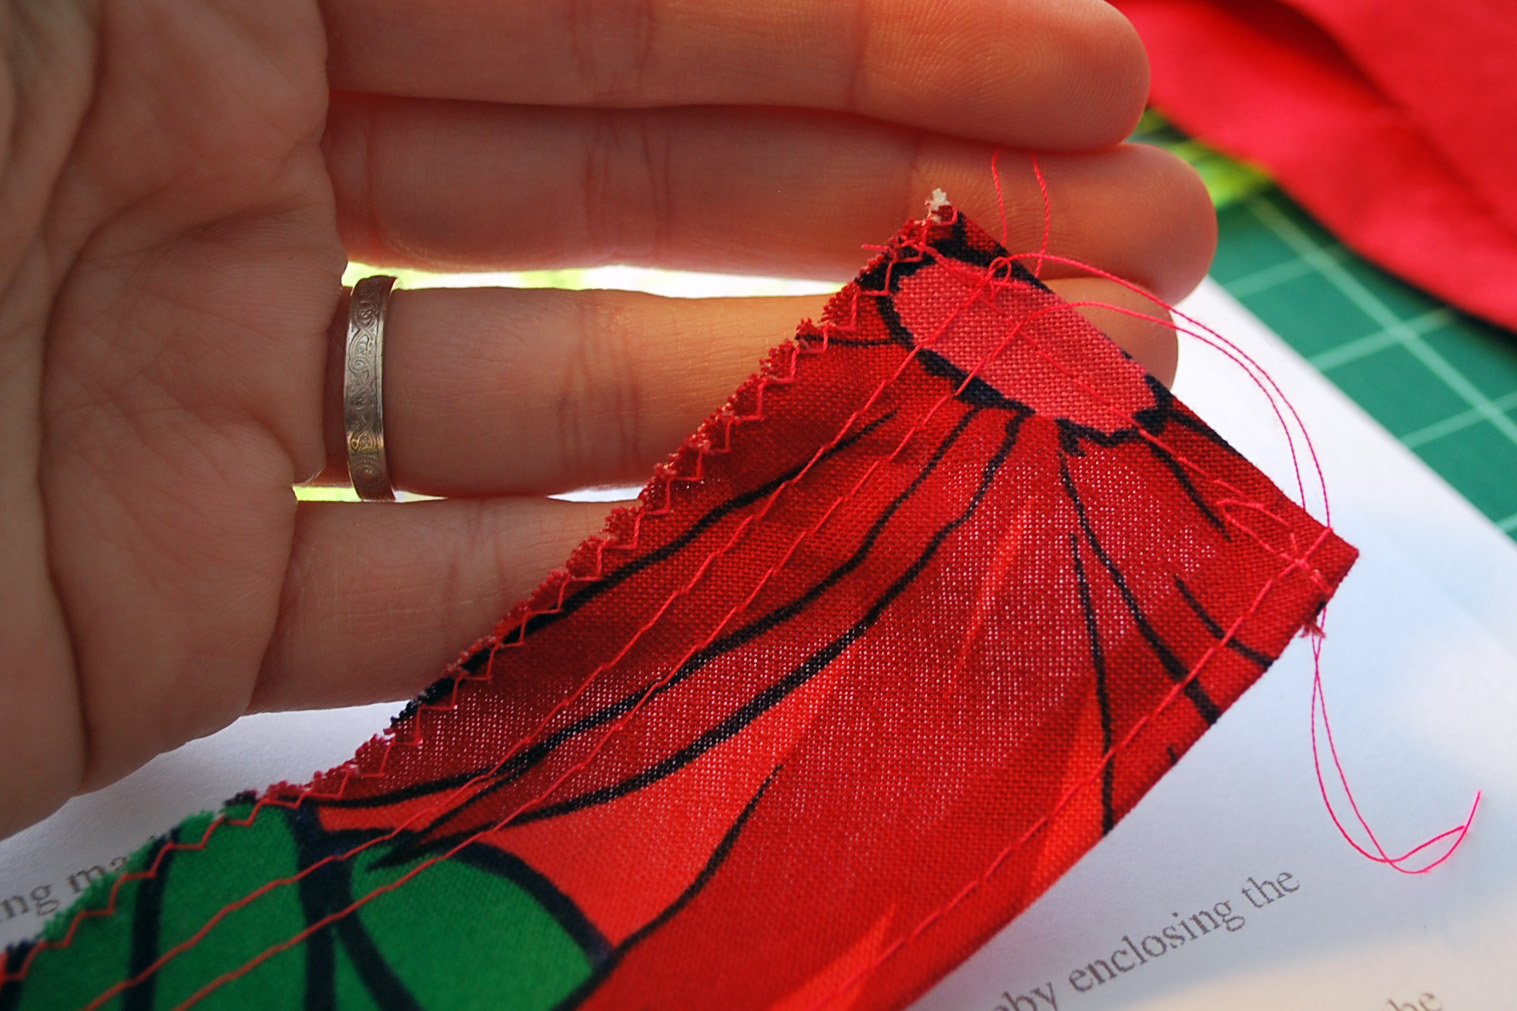
(B) Double-stitch close to the zig-zagged edge.  Try to keep the two rows of stitching as parallel to one another as possible.  Separate the top threads from the bottom threads.

Step 7B, double stitching on the zig-zag edge
Hold the bottom two threads on one side, and slide the fabric away from the bottom threads.  I measured the two marks on Piece #2 (dot 1 to a bar along the stitch line).  Then, I scrunched from the opposite side until the ruffle was the required length.  Afterward, I evened out the fullness of the ruffles.

Step 7B


(C) Next, baste the ruffle onto the edge of piece #2 with the RS of the ruffle and the garment facing up, and the edge of the ruffle along the edge of the pattern piece perfectly between the two marks.

Step 7C

(D) Sew the princess seams, piece #1 to piece #2 the one that has a ruffle attached to it w/right sides together.  This is one seam I didn't flat-fell.  Proceed with the next ruffles should you wish to add them.  I only did four ruffles instead of the intended six.

Step 8:

Baste the shoulder seams with right sides facing.  If you're doing flat-felled seams, try on the garment now to make sure the everything fits properly and your waist/hips/etc will work out... here's where you can make changes should you have to.  If you've made changes to the neckline, adjust your collar accordingly.  If you've made changes to the shoulder-line or side seams, be sure to finish your edges before proceeding.

Step 8, sew shoulder seams together
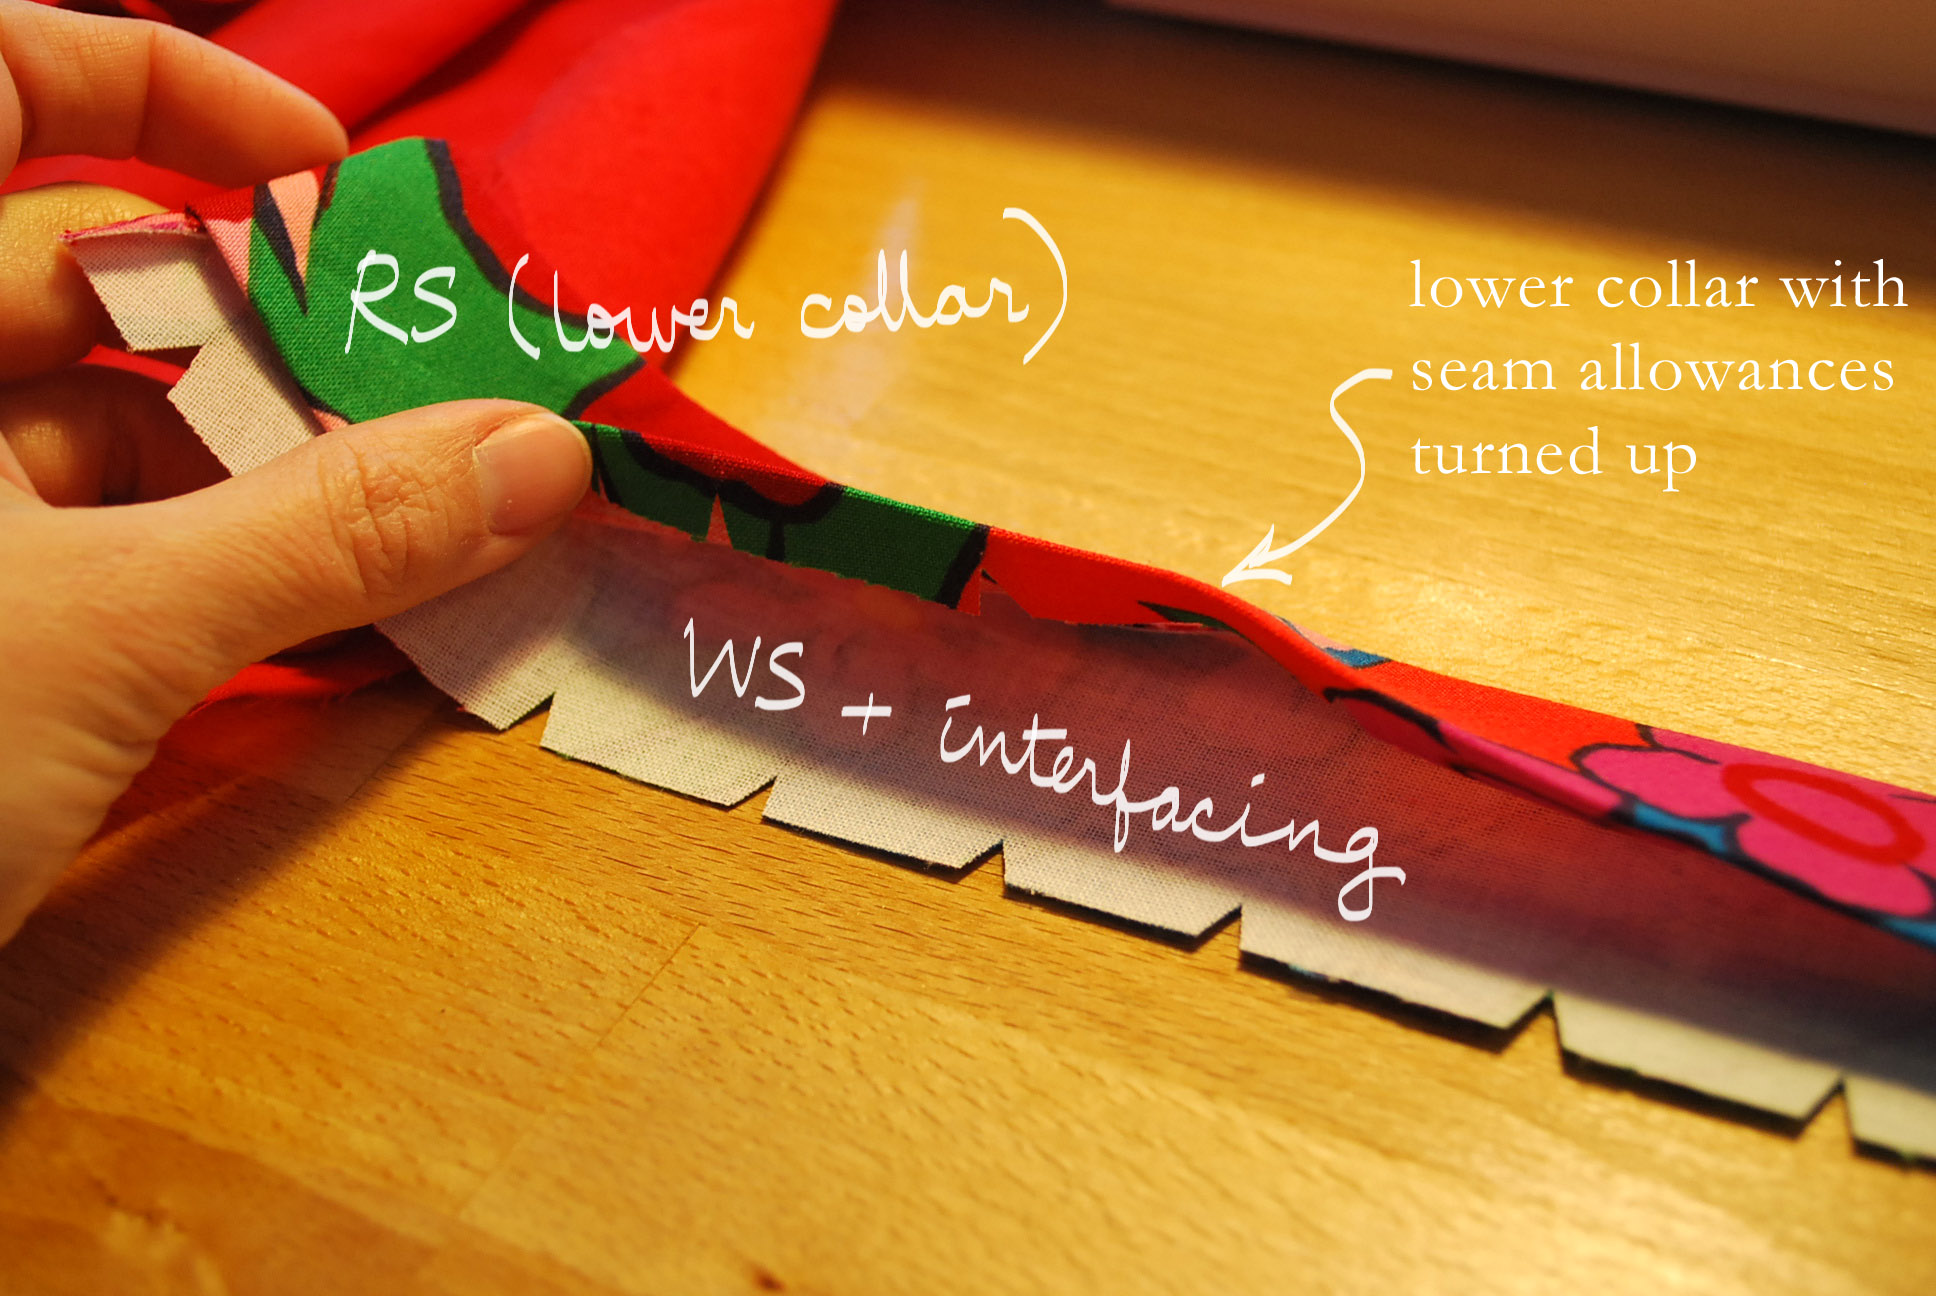
Then comes the collar.  If you haven't already ironed the interfacing onto the wrong side of one of the collar pieces, do so now.  The collar piece without the interfacing is called the "lower collar" piece.  Next, with right sides facing, baste three seams (two sides and the upper/top/smaller curve).

Leave the lower, longer curve un-sewn.  Trim the allowances of the basted edges, clipping/notching where necessary.  Prep the corners to be turned inside out.  Turn collar inside out, baste the three edges about 1/8" from the edges, and press.  Collar still has one open edge... I did this incorrectly and did all four sides.  Oops.

Step 8A, collar turned inside out
Here's the tricky collar part that I did not photograph because I did not leave the collar open.  Align the edge of the collar with the button band dot 4 (remember dot 4 from Part 1 of the tutorial?).  Pin and test to be sure your collar is correctly aligned, and that the marks are all matching.  The marks on the sides of the collar should match the shoulder seam intersection.  The instructions are pretty clear in the third paragraph of Step 8... when they say "stitch narrowly" they mean stitch 1/8" from the edge (or close to the edge).

After Step 8B, collar completed


Step 9:
I didn't do this step.  The belt loops just didn't catch my eye.  The instructions here are clear enough, though, should you want to attach belt loops.

Steps 10 through 12 are in the third and final installment of this JJ Blouse Tutorial.

Tuesday, February 14, 2012

JJ Blouse Tutorial - Part 1


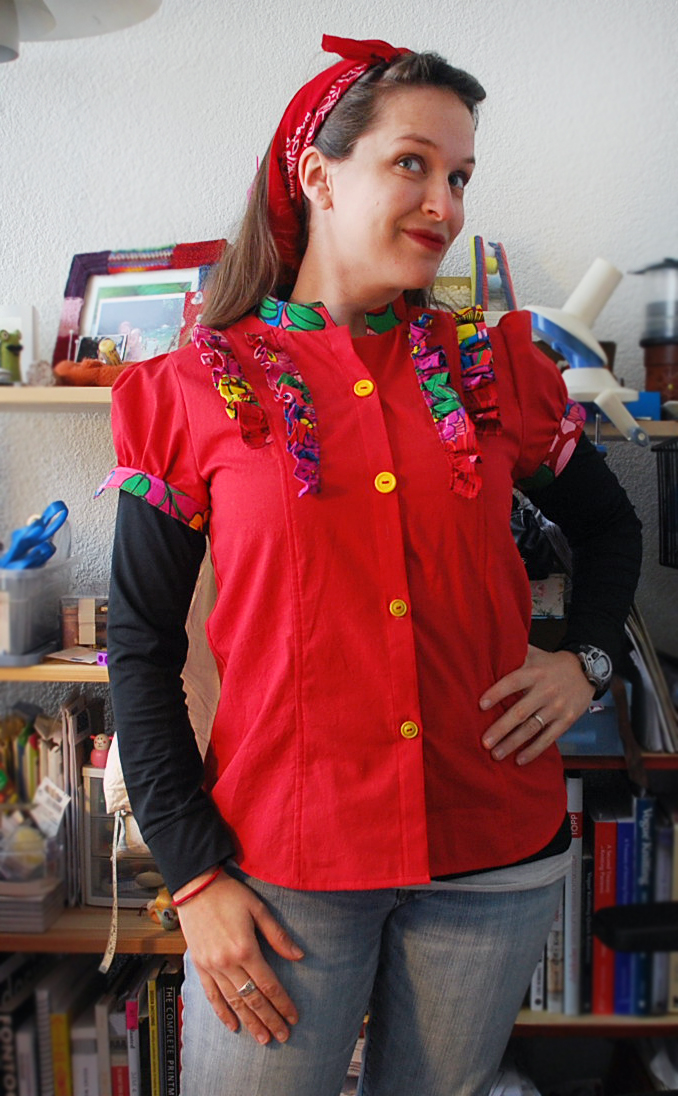
Recently,  I completed the JJ Blouse, a free pattern from BurdaStyle.com for Sew Weekly's Valentine's Day inspired red challenge.  This free pattern is adorable, but the instructions are a bit difficult to decipher.  So, here's a tutorial to clarify some of the difficult parts.

JJ Blouse, some modifications
Steps 1 through 4 are pretty straightforward...

Have the JJ Blouse pattern printed out from the BurdaStyle PDF.  Assemble the paper pattern and cut out, or trace and cut, or whatever you do to transfer your pattern pieces onto your fabric. Use the cutting layouts for help and pay attention to the fabric grain (especially for the ruffle pieces - they're cut on the bias).

Make sure you have all the correct number of pieces cut out in the fashion fabric and in the interfacing fabric.

Step 5:
Iron your interfacing onto the wrong side of one of the collar pieces (piece #7).  Before ironing it onto the two cuff pieces (piece #6), make sure the darned thing fits around your upper arm (minus 5/8" seam allowances all around).  Mine barely fits.  Adjust accordingly.  The sleeves do have some ease at the cuff, but be ready to adjust/widen (by slashing the pattern) if you have larger upper arms.


Step 6:
Here's where the fun begins.  Illustration (6A) shows you how to fold piece #1's outer edge using the folding marks to make a "Z" fold, ending with the RS facing you.

Step 6A

Step 6A
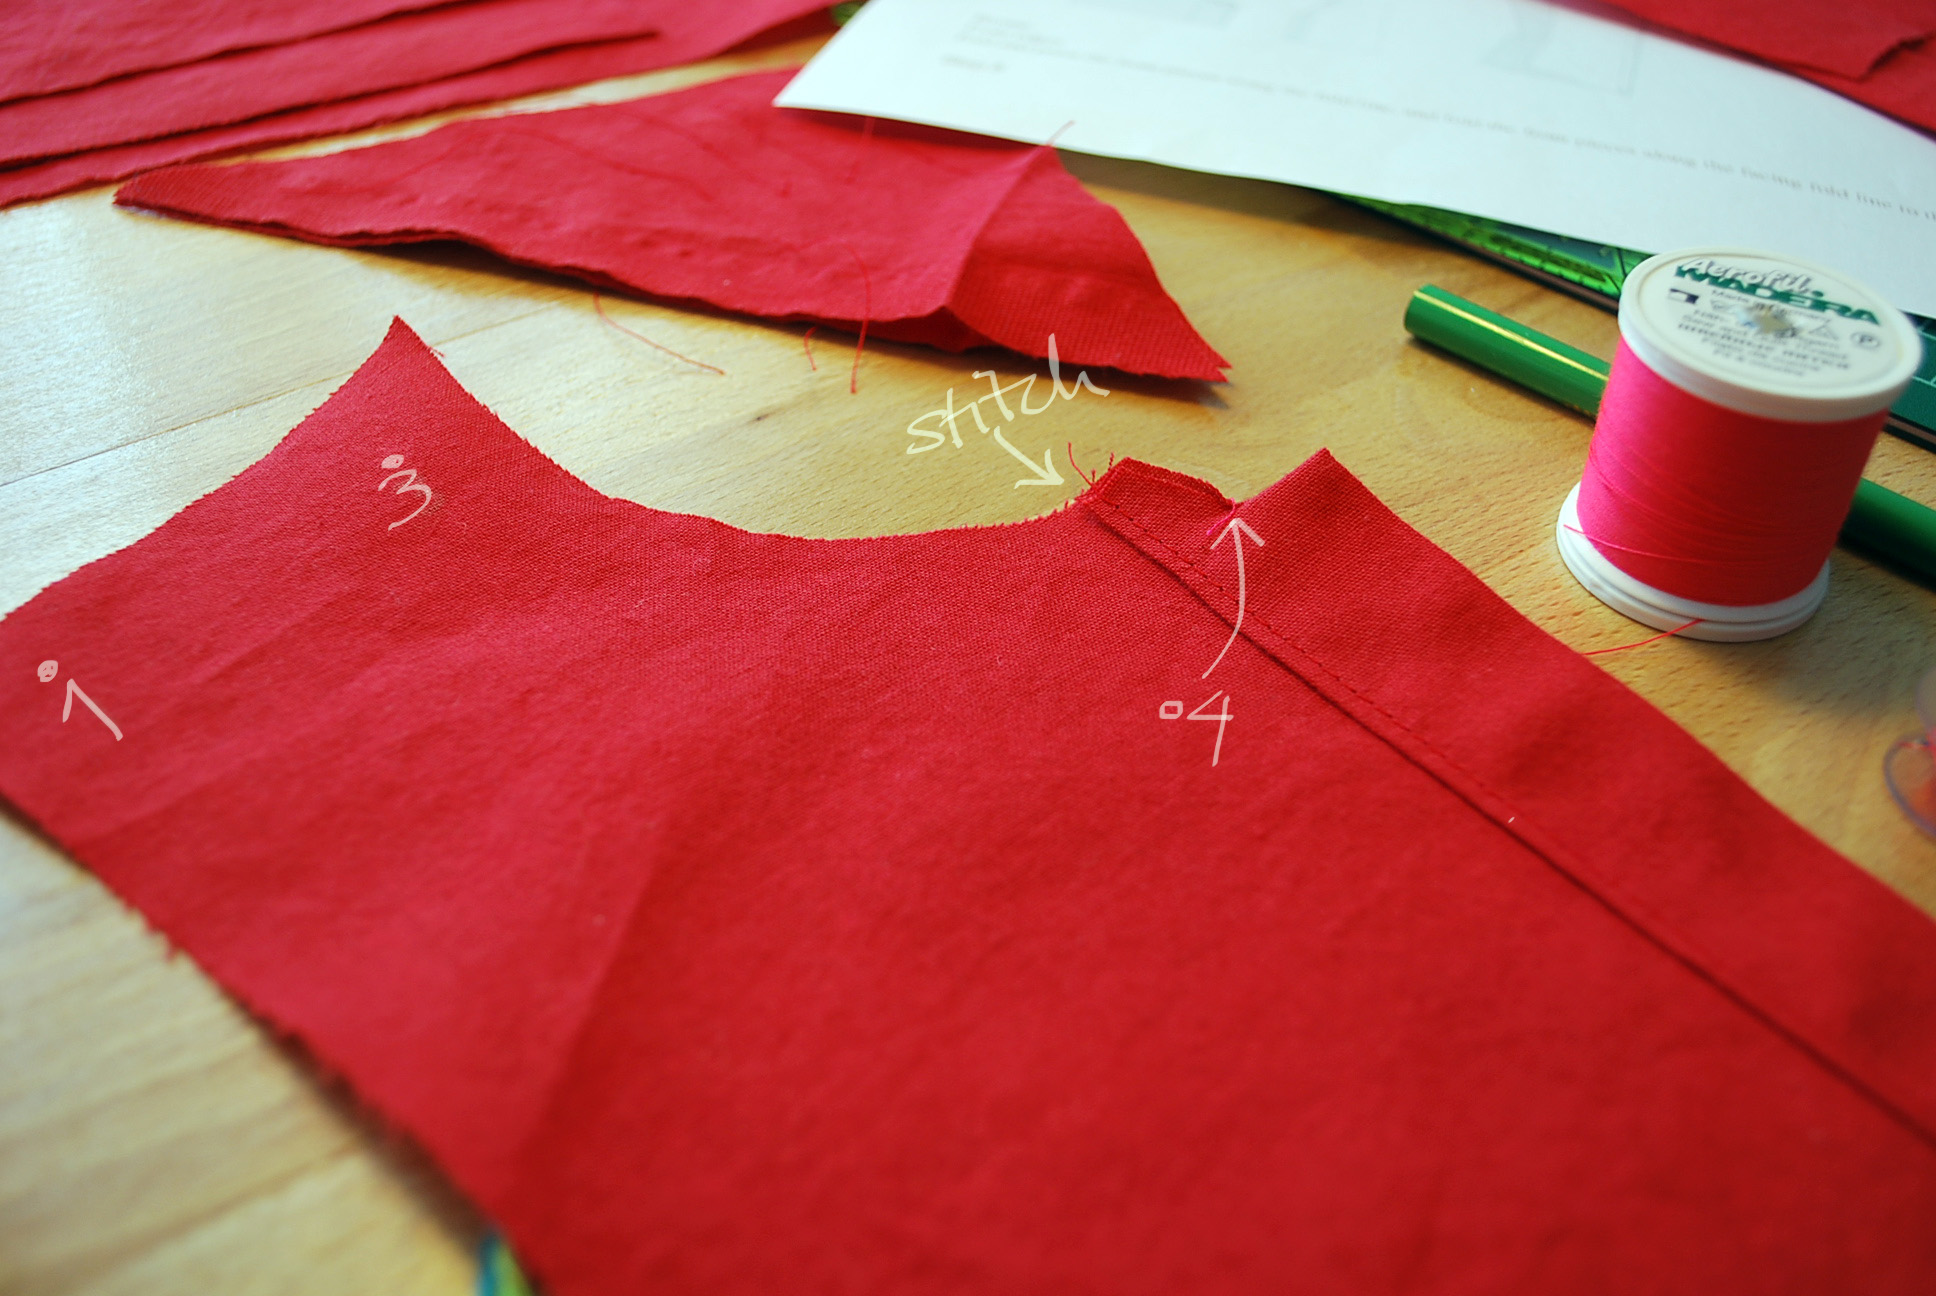
Then, with the folded edge pinned and pressed flat, stitch from the center of the folded band (marked as dot 4) out to the outer edge (6B).

Step 6B
Notch into the top of the collar toward dot 4.  Trim the excess fabric above the stitched section only.  Then, turn the folded band inside out, pushing out the corner with a knitting needle.  Press again using the folding marks as guides.  Stitch close to the edge to secure the button band.

Step 6C, WS facing
Step 6D is pretty self-explanatory.  Attach the back side pieces to the center back piece #3.  I used a flat-felled seam on the RS our outer side of the garment.  Here's a tutorial from Colette if you want to replicate it. All my flat-felled seams were pressed toward the front opening of the blouse.  Does that make sense?

Step 7... See Part 2 here.

Sunday, February 12, 2012

Croquis + Me

My sewing library grew quite a bit over the holidays.  I was able to purchase lots of books via Half.com and Amazon's used books along with buying some e-books for my Kindle.  One of the books I've been exploring in more detail is Fit for Real People by the sewing duo Palmer & Pletch.  Within the book there's a chapter on examining your shape.  This was a real eye-opening experience when combined with the idea of creating a personal croquis or personal line drawing.

Instead of having someone draw my outline against butcher paper (which would be tough since my DH is working and my dog is too short to measure me -- yep, that's the only reason my dog isn't useful in this situation) I used a photo that I took whilst wearing an elastic ribbon around my natural waist.  The photo was taken with as little distortion to my proportions as possible.  Then, I used Photoshop to trace my outline and mark the requisite points on my body - neck base, shoulder joint, waist, groin, knees, etc.  I printed it out and then proceeded as the book specified... whoah.

the croquis... and revelations
I learned that I carry my left shoulder higher than my right!  I had no idea I did this.  I made a note to watch my posture.  Based on the photo and observation, I have a lengthy "crotch depth" because of the distance between the crotch and the waistline.  And here I thought I had a short waist.  I also learned that although my measurements indicate I'm an hourglass figure, I'm really visually more of an inverted triangle (again based on the book). So, for now, I'll use this croquis to help visualize what clothing styles are flattering, and maybe on a free weekend me and a trusty friend or two can try out the more accurate wall-tracing method.

Here's a croquis sketch for two upcoming projects: the free JJ Blouse from BurdaStyle and Clover from Colette Patterns.
me + JJ blouse + Clovers

JJ Blouse, BurdaStyle 2008

Colette Clover Pants, Colette 2011


Sunday, February 5, 2012

Block of the Month: February

 This month's Craftsy BOM blocks were puzzle blocks.  They were a lot of fun to make, and it was a good chance to use up little scraps from my stash -- a win on both fronts.  Special thanks to Emma who gave me most of the fabric (except the batik blue) I used for the Chunky Chevron.

Balkan Beat Blox in progress

Balkan Beat Blox Complete
Fabric references:
Balkan Beat Blox uses the white scraps from the Simplicity New Look dress made out of IKEA cottn fabric (fabric design by Malin Akerblom) that I made last year.  The dark blue is from the Bombshell Dress, and the brown and yellow floral came from a fat quarter purchase from my former LQS in Munich (Quilt et Textilkunst).  That fabric is called "Dark Organic Leaves" from Art Gallery Fabrics's Naturella collection.

Chunky Chevron w/funky postcards from my friends


chunky chevron close-up

Fabric references:
Chunky Chevron uses the dark blue batik scraps from this Butterick skirt.  The red  and yellow are both from Kokka Fabric.  The yellow Forest Animals print is called "Trefle" and I couldn't find a name for the red.