Showing posts with label DIY. Show all posts

Tuesday, November 19, 2019

November - Indie Gift Along on Ravelry


It's that time again!

Get your yarn wound and your knitting needles warmed up.
Indie Designers Gift-Along sale is happening next week!
More info here: https://www.ravelry.com/groups/indie-design-gift-a-long

Have a great November!

-A

Tuesday, December 5, 2017

My first online class!

About My First Class on Skillshare

My first class is about learning to use Adobe InDesign (which already comes bundled with many Adobe CC accounts) to make beautiful, clean, perfectly aligned contact sheets that are easily edited, updated, and exported to help you sell your work.
I created this course to help de-mystify InDesign. A lot of creatives, artists, and photographers pay for Adobe CC, but are not sure how to take advantage of all the software it brings. So, this is my effort in making Adobe's publishing software work for you. InDesign is a really robust piece of software and the perfect companion for Illustrator and Photoshop when you're looking to put it all together and publish your work.

I created this course to help de-mystify InDesign.
I've used InDesign to produce all kinds of promotional and informational materials throughout the years: business cards, mailers, postcards, booklets, portfolios, and contact sheets.
I focused on contact sheets as a way to explore InDesign and learn concepts that will easily translate to a lot of other projects. If you'd like to learn more, you can check out the class here on Skillshare.
I'd love to hear what you think!! And, if you've never used Skillshare before, here's a link for a  free 2 month trial of their premium membership - the link's limited to the first 10 who use it though, but take advantage while you can!

Tuesday, May 10, 2016

Pre-Surtex Sneak Peek

May Flowers bring Spring... 
& Surtex!
I cannot believe it's May and time for Surtex!!
It's heeere!!
I've been prepping all year long for this surface design and textiles industry trade show, and it feels a little unreal that it's only a few days away. 
May flowers are an appropriate metaphor I think. I've been planting seeds since last year, and now is when they are starting to bloom...

My seeds (preparations) included creating over 180 images, making booth banners, promo bookmarks, promo books, fabric swatches, greeting cards, brochures, and sewing some hand-printed zip pouches! My fellow members of Finch & Foxglove, my art collective, have also been prepping their hearts out in order to make our collective's Surtex debut a success!


Prep Talk: Little Cards,
Big Thanks!

One of the things I love doing is making things with special touches -- a handmade embellishment, a touch of real texture, a tiny print, or very intricate background. In preparation for Surtex, I created teensy tiny cards that I printed, scored, and cut myself in order to give thanks to visitors, art directors, or art buyers who stop by our Finch & Foxglove booth. I also sewed some zipper pouches that are fully lined inside! The outside fabric is my own work, and it's so nice to see it on an actual product!
This is a general overview of the items I'll be bringing with me to exhibit at my debut Surtex, and I will be doing a post-Surtex review once all is said and done. I'm excited to figure out what works (as well as what doesn't)!

Wish me luck!!

And, if you're going to be at Surtex in NYC this Sunday to Tuesday, you can find me and my work at Finch & Foxglove's booth #543.  Can't wait to meet you! 

Wishing you a wonderful week!

P.S. Let me know ahead of time if you'd like to meet up with me so I can be sure to be at the booth - we're taking shifts since we're 8 artists in a 10x20' booth.

Thursday, March 24, 2016

Cornbread Recipe


I've got another fun illustration for you all!  This one is a really nice cornbread recipe I made last Thanksgiving.  I was pleased with the results and will be making it again. Next time, for added texture, I might add canned or fresh cooked corn to it for a bit more added texture and cut a bit of the liquid.

Either way process was interesting for this one.  I started back in November with a little sketch I did by the recipe itself... and finally got the time to finish it!

Enjoy!

Tuesday, June 2, 2015

Fancy joining a KAL?


Hello my fellow knitters,

I’m running a KAL for my pattern Wind & Storm. The first 10 peeps who commit to the KAL will get a free copy of the pattern. All other participants will receive the pattern at a discounted rate. And for all participants that complete the pattern, I will do a raffle giveaway!

This KAL is to celebrate the re-release (this time self-published) of the Wind & Storm pattern which was originally published by Knit Now in Issue #30 in 2014.  I'm nearly done with the self-published version which will have its official release in the fall (mid-September) but I’ll have it up beforehand as a soft release and for the purposes of this KAL.

The KAL key dates are as follows: 
Start: June 15, 2015 
End: September 15, 2015
Yarn and knitting requirements can be found on the pattern page for Wind & Storm.
And, feel free to use the image above as your project image place-holder until we officially start the KAL! It's great to have people knitting the same thing as you and when you run into questions or issues, we all help each other!  It's a lovely experience if you've never done one before.


Sunday, May 17, 2015

Toddler Streaky Legs & Moneta

That felt really weird typing the title to this blog post, but yes, admittedly my son is now a toddler and most definitely not a squishy baby anymore!  I finally finished one of his "Streaky Legs" poofy pants this weekend!

The Facts
⁃ Fabric: <1m single jersey, <0.3m ribbing for cuffs
⁃ Pattern: Ottobre "Streaky Legs" pattern
⁃ Year: 2014?
⁃ Notions: waistband elastic
⁃ Time to complete: 1 day for tracing and cutting, an hour for sewing
⁃ First worn: May 16, 2015
⁃ Wear again?  He has no choice! hahah!
⁃ Mods? Nope, they fit great on him.

and I finished Moneta from Colette Patterns for me!


The Facts
⁃ Fabric: 3m soft interlock, maybe french terry in turquoise
⁃ Pattern: Colette Pattern 1028 Moneta
⁃ Year: 2014
⁃ Notions: Framilon clear elastic
⁃ Time to complete: 1 day for tracing and cutting, 1 day for sewing
⁃ First worn: May 17, 2015
⁃ Wear again?  YES!
⁃ Mods? Yes, I would like to make the shoulders wider so it doesn't fall off my shoulders... or expose my bra straps to everyone.

Wednesday, January 7, 2015

A New Year's Post

Each year, I start by looking back at the previous year and making goals for the year ahead.  This year is no different in that sense. I started by reviewing the work I had made, etc. but, I feel like I am in such a different head-space than I was a year ago.  Everything has changed.  My eyes have a razor-sharp focus on the prize, and the stakes feel so much higher now that I have a baby.

Last January, when I made my list for 2014 I was well into my pregnancy, but I could only imagine my future as a mom in a really vague way.  Here were last year's goals:
1) make some art:  get back into pen and ink, finish digital illustration commissions
2) make some things with yarn: finish hand-knit projects, use machine to stash bust
3) make some things with fabric: continue on the quilting and sewing goodness track
4) blog more efficiently and step away from the internet traps (facebook and cheesy news sites) 
With that nesting energy, I made things like there was no tomorrow.  I hit all of my goals - made some art, knit by hand and by machine, quilted baby F's zig-zag quilt, and blogged more efficiently.  I think I was kind of scared that there wouldn't be time after the baby came.  My fear of having no time to do anything was somewhat justified.  Luckily, I think F is very healthy and pretty independent, so that affords me snippets of time to work here and there when he's playing or napping.

Clockwise from top left: Mitered Detail Cardigan, Ottobre Nursing Top,
Wind & Storm Pullover (now lost at sea!!), Ottobre Kids, Laren Mitts, and the cover of Knit Now

Clockwise from top left: my entry for an artist's book collaboration, Ottobre kids, "playful" hand lettering, quilted zip bags, steeked fairisle vest, knit baby romper from Deramores, and Oktoberfest dirndl skirt & apron
Now I'm looking forward to 2015, and that same innate sense of urgency that came with pregnancy remains in my system.  Maybe it's the hormones? Whatever it is, I feel like I must create right now -- now or never!!  Yes, it's that dramatic a feeling.

Anyway, without further ado... my goals for the coming year:
  • Find my personal illustrative style, and figure out how/where to sell my art work.
  • Sew a few new non-maternity knit tops for myself.
  • Make another quilt.
  • Create another font.
  • Knit a bit.
  • Be a good mom.  (!!!)
Kind of a mixed bag of goals, right?
That last goal is so huge, it threatens to take over my brain. So, in the spirit of getting things done, I break down each goal into action-oriented tasks.  In terms of motherhood, what that means for me, is that I just take it one day at a time.

Happy 2015, everyone!  May it be a great year.

Monday, November 3, 2014

Half Circle Skirt, Oktoberfest 2014


At the end of September, I was scrambling to make an outfit for Oktoberfest that fit.  A friend graciously gave me an extra "miede" (bodice) and I made the skirt and apron out of some beautiful trachten fabric.  The skirt is a super-crisp Trevira wool blend that is cool when you need it to be and warm when you need it to be.  I lined the side-seam pockets with a bit of nylon lining fabric so the pockets wouldn't stick to any leggings, stockings, or petticoat I might wear.


Project Details
Skirt Pattern: Burda Dirndl 09/2011
Apron was self-drafted

Wednesday, October 15, 2014

Upcycling for Baby

We're slowly running out of the really small baby clothes, and after noticing a few gaps in the little dude's wardrobe, I decided to supplement with hand-sewn items.

A beautiful cashmere blend Christmas sweater that was mistakenly felted in the wash + scrap hemp fabric from cloth diapers + an Ottobre pajama pattern = a really warm romper for the baby!

I just placed the pattern pieces over the old sweater and added the gusset.  The ribbed knit provides a nice trim and a place to attach open-ring snaps for closure at the shoulders.

patches for the knees even though the little guy just learned to turn over

detail shot: crotch gusset and cowboy socks just because


An old favorite polo shirt that's too small + scrap jersey + Ottobre romper pattern = a new romper for baby!  This used the same principle.  I just traced the pattern over the old shirt at the shoulder level, and then filled in the missing elements with scrap fabric.  It worked out pretty well!  The scale of the collar is a bit silly, but it's nice to see my old shirt back in action.

polo shirt collar and placket saved

bottom hem conserved, ribbed knit and open-ring snaps added for closure


Saturday, August 9, 2014

Two-Part Nappies Revisited: Part 2

A quick tutorial on how to make your own diaper inserts using my pattern (or your own drafted pattern).
These diaper inserts require an outer waterproof cover of some kind, and will fit from newborn to 6kg+ (at least they're still working for us!).

the absorbent inserts inner flannel / outer terry cloth
Materials
  • Absorbent fabric (German term in parentheses) such as flannel (Flanell/Molton), terry cloth (Frottier), hemp fleece (Henf), or jersey, etc...  Feel free to recycle materials you already have; like an old flannel blanket, an old sweatshirt, or a towel.  I use terry-cloth on one side because I like to use Snappis and avoid hook & loop closures, but feel free to use whatever closure method you want.
  • Elastic (I used 1/4" wide elastic that is resistant to high heat)
Instructions
1- Place the paper pattern on the fold, and cut your materials for the diaper insert.  Don't forget to transfer all markings to your fabric.


2- Cut fabric for center pad (it's that center rectangle with the dotted line in the pattern).  I cut 2 layers of bamboo terry-cloth.
3- Layer the 3 elements as follows: absorbent material #1, pad rectangle(s), absorbent material #2.


Center the pad, and secure all three layers with pins.


4- With the smoothest fabric facing up, sew 1/8" to 1/4" within the four edges and across the center of the pad to secure it in place.


5- Measure the elastic band for the sides and top, then cut elastic 2-3” shorter than the measured length.
6- Tack both ends of the elastic where indicated and pin at the center.  Make sure to leave a little space on the outer edge for finishing the fabric.
7- Use a zig-zag stitch to attach the elastic on the back of the insert and the leg openings, stretching the elastic between the two outer layers as you go.


8- Use a zig zag stitch or overlock around all the outer edges to finish.  I stretch out the back and sides while feeding it through the overlocker.  I do not serge over the crinkled/gathered edges.

Wash a few times, and then let baby poo all over your work! Hahah!

Friday, August 8, 2014

Two-Part Nappies Revisited: Part 1

This post covers lessons learned in making diaper covers at home.  In cloth diapering, the outer cover is a waterproof barrier that prevents leakage.  These can also be used over regular disposables to prevent leaks, or just because they're really cute.


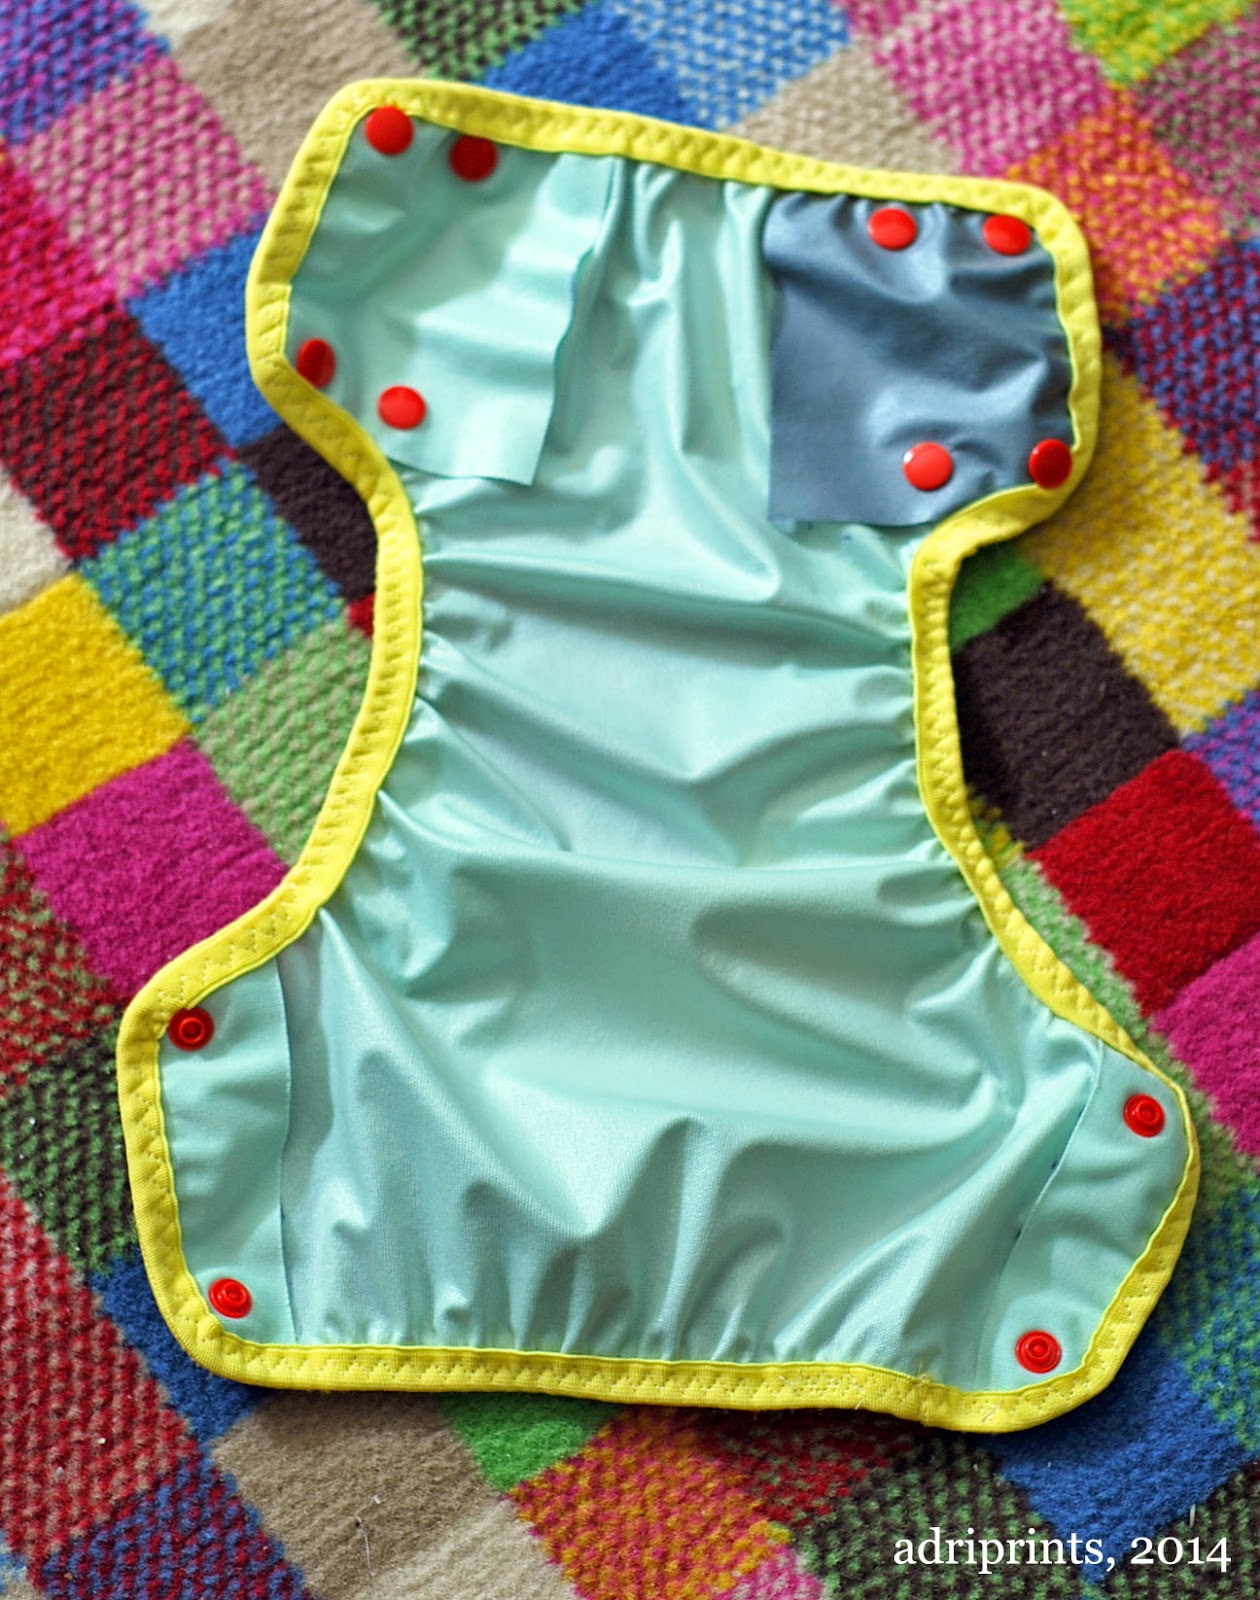
After a few mishaps and lots of leaks, re-purposing PUL, and studying more cloth diapers, I think I've found a few types of cloth diaper systems that work for the little dude.  This particular diaper cover is a homemade version of Motherease's diaper cover the Air Flow.  It works really well with the diaper inserts I make at home (more on that later).  These are not easy to come by here in Germany, so to me it's worth the effort of making more of them.

What I've learned so far:
FOE - fold over elastic goes on a LOT easier if you use a triple zig-zag stitch.  This video was key.
detailed photo of the inner wing of the diaper cover


KAM snaps - these snaps make a better seal with the Eco-PUL I bought from Diaper Sewing Supplies when there are 3 layers, and it's been exposed to warmth (i.e. it's been through a 60* wash and tumble dry).  That's it!  That is what was missing last time.  I didn't wash/dry the cover before trying out the snaps, and it was too thin.  Now I'm kind of sad I chopped up the grey & yellow cover before washing/drying.  It may have been salvageable.  Oh well.


With my latest effort, I went with a retro color combination!  Aesthetics aside, they work really well.  No leaks or poo-splosions yet!


As for the diaper inserts (the absorbing inner part of these two-part systems), I've drafted a pattern for anyone who wanted to try it on their own!  You can download it from the Google-Drive link here.

Come back this weekend to see the photo-tutorial on making your own diaper inserts!

Friday, June 13, 2014

DIY Diaper Mishaps!


I love sewing as you all know. And, I thought I'd try my hand at making cloth diapers for the baby.  Already, we have a collection of cloth diapers that I used as references, but I started with The Nappy Network's online resources.  That website has a plethora of links, and I found a few patterns that I thought would work... collected materials: PUL (polyurethane laminate fabric), stretch terrycloth, hemp cloth, FOE (fold-over elastic), etc... and plastic snaps.  I bought a KAM snap tool and lots of snaps.  Little did I know that the snaps would be the weak link in this particular DIY effort.

my first effort - a bit wonky working with the FOE

After making a plain, unlined diaper (grey and yellow), I made a couple with the stretch terry lining.  These are basic diaper covers.  I installed the snaps and ran into a bit of trouble when I installed one backwards - sleep deprivation!  Then, I tested the snaps.  D'oh.  That should have been my first step.  I should have tested the snaps, but I didn't.  So, the majority of the snaps are the bulk, cheap, e-bay variety of KAM snaps and they do not want to unsnap!  The snaps fit so tightly into one another that they don't want to let go!  The PUL tore before I could get two of the snaps on the plain grey and yellow to unsnap.  Oh well.  I don't know how functional these first three will be, but I'm happy to at least get back into the sewing swing of things.

Have a great weekend, and I hope your crafty efforts are more successful than mine were this week!

Wednesday, May 14, 2014

Week 2 Round-up, MMM14

This week was craaaaazy!  I had the baby!  So, my me-mades are a mix of handmade items made by me to be worn by me, and also those that I made for baby.

Also, I couldn't have been luckier with how the delivery went, and baby and I are doing well!


If you'd like to make any of the above items that have a pattern, here are the links:
May 8- Colette Pattern's Sorbetto can be found here and my modifications can be found here.
May 12 - Ottobre Spring 1/2014 patterns can be found here.
May 13 - Blank Canvas Tee can be found here and my modifications are here.
May 11- Christine's Stay-On baby bootie pattern can be found here on Ravelry.
May 14 - Simplicity 2317 Lounge wear pajama pants can be found here.

Friday, May 9, 2014

3 Hours Past's Blank Canvas Tee: Maternity Hack

During Me-Made-May 2014 I'd like to share some of the me-mades I've made in more detail.  In order to see if I could replicate a maternity/breastfeeding top that I love, I tried my hand at drafting and here are the results!


If you're just starting out sewing with knits, a great place to start is a simple dolman sleeved t-shirt like the Blank Canvas Tee from 3 Hours Past the Edge of the World's Blog.  If you're past that, are ready to try some drafting, and would like to make yourself a breastfeeding or maternity top, then this is the mod for you!

Start with the Blank Canvas Tee from 3 Hours Past...

Added Materials

  • additional fabric because the length of the T-shirt is extended.
  • 1 piece of elastic - soft baby elastic or elastic about 1/4" wide that suits your fancy in the width of your t-shirt + 2" or so.

Extra Skills

  • sewing with elastic

Special Tools

  • twin needle
  • stretch needle 75/11  (a whaah?  Here's a needle guide from Schmetz)
  • pencil and ruler
  • maybe tracing paper if you don't want to write on your pattern
Inspiration: From boob design, this short sleeve maternity/nursing top is one of my faves.  It fits really well and the split top allows for belly room.


Okay.  Ready to make your own?
First print and assemble your pattern pieces from 3 Hours Past... Then, here's our goal: we want to create two pieces for the front that overlap by around 5" / 13cm for the smaller sizes.  You'll likely need a bit more overlap for the larger sizes or if you usually find yourself doing large bust adjustments.

The goals.
Measure from just below the armpit curve to your goal overlap length, then add 1" / 2.5 cm so you have enough to turn up a hem.  Trace what you have onto your fabric, or onto tracing paper to make pattern pieces.  I've highlighted what I did to the pattern in the photo below.


See the red highlight?  That's the top front piece.  The blue highlight shows where the the bottom front piece would be.  For the bottom, I took the design line straight up and did not taper in like the pattern - it's housing a big belly at the moment, and I thought it would be advantageous to have a little leeway.

The other change I made here was adding length.  Add what you will.  My goal was to have a t-shirt around 28" so I added a few inches to the bottom of both the back and front bottom pieces to achieve that.  I just followed the design lines to my goal length. To calculate length, I measured from the peak of the shoulder, parallel to the fold line.

Alright, you've traced and cut your 3 pattern pieces.  Do you have your edging pieces (no change from pattern) cut, too?  And those two strips of interfacing for the shoulders?  What interfacing? I used Vlieseline G785 since it's stretchy, lightweight, and works with knits. Everything cut? Great! Let's get these pieces ready to put together.

Assembly:

  1. Step 2 from pattern: Iron on interfacing to WS of back piece shoulder edges
  2. Front top piece - finish bottom edge with zig zag stitch or serge, turn up and twin needle the hem from the right side
  3. Front bottom piece - add elastic to top RS edge using a triple zig-zag stitch.  How?  I simultaneously slightly stretch the elastic while guiding the main fabric under the presser foot.  I do not stretch the main fabric.  Right hand for elastic, left hand for guiding fabric.  I do this 2" at a time so I don't lose my nerve.  Then, I fold over the elastic so I only see the final fabric, and straight stitch the bottom edge of the elastic.
  4. Overlap the two front pieces- With RS facing you, make sure the front top is on top, and the front bottom is behind it.  Make sure the overlap is what you desire and pin.  Stay stitch within the seam allowances (so ~1/8" from the edge) to secure the overlap.
  5. Step 3 to 9 are the same as the original pattern.
And there you have it!  You've made a maternity/breastfeeding t-shirt!  Feel free to change the neckline and make it a scoop neck like in the inspiration photo.  I like crew necks so I kept the pattern as is.  But, I think I'm going to try and make a tank or sleeveless v-neck.  We shall see!

Wednesday, May 7, 2014

Week 1 Round-up, MMM14

Here's the weekly round up of me-mades worn this past week!


If you'd like to make any of the above items that have a pattern, here are the links:
May 1- Mitered Detail Cardigan can be found here on Ravelry.
May 2- Mod Podge can be found here on Twist Collective's site or here on Ravelry.
May 3- Colette Pattern's Sorbetto can be found here and my modifications can be found here.
May 4- Iris Pullover from Schnittchen can be found here.
May 5- Blank Canvas Tee can be found here and my modifications here.

Monday, May 5, 2014

Colette Sorbetto: Maternity Hack

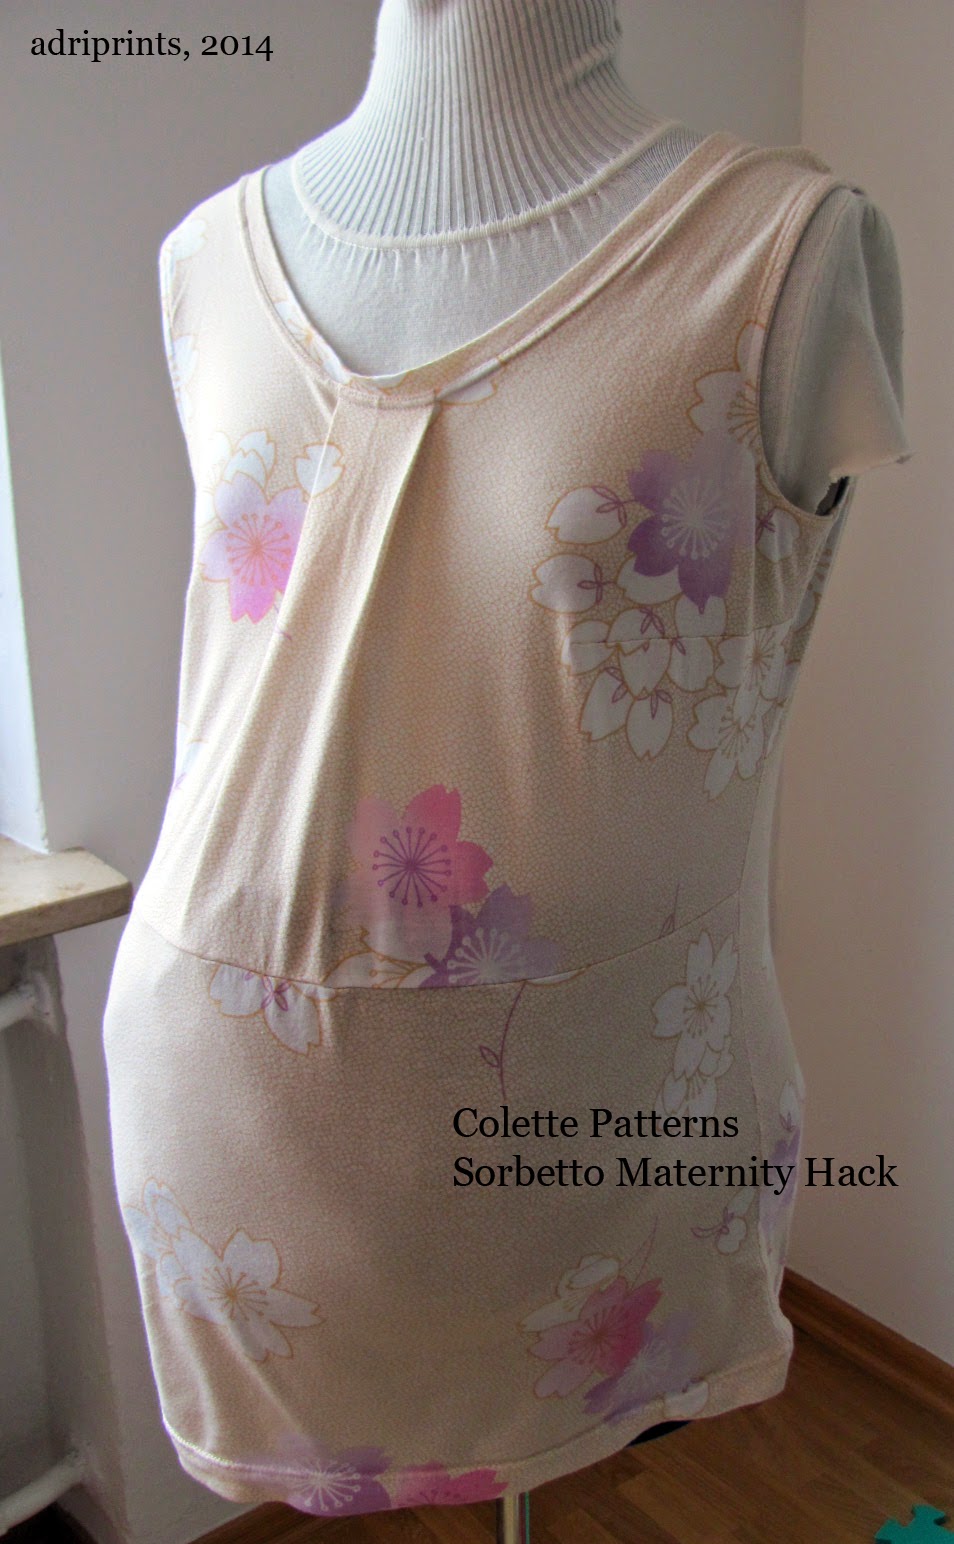
During Me-Made-May 2014 I'd like to share some of the me-mades I've made recently.  For week #1 of MMM14, I've been wearing this particular garment almost daily ((or rather, nightly))!  It's a maternity pajama based on Colette's free pattern, Sorbetto...


During this pregnancy, I've inherited so many things from friends.  One of my favorite items was a Sorbetto top I helped a friend make for her first pregnancy.  I took her measurements and devised a way to use the pattern to make her a top.  We learned that by leaving the bottom part of the pleat open, you get a lot of room for a belly.  We also added 5" of length at the waist for extra coverage.


One of the drawbacks of the first prototype, though, was that it was made out of plain cotton and so it did not allow for freedom of movement or stretch should you want to sleep in it.

So, when it was my turn, I thought about improvements that could be made to last year's prototype.  Firstly, I made the decision to try a single knit jersey.  I had a big chunk of single jersey fabric from my attempt at this "wrap dress pattern" from Burda... There was no way that dress was going to work for me, and so I was happy to chop it up for this Sorbetto Maternity PJ top.

Yes, that's my dressform with a bag of fabric scraps stuffed into a belly band
to simulate my enormous pregnant belly.  It's a little lumpy, but you get where I'm going.
I had to patch 2 pieces together for the front piece since I didn't have any pieces wide enough to trace the pleat at the front.  I once again added the 5" at the waist, and I only sewed the top 5" of the pleat down the front.

Secondly, all the edges were finished with self-fabric so they're stretchy.  This was done by cutting 1.5" strips and folding them in half, then using the serger to attach them to the edges before the shoulder and side seams were sewn.


So, if you're attempting this at home... 

Colette Patterns Sorbetto is your base pattern.
Drafting: Add 5" length to the waist of front and back piece (or more if desired).
Cut 4 strips of 1.25" self fabric or knit rib with max stretch going with the long edge: 1x strip @ 2" longer than the front neck circumference,  1x strip @ 2" longer than back neck, 2x @ 2" longer than the total armhole circumference.
  1. Make bust darts as written
  2. Sew only top 5" of pleat, stay stitch pleat at neck edge
  3. Attach edging to front and back neck edges (fold edging strip in half, 3 raw edges together, serge)
  4. Sew shoulders
  5. Attach edging to armholes
  6. Sew side seams
  7. Turn up hem, press
  8. Twin needle finish for neck edge and hem, single needle top stitch for armholes 

And that's pretty much it!  You can stabilize the shoulders if you want, but mine is a pajama so I don't really care, and it hasn't rippled even after washing.  The front neck edge could be tighter if I had used ribbed knit fabric.  And, that's it for now!

Wednesday, April 30, 2014

Me Made May, 2014


I can't believe it's already May tomorrow!  I signed up again to participate in this years's MMM 2014 over at So, Zoe...What do you know? and here's what I pledged on April 1st on Zoe's blog...
I, Adri H. of Adri Makes a Thing or Two (adriprints.blogspot.com), sign up as a participant of Me-Made-May '14. I endeavour to wear at least one handmade item each day for the duration of May 2014.

Can't wait! Last year was so much fun. :D
...because I'm crazy, and I somehow forgot my official due-date is in mid-May.  My internal monologue at reviewing what I posted was this: "Adriana, have you lost the plot?!   None of your clothing fits you at this point!  ¡Qué locura! (What madness!)"  in that order.

Oh well, a pledge is a pledge, right?  Ack! Yes, it's time to bring out the hand-made accessories and start sewing up some summer dresses, but let's be realistic here, people.  At this point in the pregnancy, the circumference of my belly is nearly the same as my height (only slightly exaggerating) which means my clothing options are beyond limited.  For my own sanity, I'm going to attempt to wear 5 "me-made" items a week instead of 7.  I will post a weekly round-up, too.  ((oh gosh, I'm really nuts, aren't I?  Well, waiting for the surprise of labor is kind of taking its toll on me.))

There may be a gap in posting, too... cross your fingers that the baby is healthy and that we make it through labor in good working order.  I've already been hospitalized twice during this pregnancy, and am looking forward to the familiar faces of the nurses and doctors who already know me, but I would prefer we not have an extended visit.

Alright, that's it for now!  I'm looking forward to sewing some stretchy knits because that's all that fits! :D

Tuesday, April 22, 2014

Tutorial: Zig-Zag Quilt

You can make your own Zig-Zag Quilt top from stash scraps, and it's not too difficult!

Main requirement for piecing this quilt top:
72 white pieces of fabric, 4.5" square
72 print pieces of fabric, 4.5" square

You'll also need:
- additional yardage for sashing, backing, and binding
- batting for the center of the quilt sandwich

Side Note: Someone asked me how I get the fabric for my stash and how I chose the colors for this quilt.  My stash was built up from fat-quarters and yardage for garment sewing.  I am a bit compulsive after sewing projects.  I can't remember where I got the idea to save scraps larger than 2" square after sewing projects.  But, that's what I do. After a project, I cut down the smaller bits of fabric into two categories: strips or squares.  I trim the squares to be 4.5" because that's the size of my plastic template.  And the smaller stuff gets turned into strips or dresden plates.  Then, I have little clear plastic bags where these scraps are organized by color.  Obsessive yes, but hey, it made this project a real snap!


First, the basis of this quilt is the half-square triangle.  It's known in the quilting world as the HST.  After you've mastered that, you're pretty much set to go.  Here's how I did the HSTs for this quilt...


As described above, I started with two fabric squares in contrasting colors of identical size.  In the case of the Zig-Zag Quilt, I started with squares that measured 4.5".  As long as all your squares are consistently cut and pieced, it's all good.  Each pairing makes 2 HSTs.  You lay one white, one color square with right sides together.  Mark the diagonal, and stitch 1/4" above and below the mark.  Then, cut across the diagonal mark, open, and press the two squares you just made.  I do loads of squares at a time by chain piecing and then press them all at once... I learned this from Craftsy's 2012 Block of the Month with Amy Gibson - the February video here is all about the HST.

Once you've made a bunch of these HSTs, they can be combined in so many different ways!


In the case of the Zig-Zag Quilt, here's how I pieced the top:


Each row of zig-zags used 24 HSTs.
The final quilt had 6 lines of zig-zags, which equals 144 HSTs.
This also means that I started with a total of 144 squares of fabric: 72 color and 72 white squares.

In any case, once I had the long pieced rows of zig-zags, I carefully joined them across these rows, making sure to use pins to line up all the seams.  I tend to press my seams open, and this was no exception.


Next, I added sashing to the outer edge of the top (that white outer frame).  My sashing had extra width to it.  If I remember correctly, the sashing was 6" wide so I could trim it down if I had to square up the quilt after free-motion quilting.  I didn't end up FMQing, but it's always good to have a bit of wiggle room for squaring up.

You cut your batting (the fluffy middle) about 4" longer and wider than your top so you have 2" of adjustment... just in case!

For me, the trickiest part of this quilt was the backing.  If you have a really vertical/horizontal element on the back like in my version of the quilt, you want to be sure to hand-baste a few cross-hairs across the quilt so it's accurately aligned to the front.  I ran a line of basting down the center of the big vertical element, and across both the horizontal elements.  This help me to be sure it was oriented correctly to the quilt top. If you want to avoid this extra step, just use a non-directional print, and a whole cloth style for the back.


My first quilts lacked this kind of precision (and were really wonky) because I didn't understand how important basting was.  Once you learn to hand-baste quickly, there's no excuse! It takes a few minutes for a quilt of this size.  I did both pin and hand-basting for this quilt.

Lastly, is the actual quilting.  First, I stitched in the ditch (along the main zig-zags).  Then, I echo-quilted which means I ran a line of stitching about 3/8" away from the zig-zags.  I just used my presser foot's width as a guide.  Then, I quilted the sashing, added the binding (that final outer edge) using this tutorial from Sew Mama Sew and Mary on Lake Pulaski.

And, that was it!

The final quilt including the sashing and binding is 51" x 51".
The main print for the backing is Tula Pink's "Turtle Bay" print from her 2011 collection "Prince Charming" in Indigo.  Everything else was scraps and leftovers from my stash.

I hope this tutorial helps clarify the process of quilting something like this improvised quilt.  Have you ever quilted before?  What were your first quilts like?