Showing posts with label how to. Show all posts

Tuesday, December 5, 2017

My first online class!

About My First Class on Skillshare

My first class is about learning to use Adobe InDesign (which already comes bundled with many Adobe CC accounts) to make beautiful, clean, perfectly aligned contact sheets that are easily edited, updated, and exported to help you sell your work.
I created this course to help de-mystify InDesign. A lot of creatives, artists, and photographers pay for Adobe CC, but are not sure how to take advantage of all the software it brings. So, this is my effort in making Adobe's publishing software work for you. InDesign is a really robust piece of software and the perfect companion for Illustrator and Photoshop when you're looking to put it all together and publish your work.

I created this course to help de-mystify InDesign.
I've used InDesign to produce all kinds of promotional and informational materials throughout the years: business cards, mailers, postcards, booklets, portfolios, and contact sheets.
I focused on contact sheets as a way to explore InDesign and learn concepts that will easily translate to a lot of other projects. If you'd like to learn more, you can check out the class here on Skillshare.
I'd love to hear what you think!! And, if you've never used Skillshare before, here's a link for a  free 2 month trial of their premium membership - the link's limited to the first 10 who use it though, but take advantage while you can!

Tuesday, December 1, 2015

Process: Advent Calendar Noel Image

Hello! I just wanted to introduce myself in case you hadn't met me before.  I'm Adriana Hernandez-Bergstrom!  I go by Adriprints on my work, and  you can find me really easily with that moniker.  I'm the founder of the Finch & Foxglove art collective, and I did the first illustration on our digital Advent Calendar.

I am a really process-oriented person and I love learning how others get to the images they do.  I hope you can learn a little bit from my process too!

The "Noel Peppermint Bark" illustration started off as a doodle that I did in August or September.  I was at my mom's house playing around with an old watercolor set that I had left at her house in case all my luggage was lost.  In my mind, I was working on a tropical-Christmas kind of theme...


In between then and now, our group came up with a wonderful color palette for our advent calendar.  We looked at vintage Christmas postcards to get us started.  These colors were rich and wonderful, but not really tropical... and I really wanted to use the "Noel" lettering.  So I traced the lettering in Adobe Illustrator with the pen tool, used a color from our palette, and started working on composition with the other illustration assets that matched the palette a bit better.  I had created these assets or icons a few weeks ago by painting in watered down gouache.  They were extras from the greeting card project I did in October, and I did a direct "live trace" using Adobe Illustrator to capture them...


Once I had a composition that I liked, I brought each element separately into Photoshop, converted them to Vector Smart Objects and began to add texture and depth...


I really wanted a rich feeling like chocolate in the background, and at first I tried mint + chocolate with the lettering...


But, as you can see it looked a bit too cold in this version.  It read like mold or marble or something unappetizing.  So, next I tried peppermint, and that is what you see in the final image.  A little bit tastier, I think!


This is just one of the many illustrations in our wonderful digital advent calendar.  Follow along on our Finch & Foxglove Advent Calendar page!

Tuesday, April 22, 2014

Tutorial: Zig-Zag Quilt

You can make your own Zig-Zag Quilt top from stash scraps, and it's not too difficult!

Main requirement for piecing this quilt top:
72 white pieces of fabric, 4.5" square
72 print pieces of fabric, 4.5" square

You'll also need:
- additional yardage for sashing, backing, and binding
- batting for the center of the quilt sandwich

Side Note: Someone asked me how I get the fabric for my stash and how I chose the colors for this quilt.  My stash was built up from fat-quarters and yardage for garment sewing.  I am a bit compulsive after sewing projects.  I can't remember where I got the idea to save scraps larger than 2" square after sewing projects.  But, that's what I do. After a project, I cut down the smaller bits of fabric into two categories: strips or squares.  I trim the squares to be 4.5" because that's the size of my plastic template.  And the smaller stuff gets turned into strips or dresden plates.  Then, I have little clear plastic bags where these scraps are organized by color.  Obsessive yes, but hey, it made this project a real snap!


First, the basis of this quilt is the half-square triangle.  It's known in the quilting world as the HST.  After you've mastered that, you're pretty much set to go.  Here's how I did the HSTs for this quilt...


As described above, I started with two fabric squares in contrasting colors of identical size.  In the case of the Zig-Zag Quilt, I started with squares that measured 4.5".  As long as all your squares are consistently cut and pieced, it's all good.  Each pairing makes 2 HSTs.  You lay one white, one color square with right sides together.  Mark the diagonal, and stitch 1/4" above and below the mark.  Then, cut across the diagonal mark, open, and press the two squares you just made.  I do loads of squares at a time by chain piecing and then press them all at once... I learned this from Craftsy's 2012 Block of the Month with Amy Gibson - the February video here is all about the HST.

Once you've made a bunch of these HSTs, they can be combined in so many different ways!


In the case of the Zig-Zag Quilt, here's how I pieced the top:


Each row of zig-zags used 24 HSTs.
The final quilt had 6 lines of zig-zags, which equals 144 HSTs.
This also means that I started with a total of 144 squares of fabric: 72 color and 72 white squares.

In any case, once I had the long pieced rows of zig-zags, I carefully joined them across these rows, making sure to use pins to line up all the seams.  I tend to press my seams open, and this was no exception.


Next, I added sashing to the outer edge of the top (that white outer frame).  My sashing had extra width to it.  If I remember correctly, the sashing was 6" wide so I could trim it down if I had to square up the quilt after free-motion quilting.  I didn't end up FMQing, but it's always good to have a bit of wiggle room for squaring up.

You cut your batting (the fluffy middle) about 4" longer and wider than your top so you have 2" of adjustment... just in case!

For me, the trickiest part of this quilt was the backing.  If you have a really vertical/horizontal element on the back like in my version of the quilt, you want to be sure to hand-baste a few cross-hairs across the quilt so it's accurately aligned to the front.  I ran a line of basting down the center of the big vertical element, and across both the horizontal elements.  This help me to be sure it was oriented correctly to the quilt top. If you want to avoid this extra step, just use a non-directional print, and a whole cloth style for the back.


My first quilts lacked this kind of precision (and were really wonky) because I didn't understand how important basting was.  Once you learn to hand-baste quickly, there's no excuse! It takes a few minutes for a quilt of this size.  I did both pin and hand-basting for this quilt.

Lastly, is the actual quilting.  First, I stitched in the ditch (along the main zig-zags).  Then, I echo-quilted which means I ran a line of stitching about 3/8" away from the zig-zags.  I just used my presser foot's width as a guide.  Then, I quilted the sashing, added the binding (that final outer edge) using this tutorial from Sew Mama Sew and Mary on Lake Pulaski.

And, that was it!

The final quilt including the sashing and binding is 51" x 51".
The main print for the backing is Tula Pink's "Turtle Bay" print from her 2011 collection "Prince Charming" in Indigo.  Everything else was scraps and leftovers from my stash.

I hope this tutorial helps clarify the process of quilting something like this improvised quilt.  Have you ever quilted before?  What were your first quilts like?

Monday, April 7, 2014

MK Tutorial: Mitered Detail with Short Rows


This tutorial is a machine knitting tutorial that leads up to the publishing of my pattern, "Mitered Detail Cardigan."  The mitered detail in the pattern can be accomplished in two ways.  The first way described in the pattern, is with short rows (also known as partial knitting) and by wrapping each stitch as they are put on hold.  In order to best show what I mean, I made a video tutorial for this one...


Just in case it's too blurry in the video, here are detailed photos of what it looks like to "reactivate" a stitch into working position.

Wrap & stitch back in the hook part of the needle.

Wrap & stitch ready in working position ready to knit.

Here's a mini sample showing the detail on the front and back.  I think the color pooling of the yarn helps show the order in which things were knit.  The green section happened first, then the purple.  With WS (wrong side - in this case the purl side) facing, this block was worked from left to right.


Wednesday, October 10, 2012

Tutorial: DIY Pompom

Fall is in the air... And, I love hats with pompoms. And, sometimes you just want to make your own pompom, right? And add pompoms to everything? Okay, well maybe not everything, but just in case you *did* want to add a pompom to a favorite hat or rabbit toy, or change out an existing pompom for a different one, here's a photo tutorial on how to do it using a template I created.

You can download your own template here on Craftsy.

First, trace and cut the pompom templates from chipboard (like the cardboard of a cereal box). Align the openings of the template pieces so yarn can easily pass through.

Hold one end of the yarn.
Wrap yarn tightly around the template until there is very little room in the center of the circle, but the opening remains clear.  I mean really wrap it around until it's hard to wrap any more.  Use different colors of yarn and mix it up for a crazy party pompom!  Most yarns can be used as long as you can wrap it around the template, and cut it afterward...

wrap yarn around the template until center is barely visible


Using a pair of sharp scissors, cut wrapped yarn all the way around the outside of the circle between the two templates.

use sharp scissors to trim between pieces around outside circle

Secure the pompom by wrapping scrap yarn between the two template pieces, around the center circle, and tying a tight knot.
trim completely around the circle and secure
Remove template.  Fluff and trim to shape.
Use tapestry needle and tie-ends to attach to your project.


Want to make your own pompom?  Download your own template here.

Tuesday, October 9, 2012

Tutorial: Blocking Your Knitted/Crocheted Items

"Blocking" in the fiber arts world, is usually a finishing step. After your garment (or each piece) is knitted or crocheted, block to match the measurements given in your schematics, or you can seam them together and block them as a completed garment.

before blocking
blocked blanket

The first step I take in this process is looking at the yarn band.  I make sure I understand the care instructions for the yarn I'm about to block.  Then, I look at the pattern for any specific blocking instructions (lacy shawls often have areas that are accented in blocking).  If you're worried about your yarn and want to avoid washing the garment, you can spray/mist it with water and proceed with blocking.

The blanket shown above was made by a friend of mine, and she used a washable yarn.  So, I went ahead and soaked before blocking.  Usually it's a 20 minute soak (often longer because I forget about it).  This lets the fibers relax into its new form.  Then, I squeeze out the excess water.  If I'm using strong yarn that can tolerate it, I'd place the gently wrung-out project in a lingerie bag and set it to the lowest spin cycle on my machine with a towel or other things that need wringing out.  If the particular yarn is too fragile for the spin cycle, I use a fluffy towel and lay the piece as flat as possible on the towel, and roll it up.  This makes a towel-garment sandwich "burrito".  I then squish the towel to remove even more excess moisture.  Once you've removed as much water as you can, bring out your blocking surface.

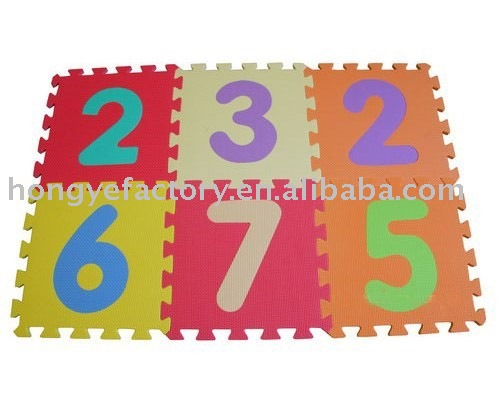
A friend and I went "halfers" on some kid's foam puzzle mat like this, so that's what I use.  Basically you need a stable surface that can take and hold pins in place.  Some folks use a mattress, others just towels.  I place a dry towel on the foam squares and place the item atop the towel.

Next, I assess the best plan of action.  Should I use the stiff wires?  Just T-pins? Flexible wires?  A combo?  The blanket project above was an easy choice - stiff wires for sharp crisp edges...

I take a blocking wire and kind of "sew" it through the edge of the blanket taking evenly spaced chunks and trying not to splice any yarn with the wires.  Sand down the ends of your blocking wire if you continuously get snags.

For hard edges like in this blanket, I used T-pins to secure the intersection between wires.  This makes a nice crisp corner too.

curved edges = flexible blocking wires
For something round like this curved earflap, I use flexible blocking wires and T-pins (Squishy Chullo Hat).


before blocking the "Percy Shawl"
after blocking the "Percy Shawl"
And with this scalloped shawl, you can see the drastic difference before it was blocked and after...  I used a combination of techniques with this one (T-pins and thread).  If I had had blocking wires back then I would have used the stiff ones for the top edge to get a straighter line.  Instead, I used what I had - thread running through the top edge and T-pins to stabilize the thread.  Then, I used a boatload of T-pins for the scallops.

I hope this tutorial gives you a general idea of the many options you have for blocking your hand-made goods.  These techniques can also be used for pre-manufactured wooly goods, too!

There are tons more resources out there and here are a few to help you out whichever way you choose to block your project...

Blocking Resources:
blocking lace on KnittingDaily
using blocking wires from Knit Picks
using flexible blocking wires on Knitter's Review
blocking with pins on the purlbee
making your own wires: DIY blocking wires
blocking without wires on CrochetMe

Thursday, May 10, 2012

Tutorial: Fair-isle Floats

In this tutorial, I'll share with you what I do to weave in a long float when I'm knitting in fair-isle.  This technique effectively splits the float in two making a smaller, less snag-prone float when you're knitting with multiple strands.

The basis for this tutorial is that I hold the two colors in my left hand, and I knit continental-style when I'm working with two colors.  If I'm working with three colors, the technique is the same except I bring in the third color that I hold with my right hand, and twist the threads to keep the floats small.  This technique is especially helpful for accessories such as mittens or hats which are prone to snagging with earrings, fingertips, etc.


Thanks for watching!  If you lose track of this post, you can always find links to my video and photo tutorials under the "tutorials" tab on the opening page underneath the header.

Thursday, February 16, 2012

JJ Blouse Tutorial - Part 3

This final installment of the JJ Blouse tutorial covers steps 10 through 12 which is basically the sleeve and finishing.  Try on that cuff piece first and make sure it fits around your upper arm (minus the 5/8" seam allowances).

If it doesn't fit, then consider adjusting the cuff seam allowances.  If it still doesn't fit consider redrafting the sleeve (slash in the middle and add some width to the piece) if you think the gathering isn't enough to work for your arms.  Then adjust the cuffs/interfacing and the marking lines accordingly.

Step 10:

Step 10A - Double stitch like you did with the ruffle on the top bell curve of the sleeve between the two asterisks.  If your machine has a large stitch length use it!  I used 4mm which is as long as mine goes.  Try to keep the two lines of stitching evenly separated... try not to let your stitch line go toward and away from the first stitch line because it makes gathering the fabric more difficult.  So, Step 10A is pretty straightforward.

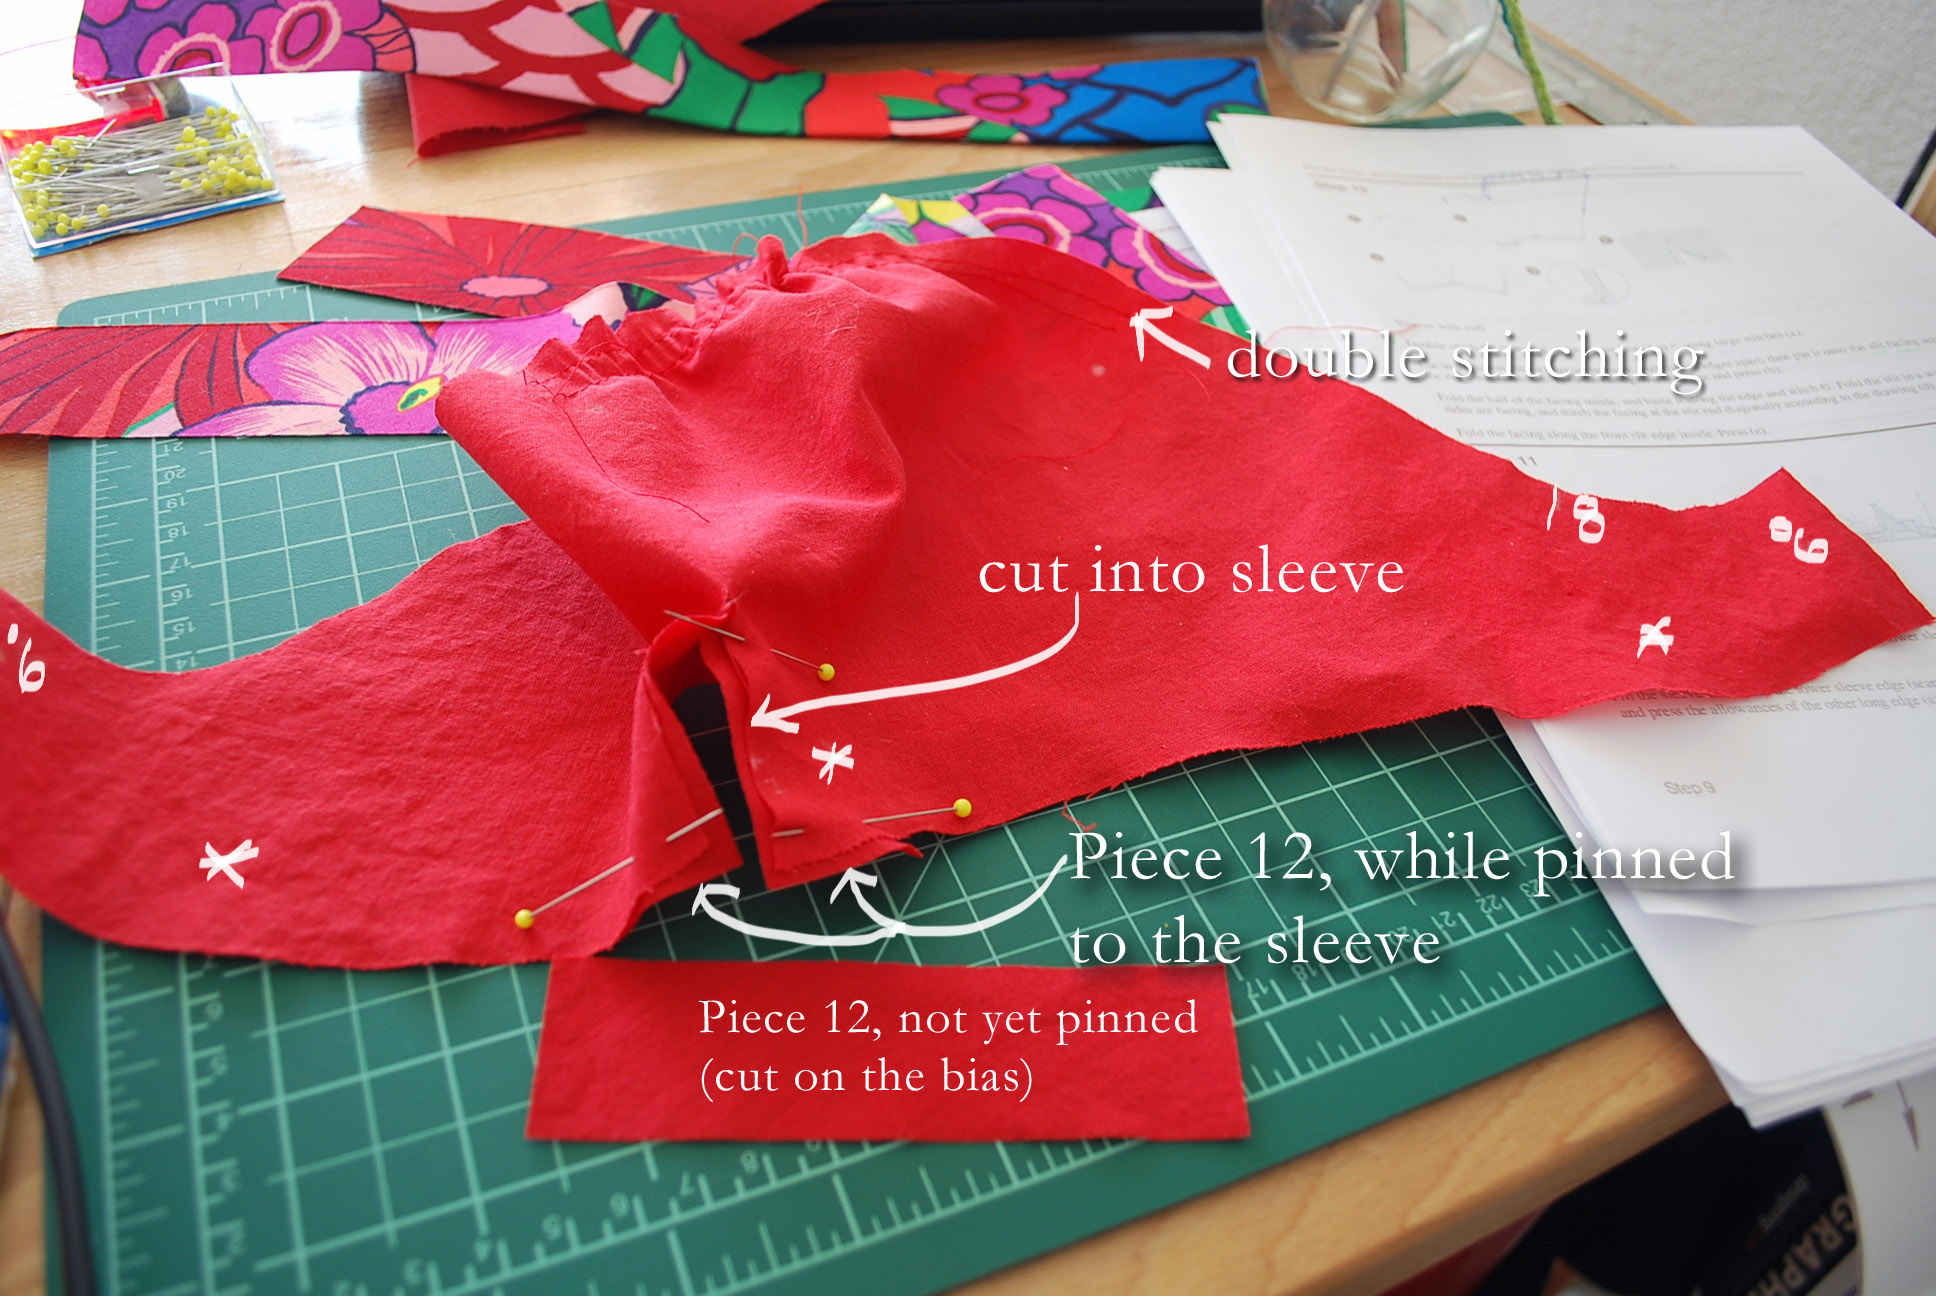
Step 10B - Then comes Step 10B, and the abstract origami illustration.  Here's what it's trying to tell you...

After you cut into the bottom of the sleeve, you're going to need to seal that edge.  So, pull the cut edges apart and pin piece 12 to the newly cut opening like this:

Step 10B, Close-up

Another view of the situation...

Step 10B, A larger-picture view
Step 10C - You are creating a sealed edge here, so be ready to fold piece 12 into itself a couple of times.  First baste that edge, though.  Then, press, fold, press.
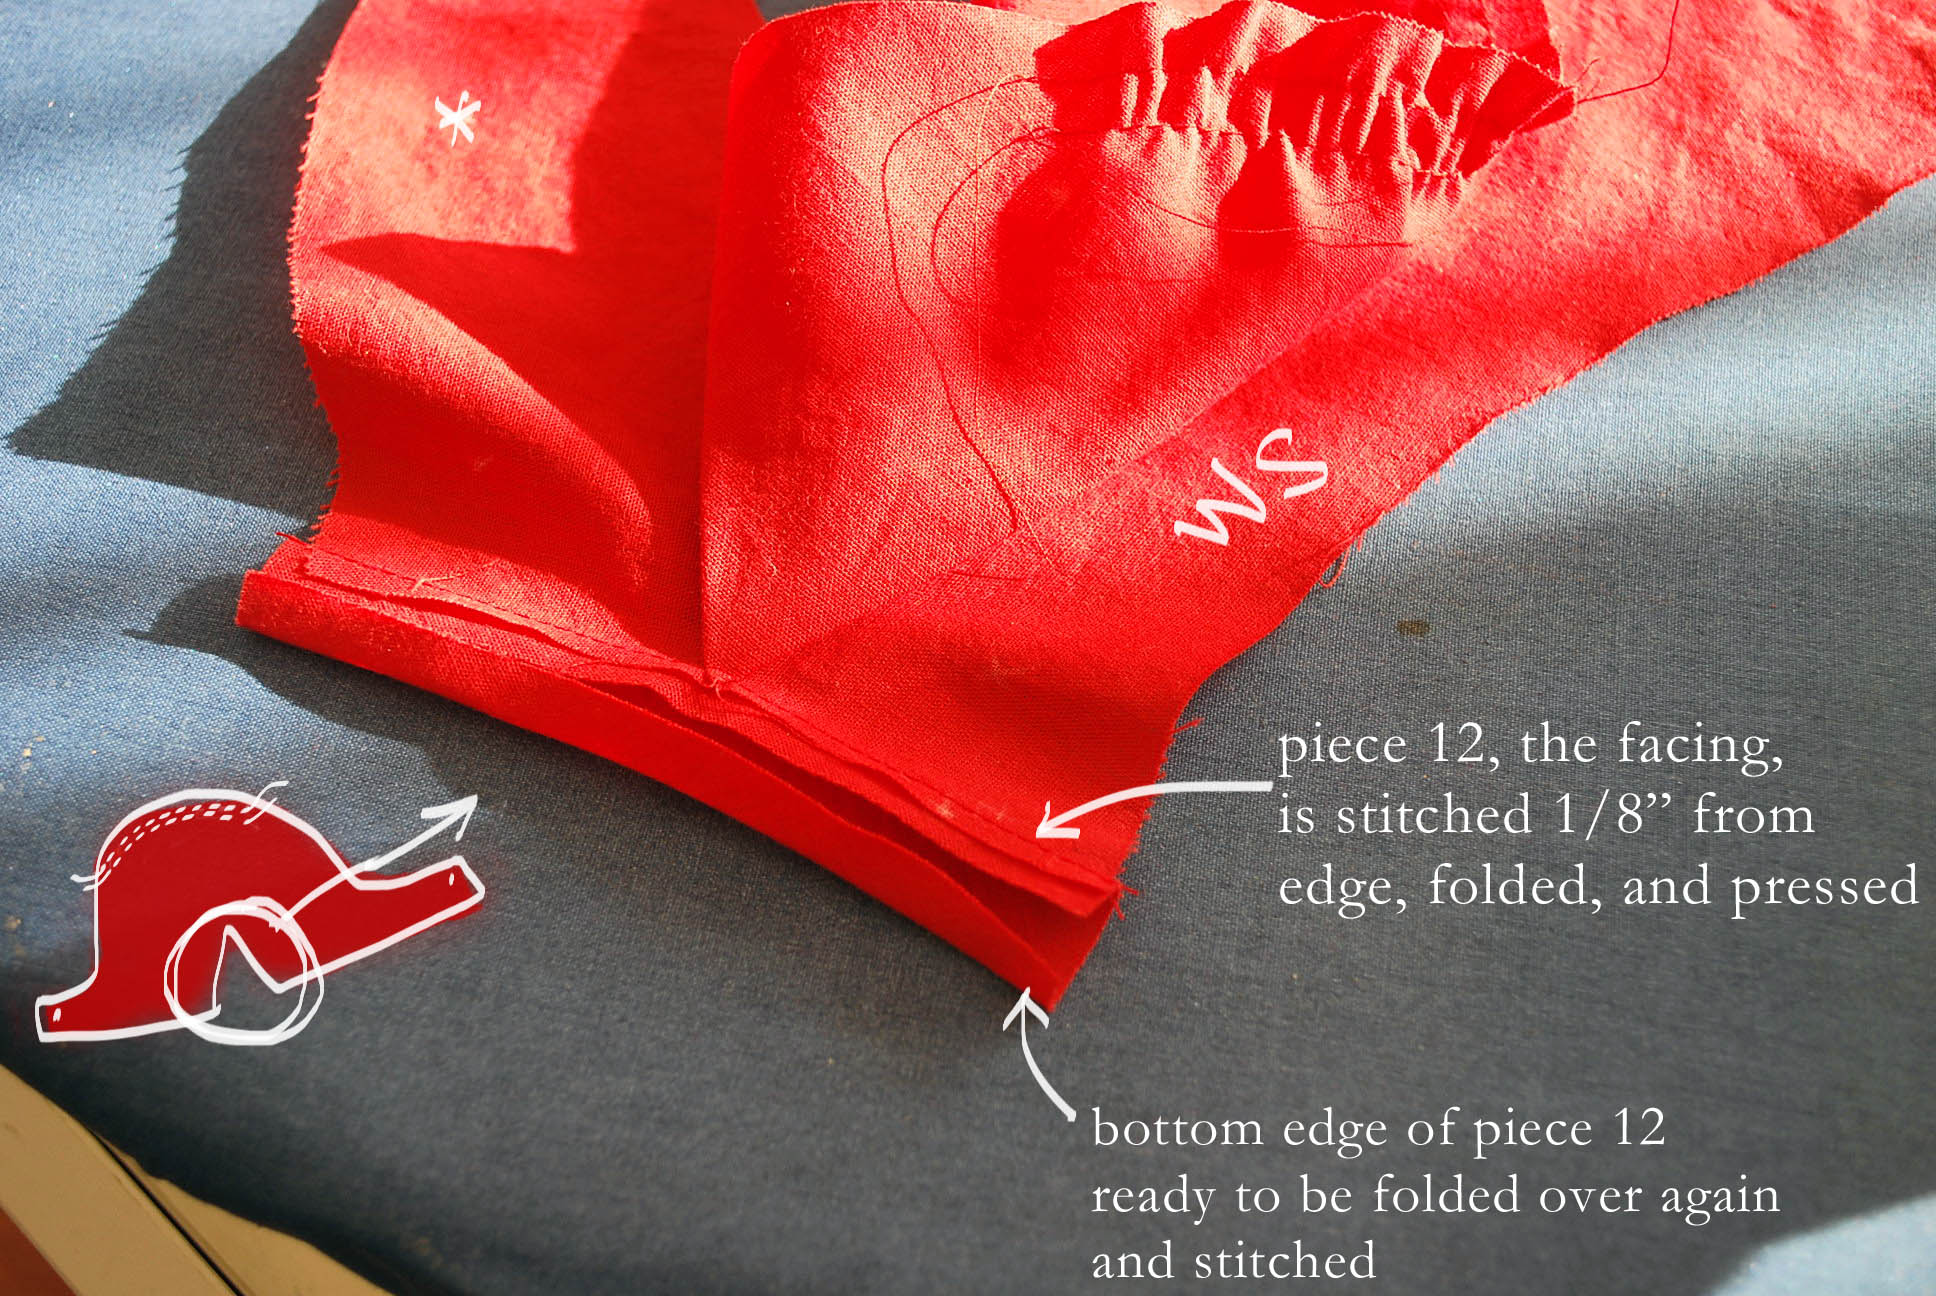
Step 10C, folding and pressing piece 12

After folding piece 12 back onto the sleeve, baste stitch along the edge to seal that bias facing and create a non-fraying, finished edge.

Step 10D and 10E - Next, stitch a diagonal line from the sleeve edge to the outer edge of the bias facing we just completed.  This creates a folding pivot for the slit and allows it to close easier and be pressed.  Press!
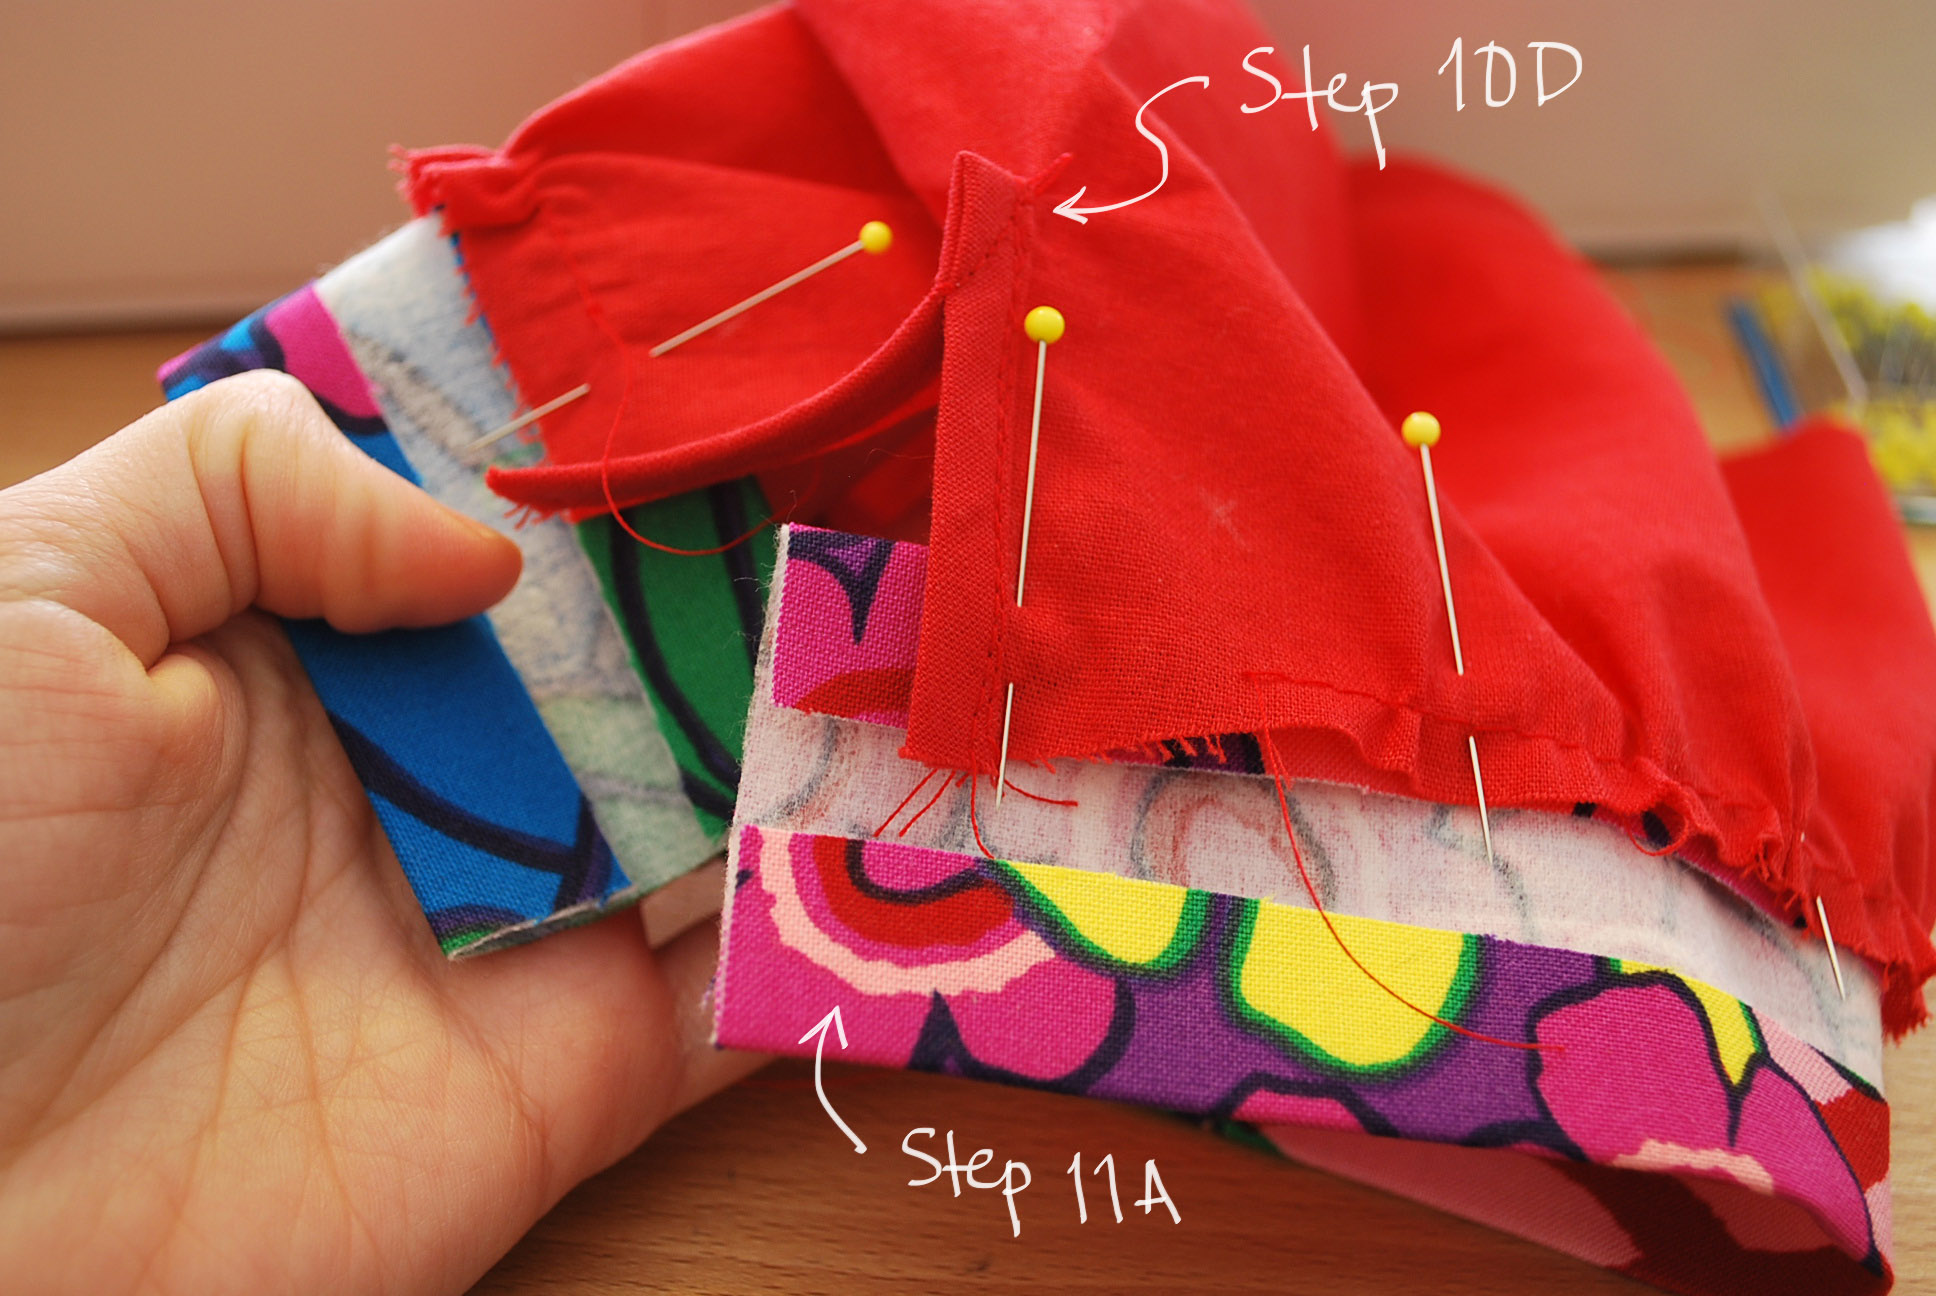
Step 10D, E, and Step 11A


Step 11:

Sew seam 6.  I did a flat-felled seam again for 6 and made sure it would match up with the side seams.  See seam treatment tutorials here from Coletterie!  After stitching seam 6 which is the underarm part of the sleeve (see here for photo), do a quick hand baste between the asterisks at the bottom of the sleeve, gather and align with the the cuff piece (be sure you already interfaced it). 

Step 11A - (photo above) Note that the sleeve has already been gathered between the asterisks and the cuff piece has been folded at the seam allowances (5/8") and pressed.  Then, it was pinned (right sides facing) securing the alignment of the sleeve piece and the placement marks of the cuff.

Step 11B -  Sew a straight line down the cuff ends as you see below (marked Step 11B in red thread).  Then, trim the excesses and prepare the corners for turning inside out. 


Step 11C - Both ends of the cuff are sewn and trimmed, and when you turn them inside out, they should be flush with the edge of the slit opening.  If not, you can redo it or make it a design feature.
Next press the cuff edge as you want to see it in the end.  Sew 1/8" or near the RS top edge of the sleeve securing the cuff.  Top-stitch at will!  Sorry for the outburst, I'm a longtime fan of top-stitching.

Step 12:

Step 12A - Don't hate me.  I did not photograph this.  The illustration was pretty good, and I'll highlight the key points.  Also, here's where your pattern marking skills come in handy.  I hope you marked all those stars and dots!  Gather the top bell of the sleeve between the asterisks.  Remember to hold the bottom threads and push the fabric away... brute force = damaged fabric.

Take note of the dots and lines where your sleeve piece is marked and pin them onto the body with RS facing.  The sleeve should be kind of nested inside the body.

All the markings should align.  For example, the side seam should match your underarm seam (dot 6), and there's a center mark at the top of the sleeve bell that should match your shoulder seam. You want to pin from the sleeve side (not the body side).  You also want to stitch on this side of your sleeve.

From my Simply the Best Sewing Techniques book, page 178:
"With the sleeve side up, begin at the underarm seam and stitch along the seamline... As you stitch, place your forefingers on either side of the presser foot, to keep the eased area from puckering under the needle.  When you reach the underarm again, overlap the stitches.  Seam a second row 1/8" away from the first, but still within the seam allowance."
I didn't know how to flat-fell seam a gathered sleeve so I just trimmed/graded the edges and zig-zagged. Then, I pressed the sleeve seam allowances into the sleeve, setting in the sleeve.

Step 12B -  This one's easy.  Fold and finger-press or pin a 1/4" (or 1/8" if you're a really good hem-person).  Fold it over once more, press, pin, stitch.
Presto-change-o! You have a JJ Blouse!


Buttons:
For instructions and some really detailed information on how to measure for buttonholes, making them by hand, and buttonhole placement, I found this PDF from New Mexico State University really helpful.


For part 1 see here.
For part 2 see here.


Wednesday, February 15, 2012

JJ Blouse Tutorial - Part 2

Ruffles!  In the previous part (part 1) of this tutorial, we cut out all the pieces, worked on the buttonhole band, and briefly mentioned that the center back piece was attached to the back side pieces using your preferred seaming method.

In this portion of the tutorial, we cover Steps 7 through 9 of the JJ Blouse, a free pattern from BurdaStyle.  Note: I actually skipped Step 9 which is the belt loops.  I chose not to include them.

Step 7:

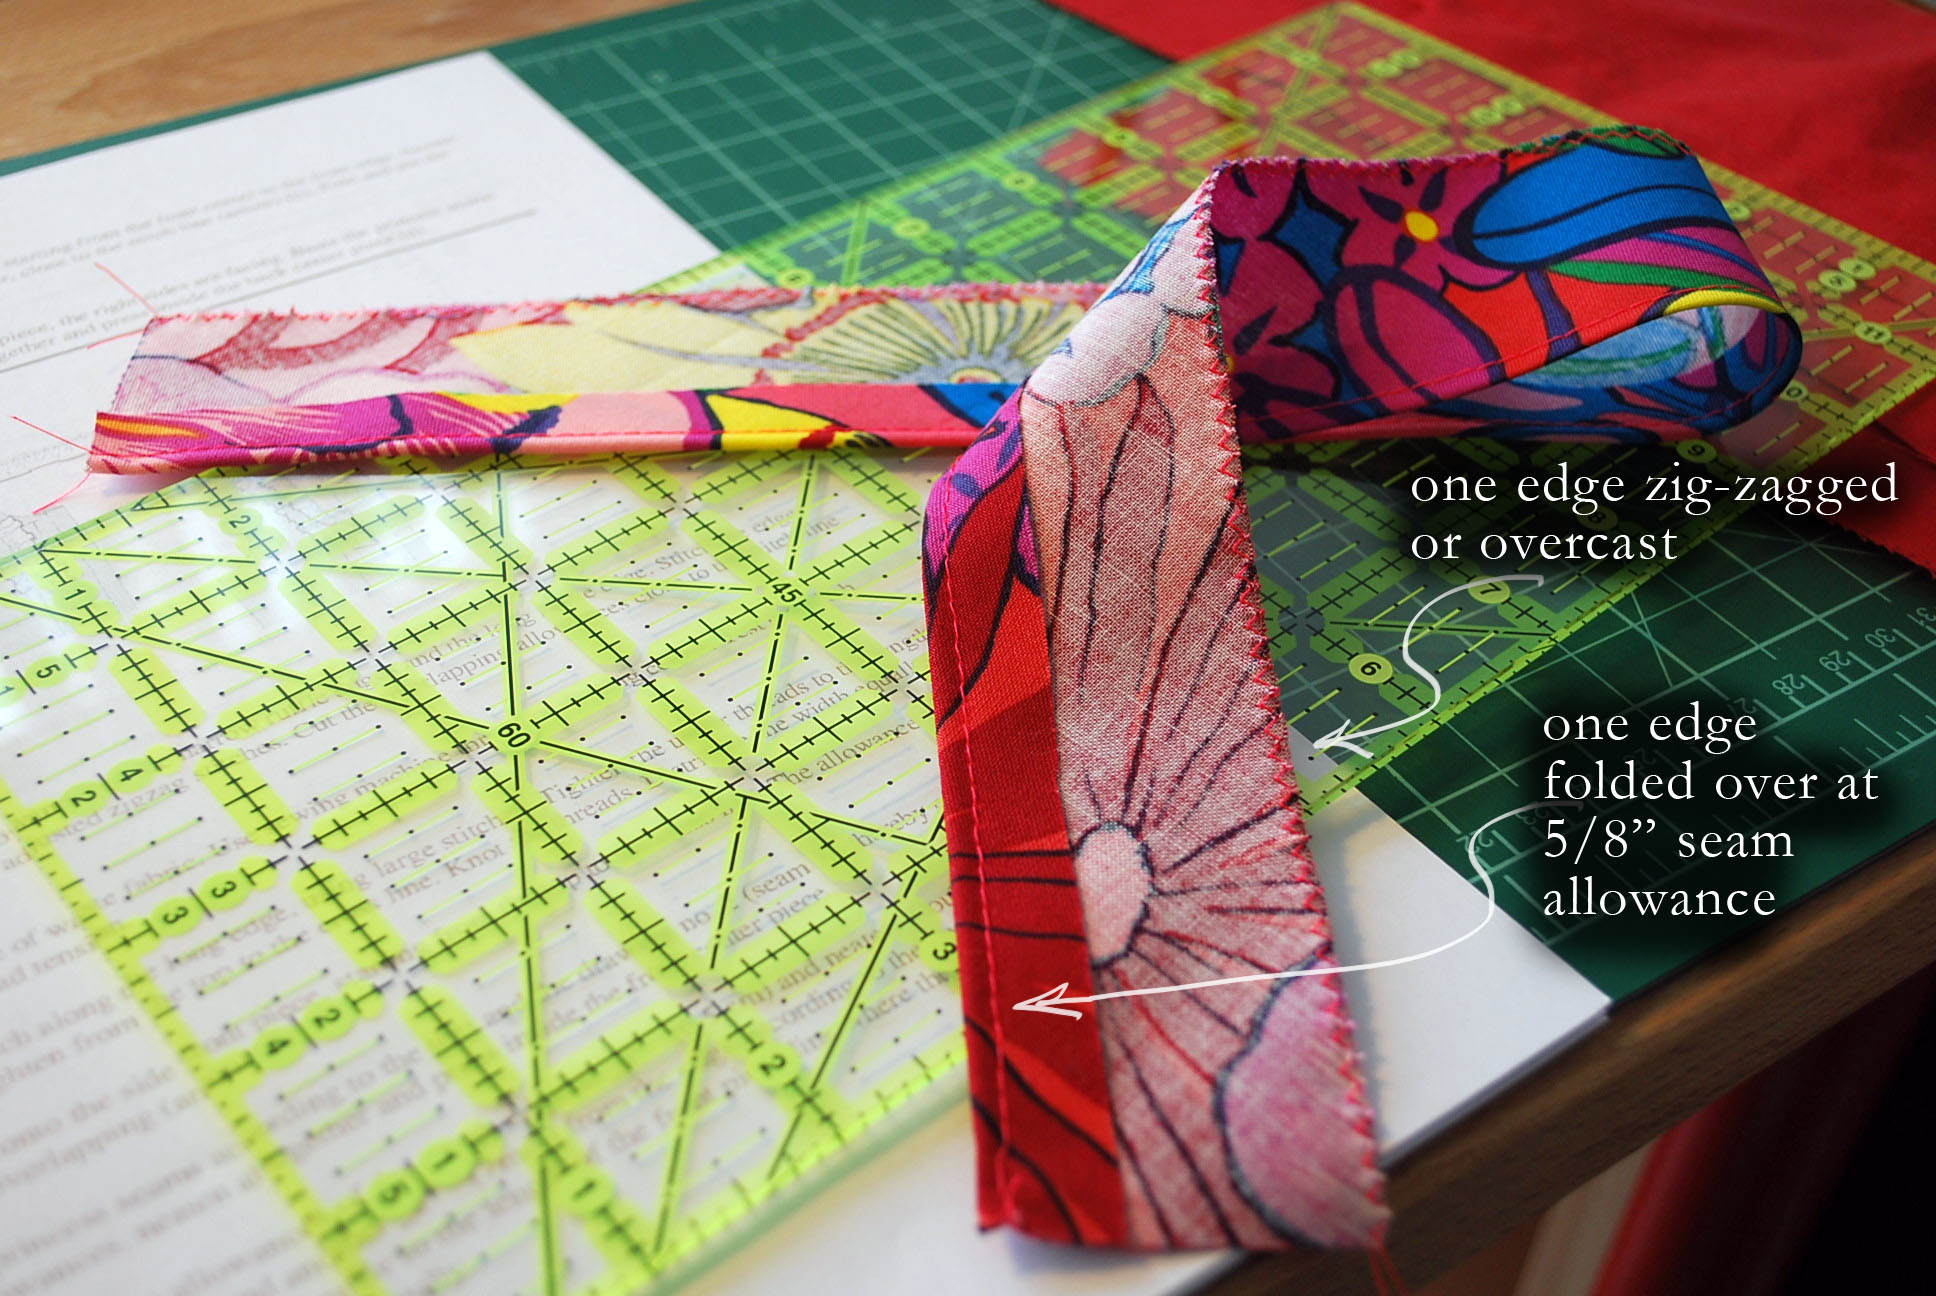
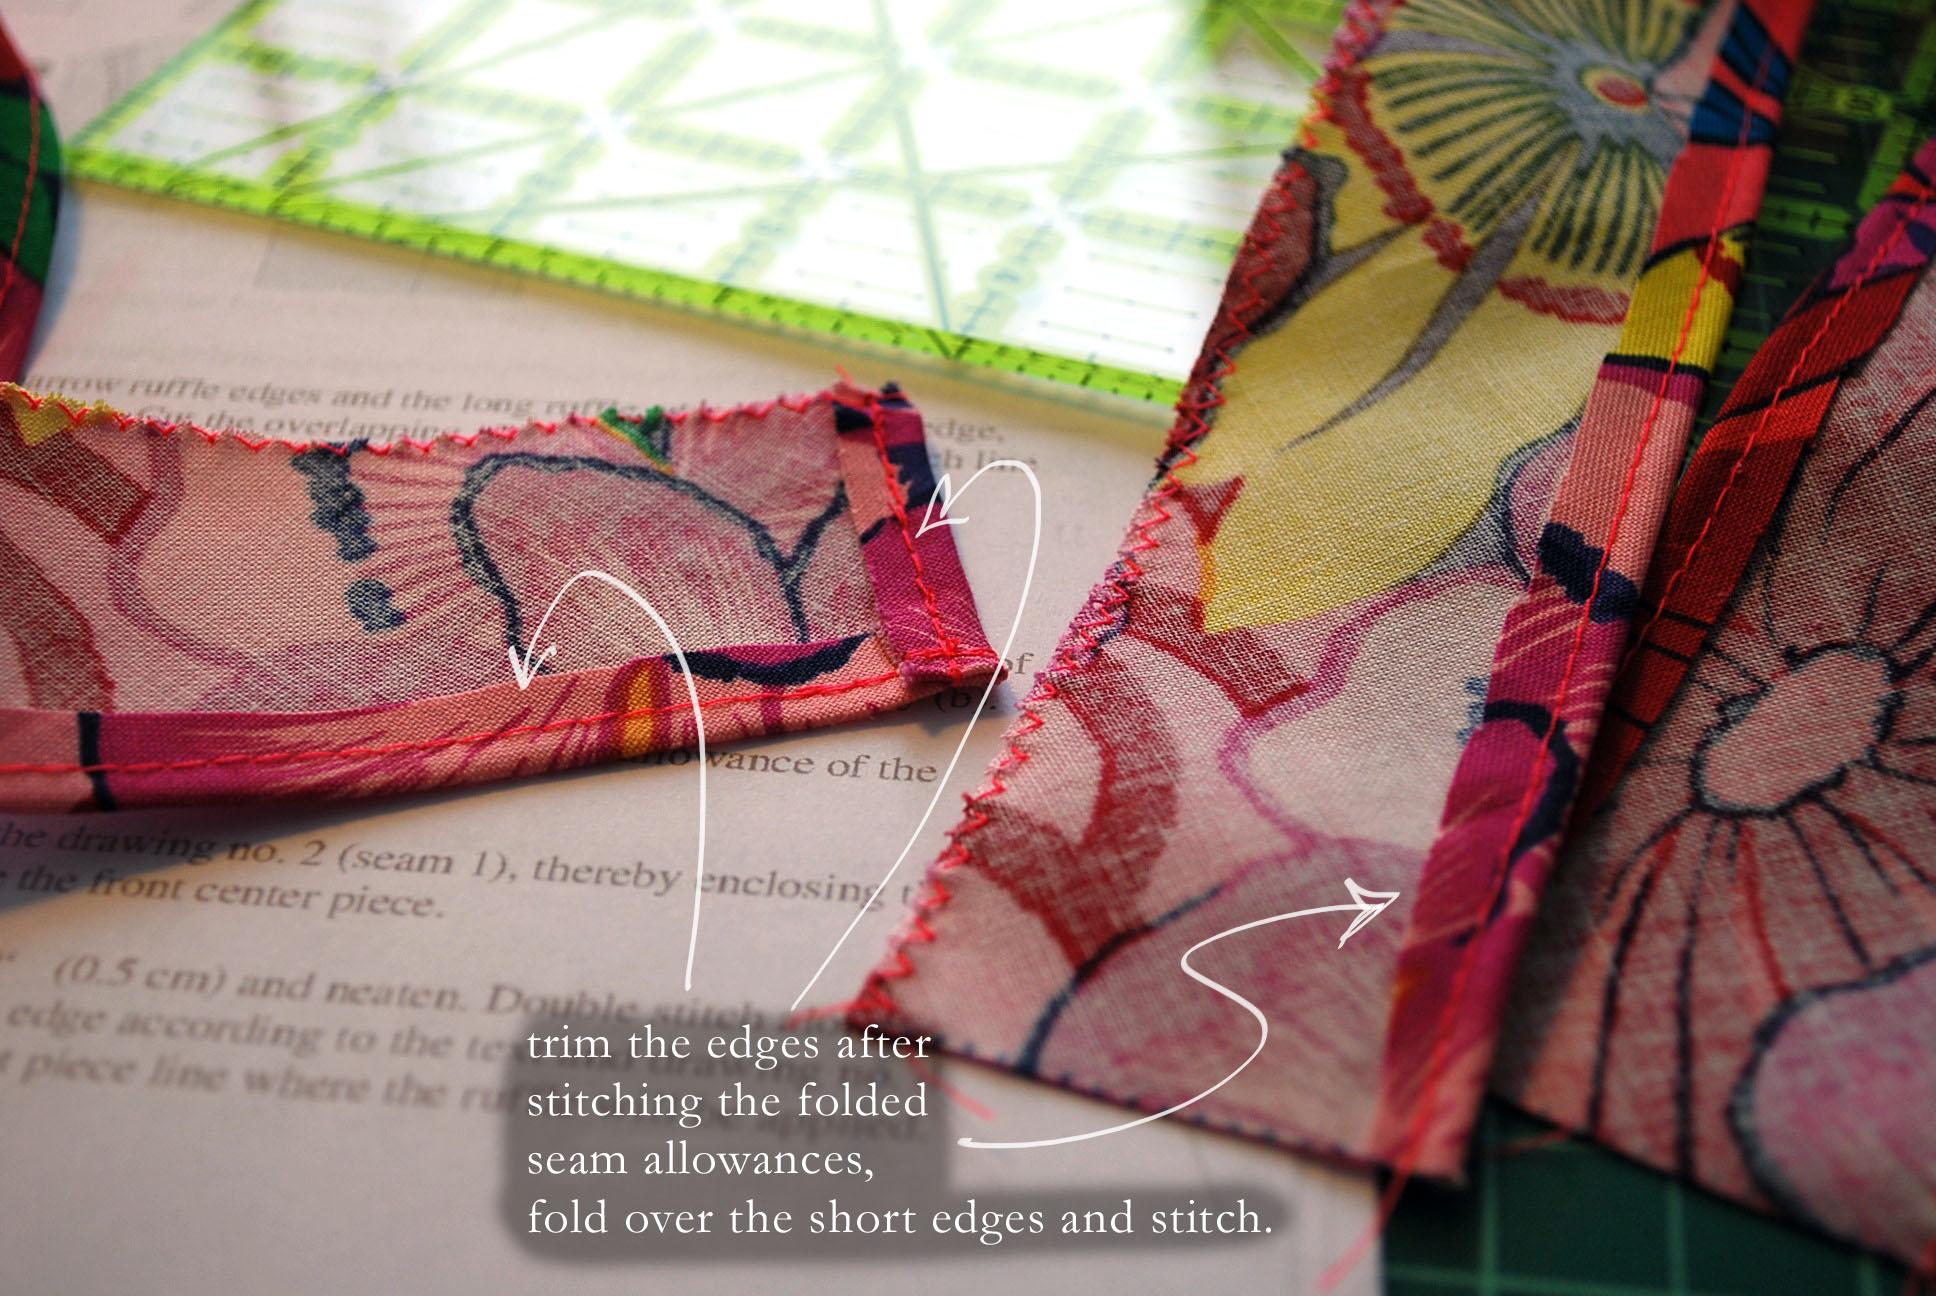
(A) The ruffles begin as flat pieces.  First the seam allowances on the longest side are folded up, pressed, stitched about 1/8" away from the edge, then trimmed down on the wrong side.  Then fold the side edges over and stitch 1/8" away from the edge.  The untreated edge should be zig-zag stitched to keep the fabric from fraying.

Step 7A

Step 7A

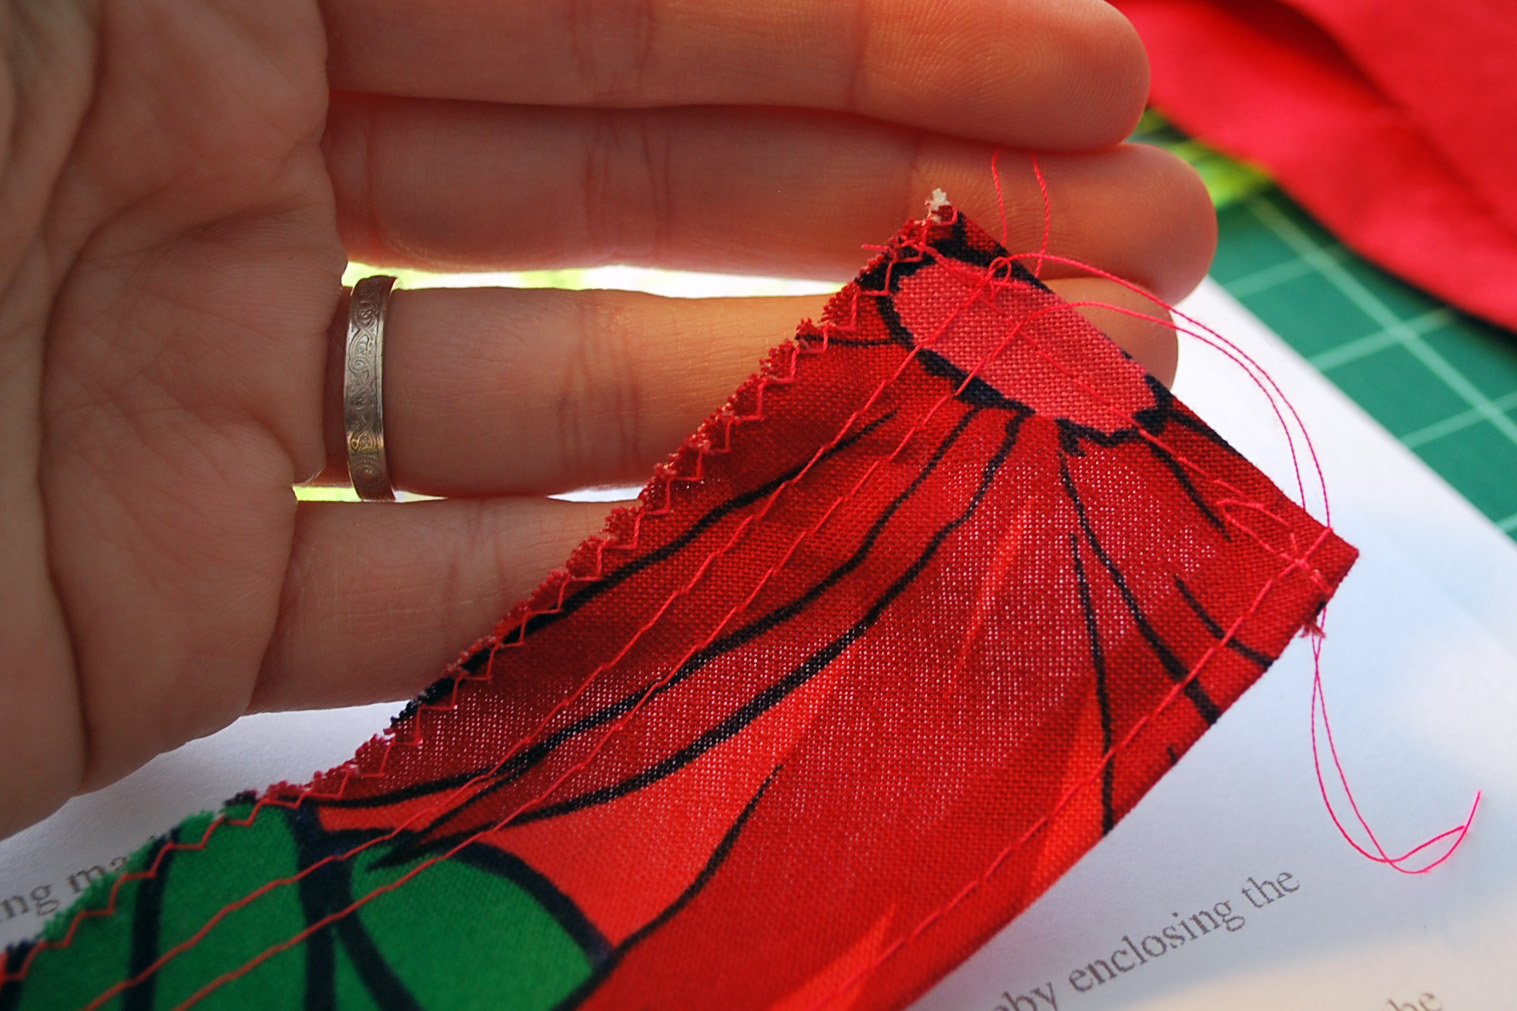
(B) Double-stitch close to the zig-zagged edge.  Try to keep the two rows of stitching as parallel to one another as possible.  Separate the top threads from the bottom threads.

Step 7B, double stitching on the zig-zag edge
Hold the bottom two threads on one side, and slide the fabric away from the bottom threads.  I measured the two marks on Piece #2 (dot 1 to a bar along the stitch line).  Then, I scrunched from the opposite side until the ruffle was the required length.  Afterward, I evened out the fullness of the ruffles.

Step 7B


(C) Next, baste the ruffle onto the edge of piece #2 with the RS of the ruffle and the garment facing up, and the edge of the ruffle along the edge of the pattern piece perfectly between the two marks.

Step 7C

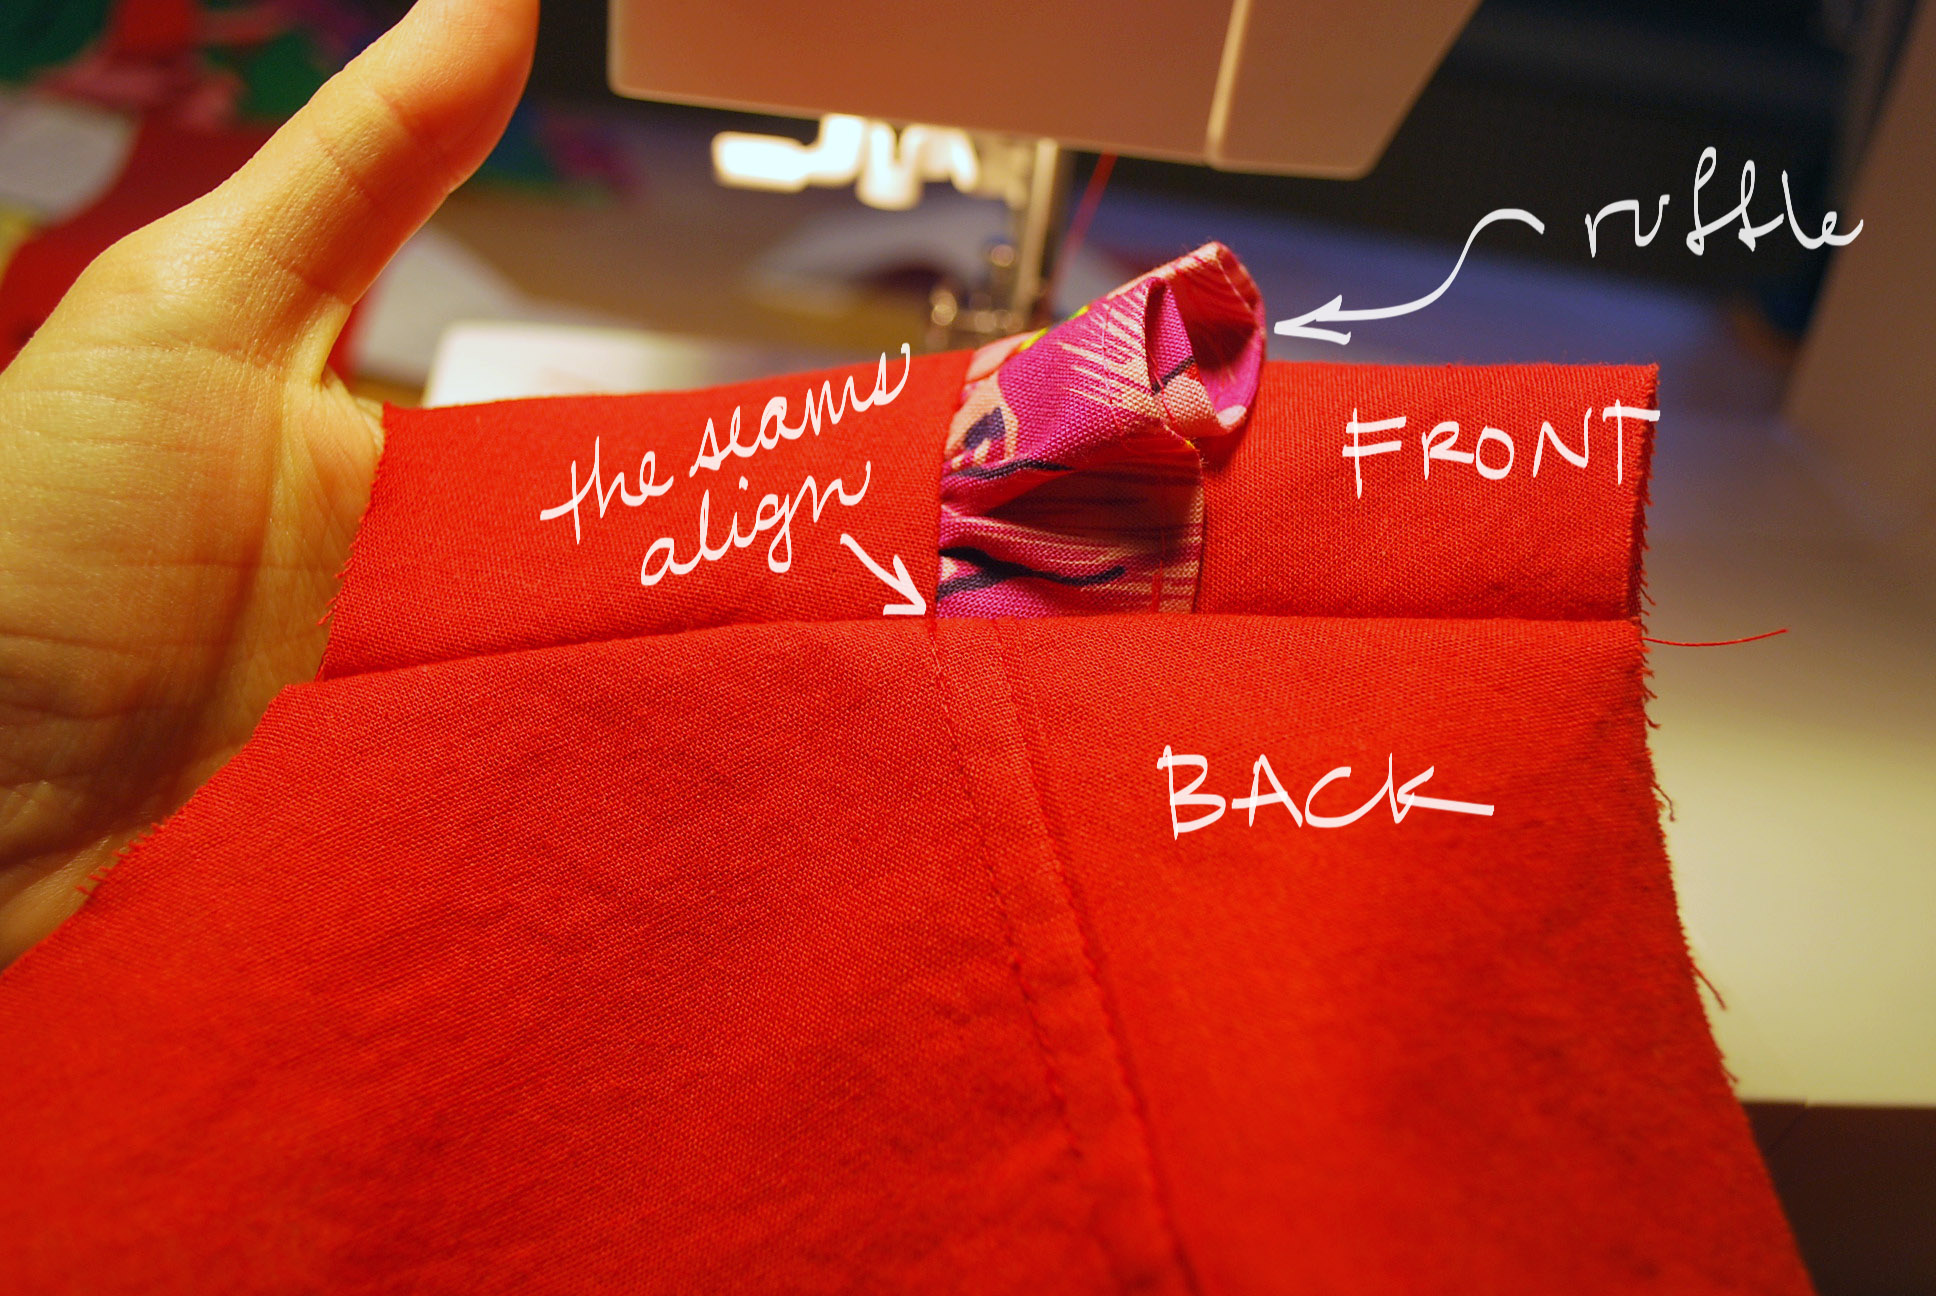
(D) Sew the princess seams, piece #1 to piece #2 the one that has a ruffle attached to it w/right sides together.  This is one seam I didn't flat-fell.  Proceed with the next ruffles should you wish to add them.  I only did four ruffles instead of the intended six.

Step 8:

Baste the shoulder seams with right sides facing.  If you're doing flat-felled seams, try on the garment now to make sure the everything fits properly and your waist/hips/etc will work out... here's where you can make changes should you have to.  If you've made changes to the neckline, adjust your collar accordingly.  If you've made changes to the shoulder-line or side seams, be sure to finish your edges before proceeding.

Step 8, sew shoulder seams together
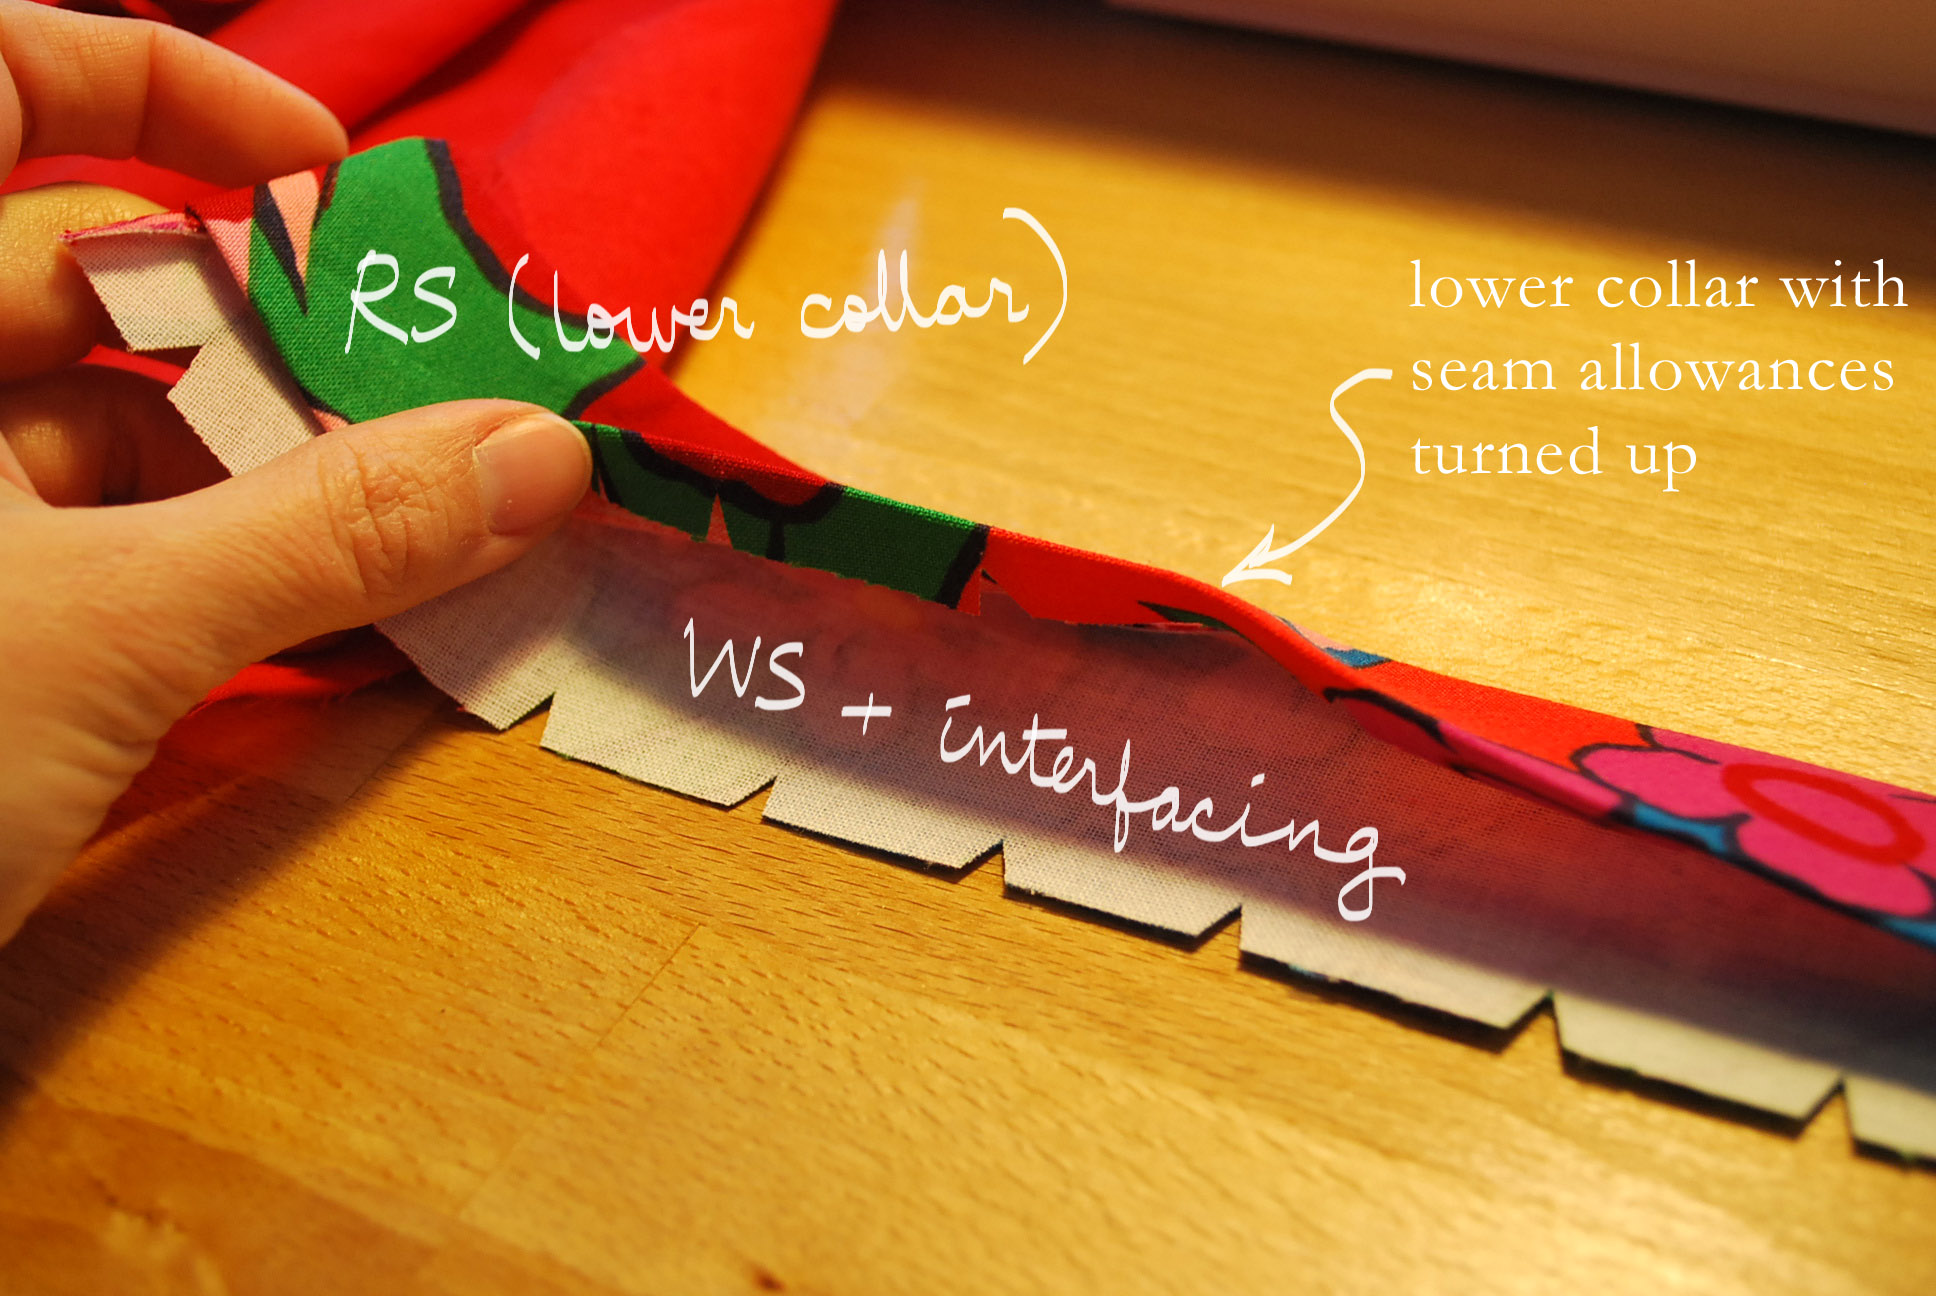
Then comes the collar.  If you haven't already ironed the interfacing onto the wrong side of one of the collar pieces, do so now.  The collar piece without the interfacing is called the "lower collar" piece.  Next, with right sides facing, baste three seams (two sides and the upper/top/smaller curve).

Leave the lower, longer curve un-sewn.  Trim the allowances of the basted edges, clipping/notching where necessary.  Prep the corners to be turned inside out.  Turn collar inside out, baste the three edges about 1/8" from the edges, and press.  Collar still has one open edge... I did this incorrectly and did all four sides.  Oops.

Step 8A, collar turned inside out
Here's the tricky collar part that I did not photograph because I did not leave the collar open.  Align the edge of the collar with the button band dot 4 (remember dot 4 from Part 1 of the tutorial?).  Pin and test to be sure your collar is correctly aligned, and that the marks are all matching.  The marks on the sides of the collar should match the shoulder seam intersection.  The instructions are pretty clear in the third paragraph of Step 8... when they say "stitch narrowly" they mean stitch 1/8" from the edge (or close to the edge).

After Step 8B, collar completed


Step 9:
I didn't do this step.  The belt loops just didn't catch my eye.  The instructions here are clear enough, though, should you want to attach belt loops.

Steps 10 through 12 are in the third and final installment of this JJ Blouse Tutorial.

Tuesday, February 14, 2012

JJ Blouse Tutorial - Part 1


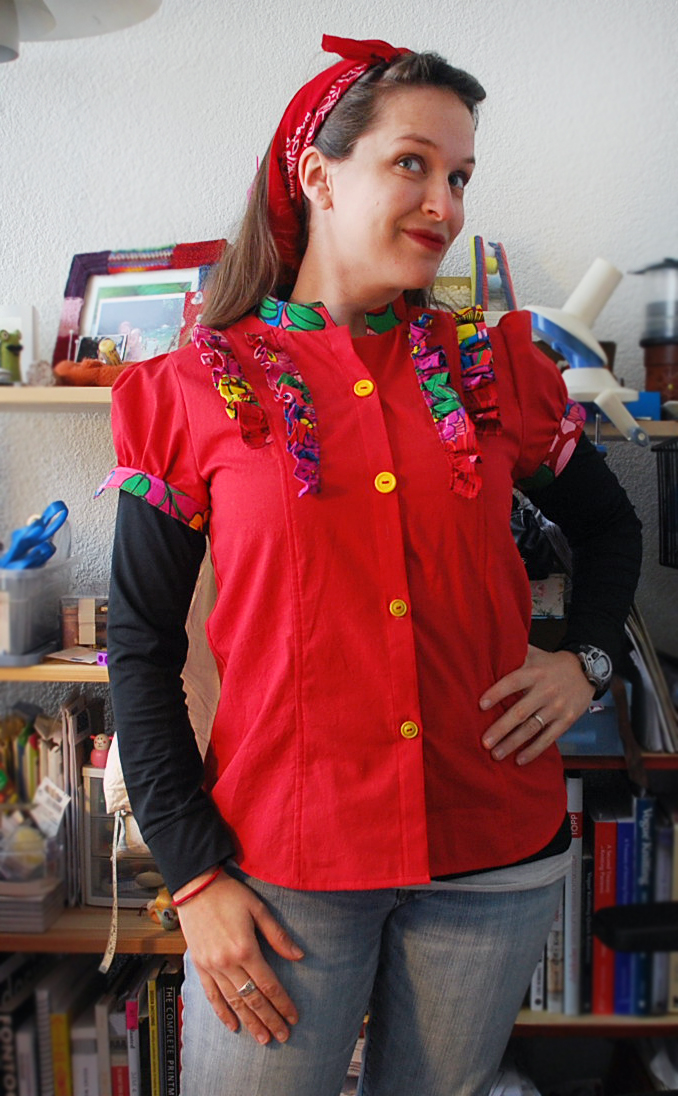
Recently,  I completed the JJ Blouse, a free pattern from BurdaStyle.com for Sew Weekly's Valentine's Day inspired red challenge.  This free pattern is adorable, but the instructions are a bit difficult to decipher.  So, here's a tutorial to clarify some of the difficult parts.

JJ Blouse, some modifications
Steps 1 through 4 are pretty straightforward...

Have the JJ Blouse pattern printed out from the BurdaStyle PDF.  Assemble the paper pattern and cut out, or trace and cut, or whatever you do to transfer your pattern pieces onto your fabric. Use the cutting layouts for help and pay attention to the fabric grain (especially for the ruffle pieces - they're cut on the bias).

Make sure you have all the correct number of pieces cut out in the fashion fabric and in the interfacing fabric.

Step 5:
Iron your interfacing onto the wrong side of one of the collar pieces (piece #7).  Before ironing it onto the two cuff pieces (piece #6), make sure the darned thing fits around your upper arm (minus 5/8" seam allowances all around).  Mine barely fits.  Adjust accordingly.  The sleeves do have some ease at the cuff, but be ready to adjust/widen (by slashing the pattern) if you have larger upper arms.


Step 6:
Here's where the fun begins.  Illustration (6A) shows you how to fold piece #1's outer edge using the folding marks to make a "Z" fold, ending with the RS facing you.

Step 6A

Step 6A
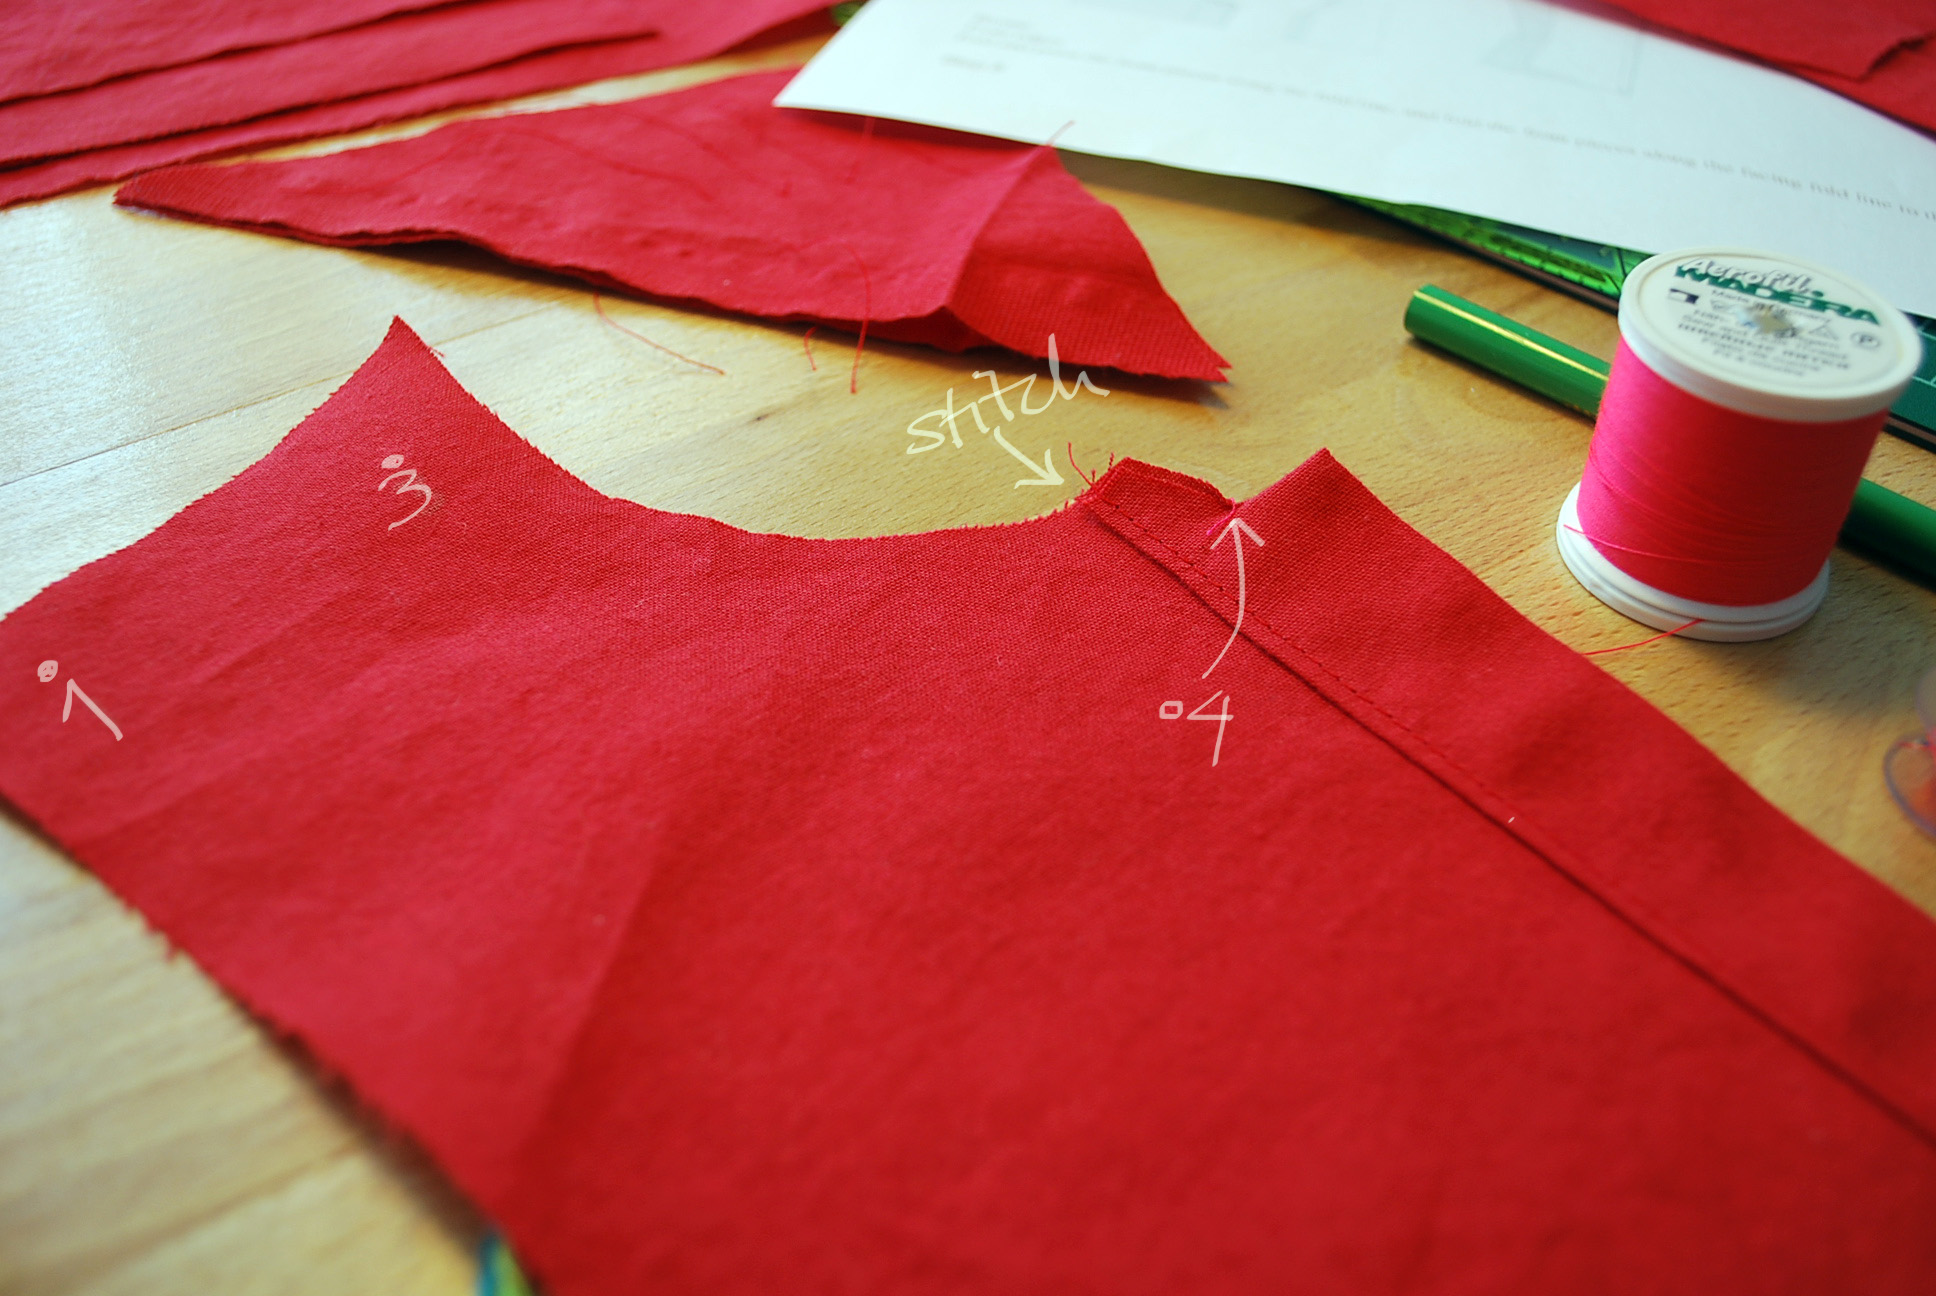
Then, with the folded edge pinned and pressed flat, stitch from the center of the folded band (marked as dot 4) out to the outer edge (6B).

Step 6B
Notch into the top of the collar toward dot 4.  Trim the excess fabric above the stitched section only.  Then, turn the folded band inside out, pushing out the corner with a knitting needle.  Press again using the folding marks as guides.  Stitch close to the edge to secure the button band.

Step 6C, WS facing
Step 6D is pretty self-explanatory.  Attach the back side pieces to the center back piece #3.  I used a flat-felled seam on the RS our outer side of the garment.  Here's a tutorial from Colette if you want to replicate it. All my flat-felled seams were pressed toward the front opening of the blouse.  Does that make sense?

Step 7... See Part 2 here.
Thursday, December 22, 2011

Bombshell Dress: Part 1

With a lot of help from Gertie's Craftsy Course: Sew Retro Bombshell Dress, I finished this big sewing project.  And, because it took a lot of hand-work, hand-sewing, and thoughtfulness, I thought I might walk you through the whole process.  In a following post or two, I'll show you the final dress. ((tee hee anticipation))

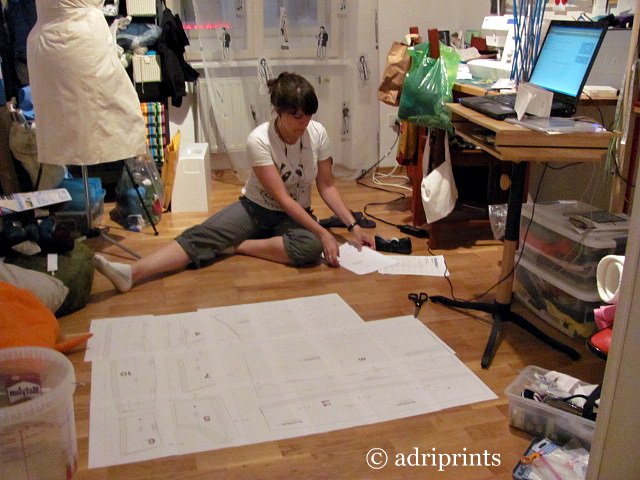
cutting out the paper pattern
In the beginning there were the muslins (also known as toiles, dummies, mock-ups, calicos, etc.).  A few of them.  These were to make sure the final dress would fit me since we knew the original pattern was a bit too small in some areas.  Thanks for the larger bust modification chapter, Gertie!


muslin #2, see the cups?  they are a little too pointy in this version
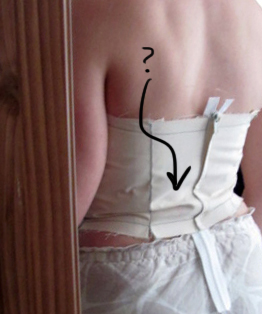
uh-oh! see that gathering... I had to adjust for a swayback


Muslins take a bit of work because you're sewing the actual pattern pieces together, then wearing them, adjusting via markers, pins, mirror, etc.  And all except the last of them ended up in the scrap bin.  But, when the muslin finally did fit my particular body specialties, I transfered the seam-lines onto fresh muslin and paper (for prosperity and reuse) and cut into the fashion fabric ((scary!)).  Spoiler Alert... It all worked out!  Yay for little victories!

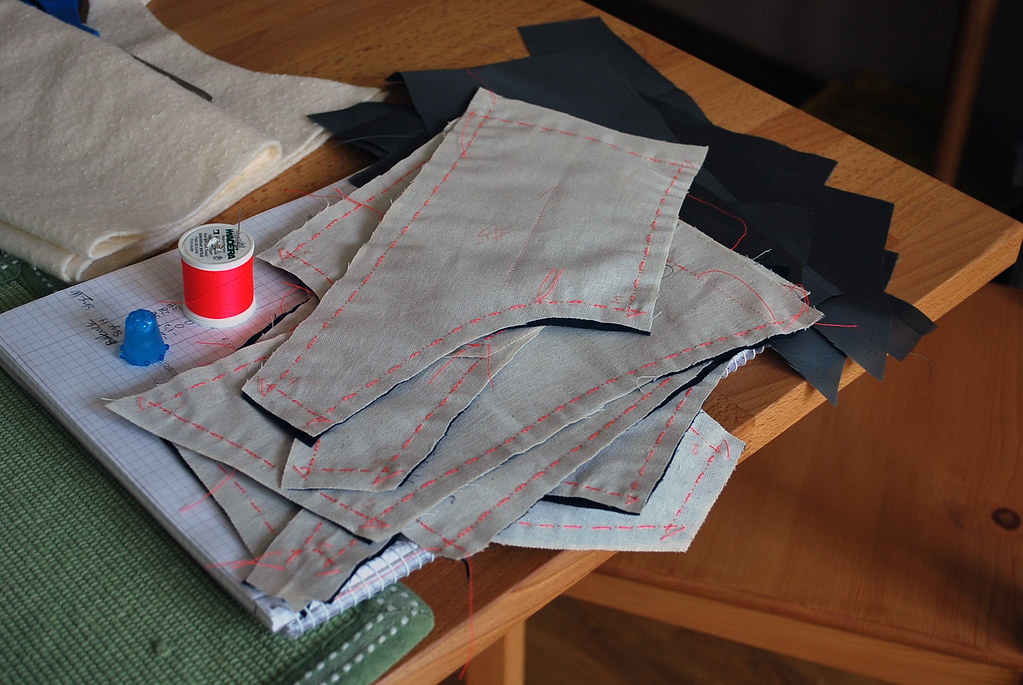
the pattern pieces, thread traced (c) adriprints
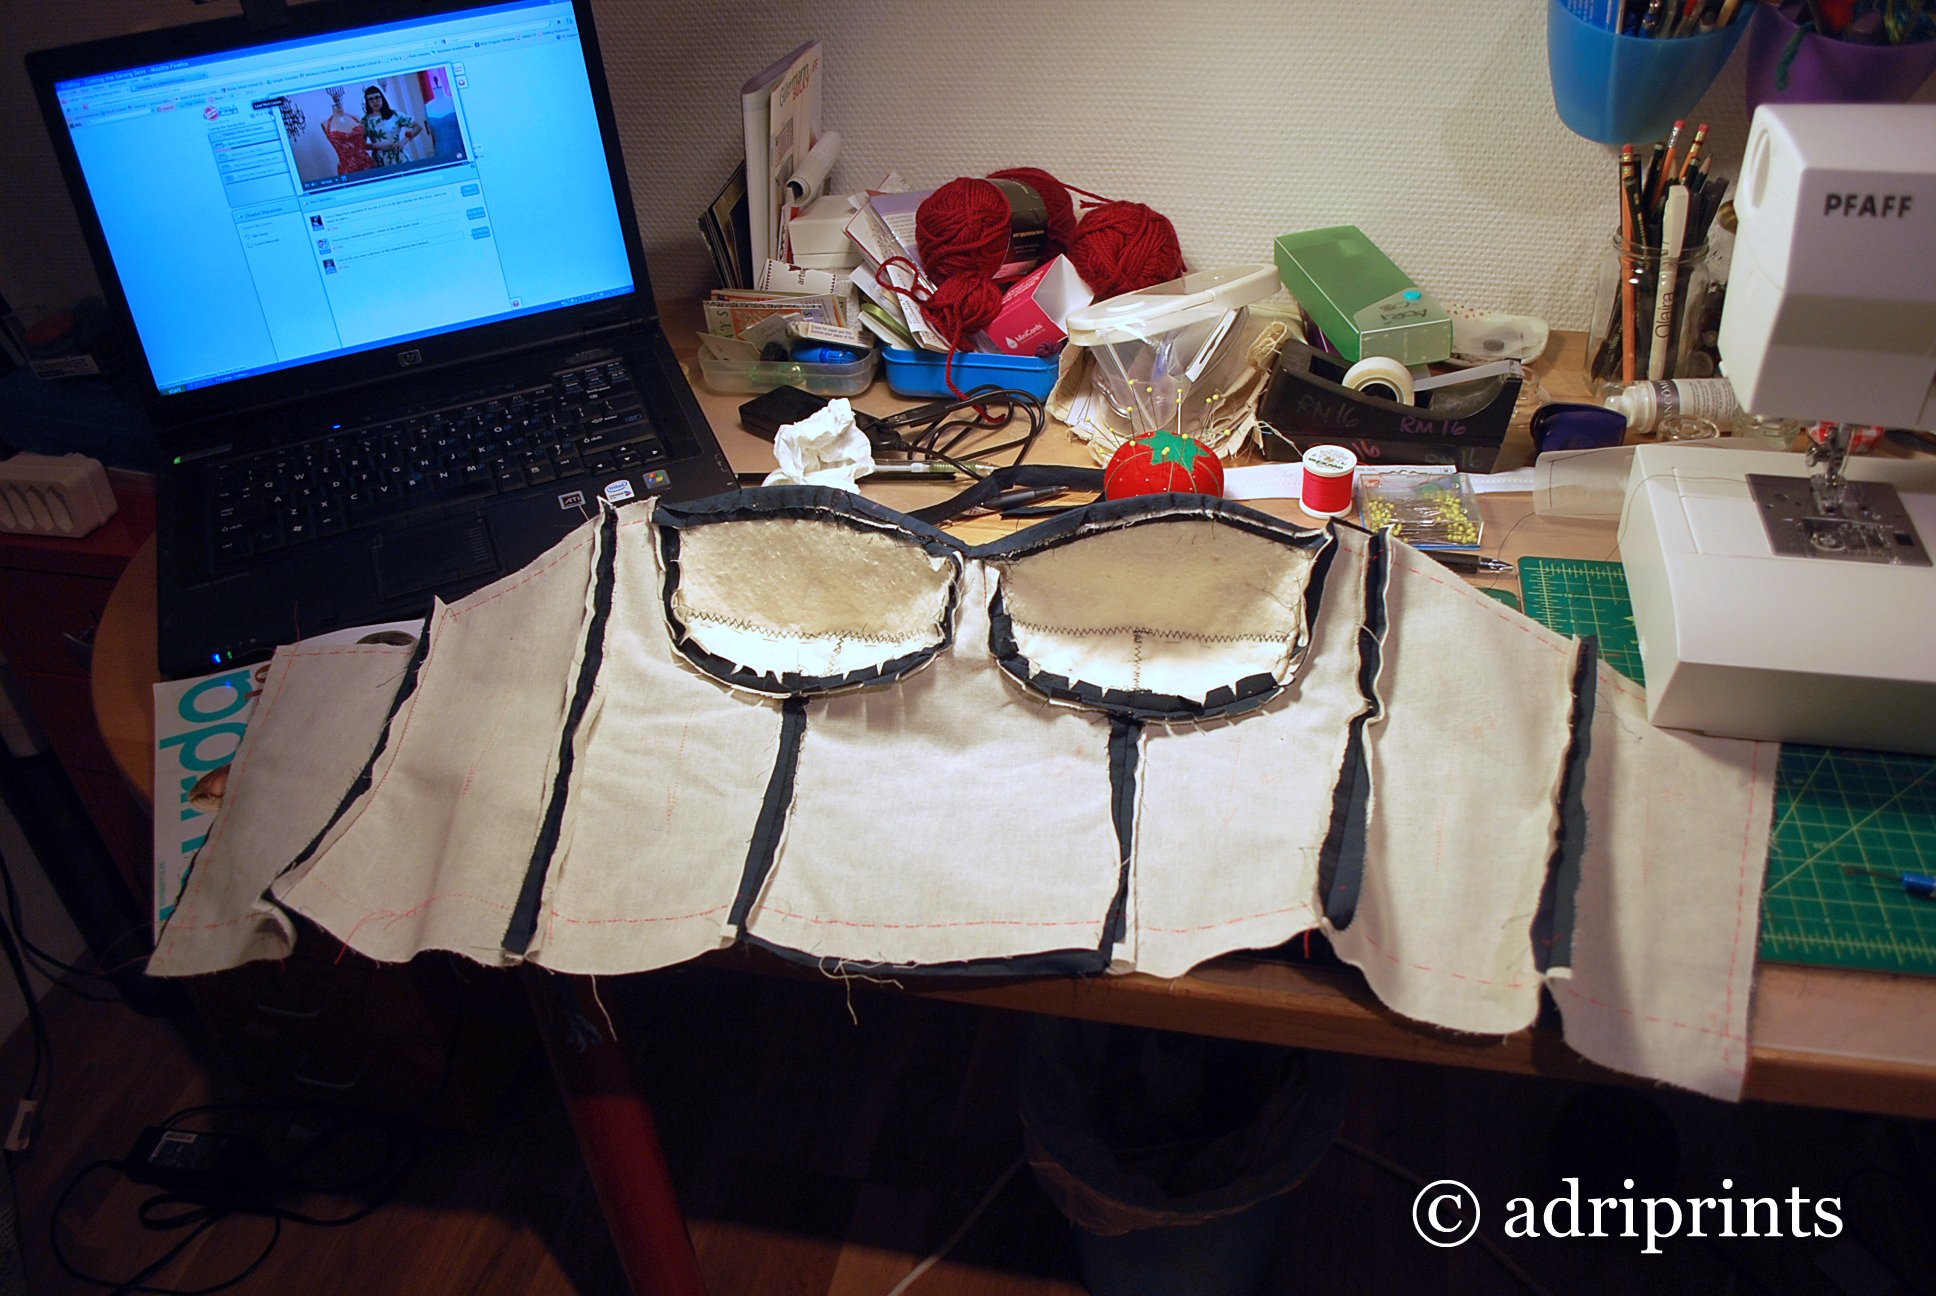
Once I cut into the dress fabric, I had already sewn the main pieces about four times.  So, this part went quickly.  Then batting (or foam or whatever you choose) is added to the bodice cups for stability.  This part was a lot of fun.  I loved sewing the cup pieces together and then adding them into the bodice.  You think you're halfway through here, but you're not.  You still have to build the inner lining and the skirt, remember?

the cups are stable!  oh, and learn from me... leave more seam allowances.
After the cups are in, you add the skirt to the bodice, and insert the zipper.  I had to re-do the waistline and revert to the original waistline.  I am high-waisted!  Then, I made the inner lining which holds the boning for more structure.  I thought I would have to wear a bra with this one, but not so; it's so secure it's not necessary!

the inner lining with the casings for the boning
After this, it's just a matter of hand-sewing that inner lining to the bodice and making sure everything's in place!  Photos of the final dress can be found here.