So, we've been in the midst of moving and settling into our new place. Unfortunately, having a new home office also means that we were disconnected from our old internet source. So, I have been unable to blog for a few weeks. That's okay, starting near the end of December, I will once again have internet and will be able to post my latest projects, patterns, fonts, and other ideas!
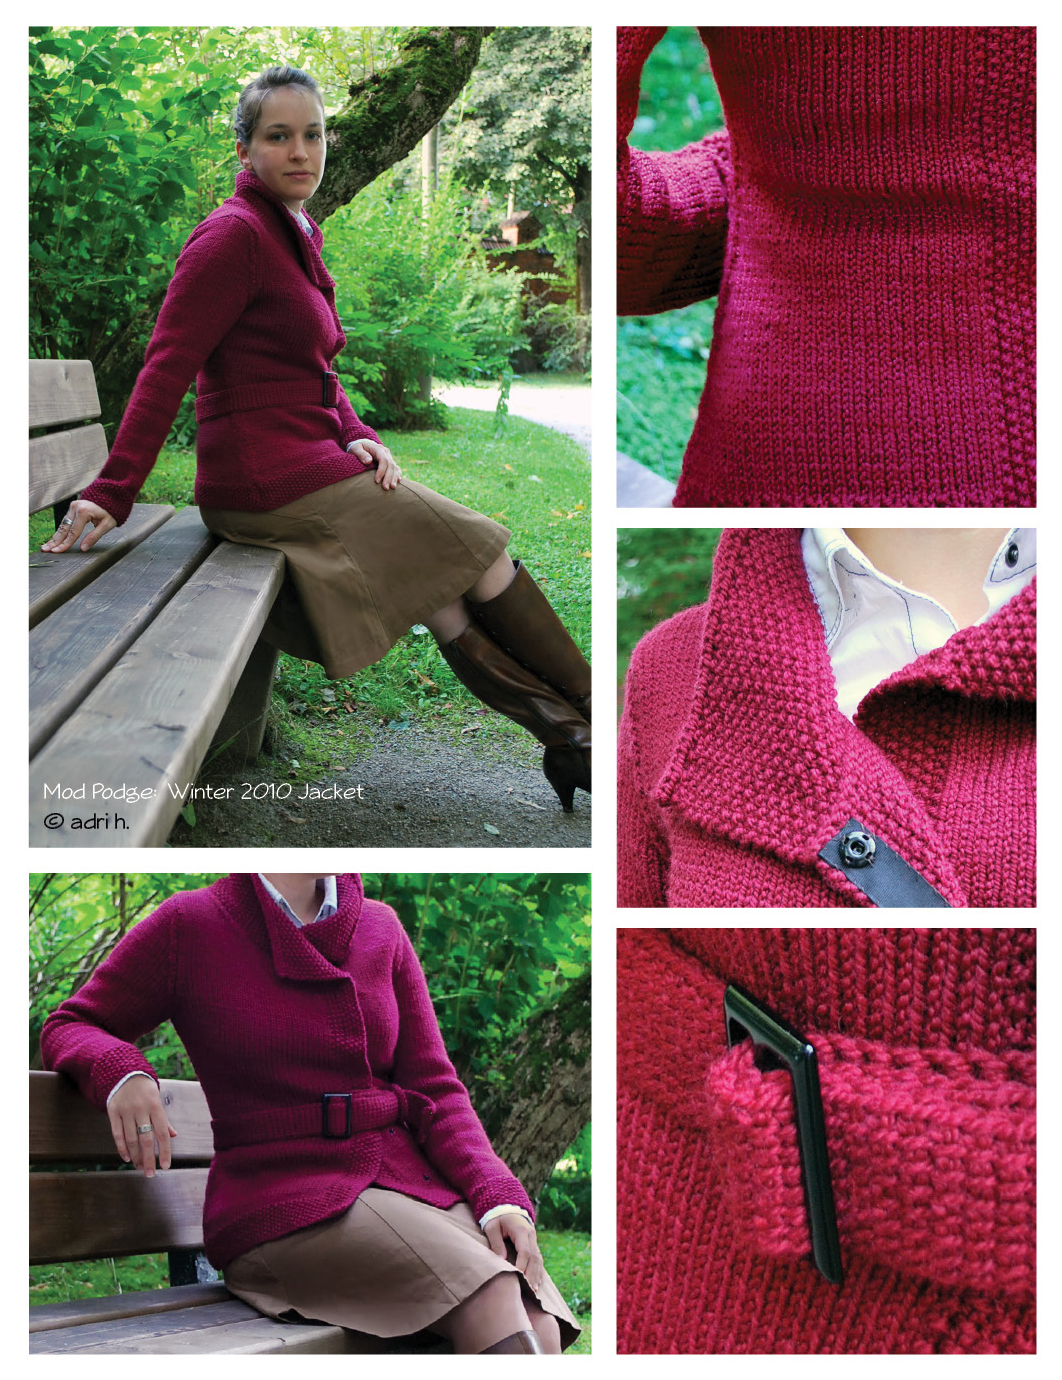
Just wanted to introduce my latest published design...
Mod Podge Winter Jacket!
If you'd like to buy the pattern and knit it yourself, Twist Collective has published it in it's Winter 2010 edition here or you can buy it directly from Craftsy here. Enjoy!
Tutorials on how to make the belt accessory can be found here and here.
It's been little over a month since my grandmother passed away, and I'm still reeling from it. Mostly, it just doesn't seem real. Then I come across a photo, or a letter (there are many), or think of something I have to tell her, and realize immediately after the stab in my heart, that she's really gone.
I don't usually talk about my personal life on this blog, but this blog is about me making stuff. And the whole reason I even started making was because my grandma took the time and taught me to crochet, taught me to sew, write calligraphy, and encouraged me to express myself through making. And now, all I can think of is her absence in the world. It's going to take a bit of time to get back into things.
I was so excited to receive a message from someone using one of my fonts in their work! I'm so glad they found it helpful. Fadima78 on Ravelry sent me a link to her lovely crochet scarf pattern called "Fan Pattern Scarf". In it, the chart uses StitchinCrochet in combination with Inkscape!
copyright Fadima78
Thanks for sharing your work! If you'd like to purchase StitchinCrochet for yourself, you can find it here!
To celebrate the upcoming pattern that will be published in Twist Collective, I've conjured up a tutorial on the Tunisian Simple Stitch (sometimes known as an Afghan Stitch among other names I've encountered). It really is a very simple stitch that uses a regular crochet hook as long as you don't require a very wide simple stitch. The pattern that is in the works uses the simple stitch to make a belt accessory. I've also used it to make a strap for a crochet bag, and it's very effective because it is a stable stitch and has a nice woven texture...
Here is what the finished stitch looks like:
Illustrated tutorial begins here:
1.
To begin the Tunisian Simple Stitch, you make a single crochet chain
with the desired number of stitches (plus one extra). Maintain this
number of stitches throughout. This kind of crochet is worked only on
one side so it's not necessary to turn the work.
2. Insert hook one stitch away from hook in the back of the stitch. Pull up a loop and keep it on the hook. Insert hook into the back of the next stitch and pull up a loop keeping it on the hook. Continue until you've pulled up a loop for every stitch in your chain counting to make sure you've the goal number of stitches on the hook.
3. Next, YO, pull through one loop. YO again, but this time, pull through 2 loops. Repeat YO and pulling through 2 loops until 1 remains on the hook. This remains on the hook and becomes the first loop on your hook for the next step.
4. Insert hook behind the vertical bar of the next stitch and pull up a loop keeping it on the hook. Insert hook behind the vertical bar of the next stitch and pull up a loop keeping it on the hook. Continue until you've pulled up a loop for every stitch in your chain counting to make sure you have maintained the goal number of stitches on the hook.
5. Steps 3 and 4 are repeated until desired length is reached. BO with crochet bind-off.
In a few days, I'll get the video tutorial up and running... Look for it in an upcoming post!
All of the images and illustrations in this tutorial are Copyright 2010, Adriprints Press. Please do not use them without express written permission of the author and illustrator. Thank you.
We had a late-night guest at our place a few weeks ago, and with nothing in the house except rolled oats, I decided to make oatmeal for us. Mostly, I am an observer of the oatmeal eater. My grandfather has eaten oatmeal for breakfast every day of his life. And, my husband eats it for breakfast, but both have exceptionally different styles of preparing it. Gramps makes it by boiling it with milk and a little butter. Hubs eats it straight from the package in a bowl with cold milk. Neither were ever very appealing to me as a breakfast choice, that is, until I came upon a recipe that used a lightly beaten egg in the mix. Hubs was incredulous, and had never dreamed of a creamy, warm, rich oatmeal (or was just to lazy to make it). I made the recipe with my own adaptations and both hubs and our guest were instantly converted to oatmeal made this way:
Tasty Oatmeal Recipe
makes about 2 servings
Ingredients
1.5 Cups Milk
1.5 Cups Rolled Oats
1 Egg (beaten)
3 Tbsps brown sugar (or maple syrup) to taste
1 tiny pinch of salt
1 Tsp Butter
Cinnamon (optional)
Instructions:
In a pan on med-high heat, mix together milk, egg (beaten), and sugar (or syrup). Stirring continuously until just boiling, add rolled oats and pinch of salt. Bring to a boil and then turn down the heat and continue to stir until desired consistency is achieved. ((I like my oatmeal thick with the oats themselves still having a bit of bite to them)) Add butter and stir until combined. Serve in individual bowls and sprinkle cinnamon on top of the servings (if desired). I've also seen fresh fruit like bananas, strawberries, and also raisins added to the oatmeal. Really, the options are endless...
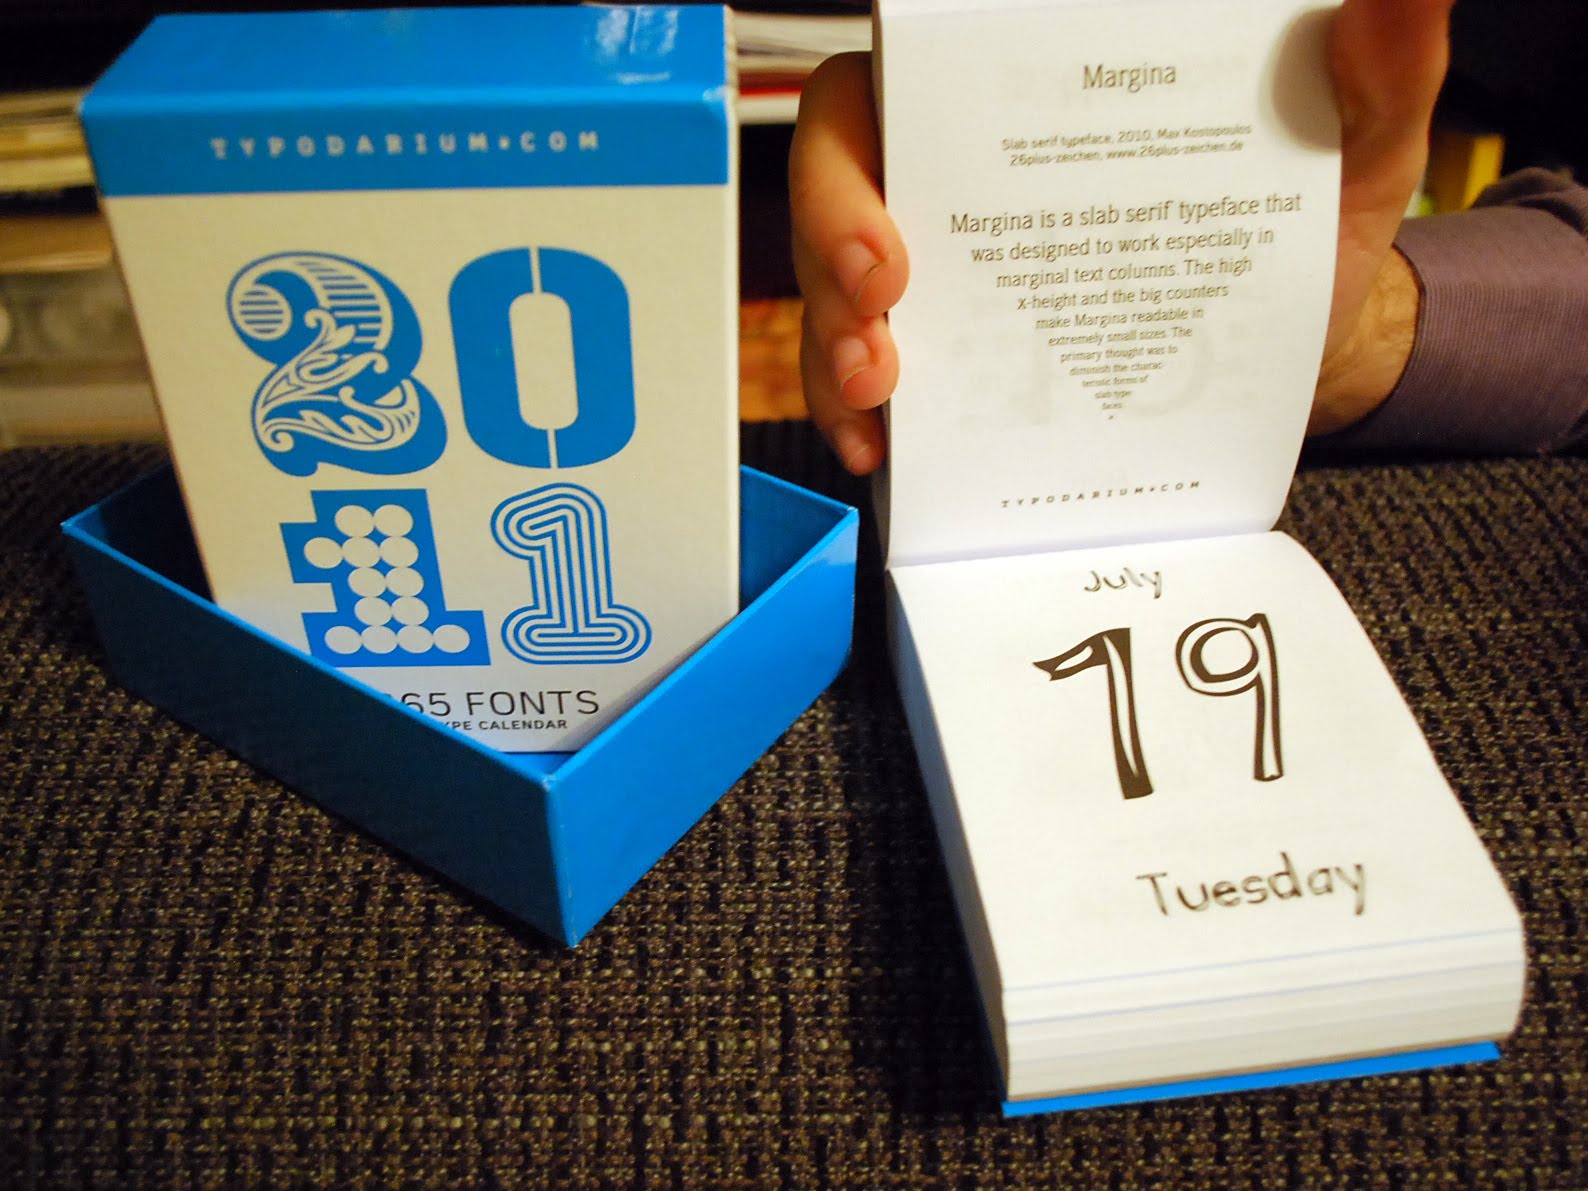
This past week I received my contributor's copy of the Typodarium 2011 Calendar... It's really cute! It's really an honor to have my fonts near those of Sudtipos, Linotype greats, and so many really talented typographers.
I'm not feeling all that well today, and with so much to do, complete, edit, make, etc...
This little t-shirt brought a smile to my face. Hope it does the same for you.
The longer I look at the illustration, the cuter it gets.
Working as a graphic designer means that you are somewhat separated from that which you design. You make something digitally and then six months later you see the printed results... This is one of those rare times where I actually got to see what I worked on get made nearly immediately! Here are some rough photos from my mobile:
This is an alligator that I designed as a sample piece for customers of an aluminum case manufacturer. Although it looks like a toy, it's pretty sharp because it's laser cut 1/8" aluminum. Not so friendly for the babies or those with sensitive skin, but very helpful to hold my pencils and other office supplies!
It's been a little bit since my last update and that's because I've been so inordinately busy!
I've been working with a local design firm as a graphic designer and illustrator. And, I'll be posting all the lovely work I've done for them once my contract is finished (and I figure out what I'm allowed to post).
One of my design proposals was accepted by Twist Collective, and the yarn is now in Germany but stuck in customs.
In recent events, I also ran a 7k (technically a 6.3k) on Thursday and had my fastest time yet for such a run: 41:04! That's faster than when I was in college and training for a half marathon...
Street Hanger's Vanessa Borge and I worked up some updates to bring a fresher look to the blog header, along with some major changes to the background, fonts and color. We brought back some of her original ideas of having a really colorful background, and I drew up some accompanying illustrations to bring a bit of flourish and to add some weight and presence to the header.
It's a cool site content-wise... Street Hanger is a consortium of all sorts of fashion forward "this and that-s" and I'm glad I got to work on it. You can check it out here.
A few weeks back a friend of mine, Diana, started some "Amish Friendship Bread" also known as Herman Bread Dough. All the recipes that came with it seemed so strange, included pudding or lots of oil, and after one not-so-tasty experience with my first batch, I decided to come up with a better solution...
Here are my Amish Starter Chocolate Chip Muffin-cakes:
I had about 500g of starter (1/3 milk, 1/3 sugar, 1/3 flour), and to that I added...
200g butter, softened and in pieces
(Want less fat content? substitute 50 to 100g with applesauce)
3 large eggs (at room temperature)
1 cup flour (~225-250g)
2 tsps baking powder
1/2 tsp salt
1 1/2 tsp vanilla (or vanilla sugar)
150g of chocolate chips.
Preheat oven to 350F or 170C.
It's tough because you're starting with wet ingredients and adding dry ingredients, but I'd start with a bowl of your Amish/Herman dough. Then add the eggs, one at a time and use a hand-mixer or a whisk to get it all blended. Then add the butter in softened pieces, and blend some more.
Combine all dry ingredients (except the chocolate chips) in a separate bowl. Add the dry into the wet ingredients until just combined, then stir in 100g of the chocolate chips reserving some for sprinkling the tops of the muffins once their poured in their respective spots.
Pour a few tablespoons of batter into each baking cup (until it was a little more than half full). Then, sprinkle the remaining chocolate chips over the tops of each muffin cup so everyone gets at least a few initial chocolaty bites.
Bake for 13 to 18 minutes or until a toothpick comes out clean from the center. Make sure you place your tin in the center of the oven (away from the edges) an on a baking rack (not cookie sheet- unless you're using individual silicone baking forms) so it can get even air circulation from all sides. If said toothpick doesn't come out clean, then try again in 3 to 5 supervised minutes. My oven cooks very quickly, but watch for some light browning around the edges.
I just had the pleasure of working with Vanessa over at Street Hanger, a lifestyle blog. She asked me to re-do the blog header and styling, and it was lots of fun. Here's what I came up with for the header...
She wanted a simple, stylish header to match her aesthetic, and I think whilst working together, we came up with something pretty pretty. Go team!
Next, I think I'm going to work up a background image to match... still visually a work in progress, but you can check out her blog here.
My Christmas present from my mom this year included this beautiful 50/50 silk/merino blend from Malabrigo in Raspberry. I knew I wanted a scarf and I knew I wanted something ruffly. The perfect pattern combination was found in Laura Chau's Cosmicpluto Knits: "Just Enough Ruffles".
Here's my adaptation... I used a thinner yarn, worked less amount of wrapped stitches, and an alternative bind-off. It's real pretty, I think.


