Showing posts with label patterns. Show all posts

Tuesday, December 1, 2015

Process: Advent Calendar Noel Image

Hello! I just wanted to introduce myself in case you hadn't met me before.  I'm Adriana Hernandez-Bergstrom!  I go by Adriprints on my work, and  you can find me really easily with that moniker.  I'm the founder of the Finch & Foxglove art collective, and I did the first illustration on our digital Advent Calendar.

I am a really process-oriented person and I love learning how others get to the images they do.  I hope you can learn a little bit from my process too!

The "Noel Peppermint Bark" illustration started off as a doodle that I did in August or September.  I was at my mom's house playing around with an old watercolor set that I had left at her house in case all my luggage was lost.  In my mind, I was working on a tropical-Christmas kind of theme...


In between then and now, our group came up with a wonderful color palette for our advent calendar.  We looked at vintage Christmas postcards to get us started.  These colors were rich and wonderful, but not really tropical... and I really wanted to use the "Noel" lettering.  So I traced the lettering in Adobe Illustrator with the pen tool, used a color from our palette, and started working on composition with the other illustration assets that matched the palette a bit better.  I had created these assets or icons a few weeks ago by painting in watered down gouache.  They were extras from the greeting card project I did in October, and I did a direct "live trace" using Adobe Illustrator to capture them...


Once I had a composition that I liked, I brought each element separately into Photoshop, converted them to Vector Smart Objects and began to add texture and depth...


I really wanted a rich feeling like chocolate in the background, and at first I tried mint + chocolate with the lettering...


But, as you can see it looked a bit too cold in this version.  It read like mold or marble or something unappetizing.  So, next I tried peppermint, and that is what you see in the final image.  A little bit tastier, I think!


This is just one of the many illustrations in our wonderful digital advent calendar.  Follow along on our Finch & Foxglove Advent Calendar page!

Tuesday, November 17, 2015

Ravelry Indie Designers Gift-Along 2015

I can't believe it's November! And, this means it's time for Ravelry's most amazing time of the year for independently published knitting patterns.  This year is no different, and I'm participating as a designer with 14 patterns on sale for 25% off their usual price...


AND, I'm offering a physical prize, too!  I'm offering a giclee (fancy term for high-quality inkjet) print of my knitterly illustration "6 Fabulous English Sheep Breeds".  So, if you're interested in winning it and/or hundreds of other prizes, check out the Ravelry Indie Design Gift-Along page full of information on the super-fun events to come.

  • Prizes
  • Games
  • Contests
  • Knit-alongs
  • Crochet-alongs
  • Machine-Knitalongs

All the details are on the Ravelry Gift-Along page and the magical gift code in order to make your 25% off of my knitting pattern dreams come true is there too!  Have a great time, and I'll see you there!

Wednesday, November 4, 2015

A Group of Charming Cuties

Last week, I had something very interesting happen.  I had a kind of cute-splosion.  I started illustrating for the children's apparel market so I can begin to pitch my work.  I did some short research by looking at my son's clothes and picking out my super-top favorites.... and then it all just flowed.

It was remarkable.  I just worked on Illustrator and out came these characters and their back-stories and little lives.  I kept wanting (and still do) to keep on drawing them and their accessories and interactions...


Next, I want to develop each character on their own!  What do you think?

Tuesday, June 2, 2015

Fancy joining a KAL?


Hello my fellow knitters,

I’m running a KAL for my pattern Wind & StormThe first 10 peeps who commit to the KAL will get a free copy of the pattern. All other participants will receive the pattern at a discounted rate. And for all participants that complete the pattern, I will do a raffle giveaway!

This KAL is to celebrate the re-release (this time self-published) of the Wind & Storm pattern which was originally published by Knit Now in Issue #30 in 2014.  I'm nearly done with the self-published version which will have its official release in the fall (mid-September) but I’ll have it up beforehand as a soft release and for the purposes of this KAL.

The KAL key dates are as follows: 
Start: June 15, 2015 
End: September 15, 2015
Yarn and knitting requirements can be found on the pattern page for Wind & Storm.
And, feel free to use the image above as your project image place-holder until we officially start the KAL! It's great to have people knitting the same thing as you and when you run into questions or issues, we all help each other!  It's a lovely experience if you've never done one before.


Thursday, May 14, 2015

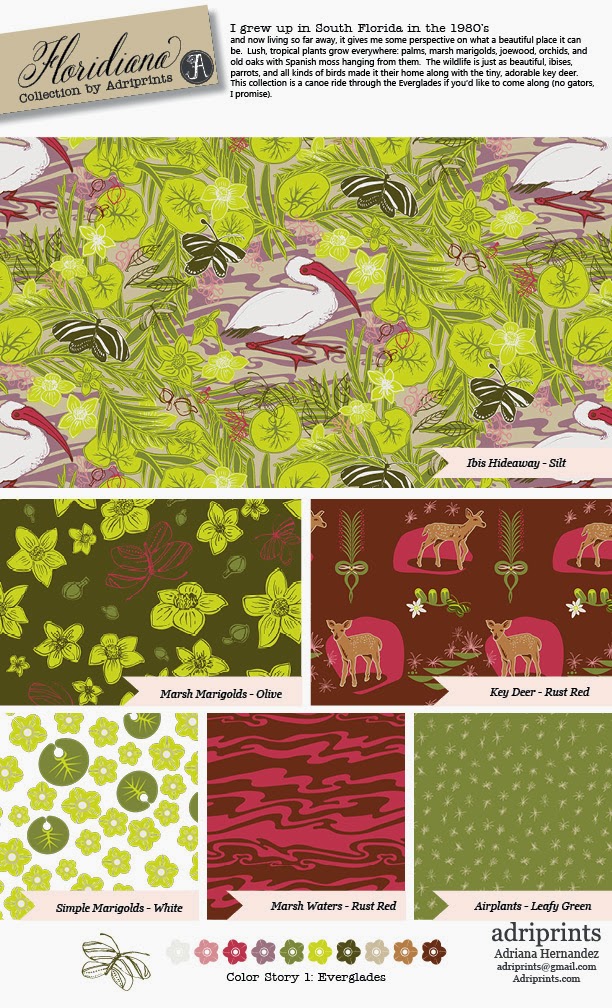
Floridiana: Behind the Scenes Part 2


I first signed up for Bonnie Christine's Surface Pattern Design 2.0: Start a Career Skillshare Class in April, but I kept a diary of my process, and thought it would be nice to share with you all, my readers.  This is Part 2 of 2 explaining my process behind the Floridiana surface patterns.

May 4, 2015

My first go-around at putting the patterns together with Palette #1(warmer colors)... I think I need some with more patterns with open space.  I see now that I tend to make very "busy" patterns.


 May 6, 2015
I tried my hand at doing  a room mock-up, and yes, confirmed that I need some patterns with less "stuff."  Okay!  Will do!


May 6, 2015: Finals Uploaded
May 7, 2015 - Edited Images for naming consistency
With so many patterns in the collection, I found that I had to go back and re-check to see if they were all exactly the same in all the final documents.  Maybe next time I will choose simpler names!

Color Palette 1: the Everglades (warm colors)


Color Palette 2:  Night & Day (Cooler Colors)


Mock-Ups
Some are better than others, that's for sure!  Here are my attempts at trying to pull a room together and  mocking up products using the patterns in the Floridiana collection. This is an area where I absolutely have room for improvement!


Phone Cover
Are custom i-phone covers really a thing?  I'm a bit behind in this trend.


Stationary
This mock-up excited me the most! I love paper and stationary!


Clothing
I think the KeyDeer print would make a lovely t-shirt... and dress, and skirt, and lots of other stuff too, but this post is waaaay long as it is.


Thanks for stopping by and making it through the entire project!

-Adriana


Monday, April 13, 2015

Working on Magic

Something clicked for me after MATS A, and that's the concept of joy in one's work.  I connected it finally with the idea of creating magic in an illustration. It's something I have struggled with for a long time, and am always working on.  So, this past week, I made it a point to focus on this element and re-work some past illustrations.

I started with my sketches from the Global Talent Search back in 2013.  I loved my sketches for this project, but ended up submitting something completely different and kicked myself afterward.

Anyway, I worked with this palette which I used for the competition and that I love, and it helped me focus on just having fun and making a sweet little repeat.

revamped repeat

original illustration from 2013

Next, I thought of a different concept with the playground scenario.  What if the playground animals came alive at night and had fun jumpin' around in a magical firefly forest after dark?  So, I re-inked the original sketches, illustrated all-new spring animals, and created a night-time palette to help me focus on illustrating.  Here is what I came up with:

alternate night time theme, 2015


Wouldn't it be so cool if it came in actual glow-in-the-dark fabric?  I keep thinking of a pajama set for my little guy that glows in the dark!  That would be neat!

Sunday, March 8, 2015

Picante Dirndl

When I was a kid, I loved comics.  I was a big fan of the "what-if" and alternate reality issues that comics would sometimes print.  This idea of "what if's" popped into my head as I posted about this past week's MATS Bolt Fabric Assignment, and it wouldn't let go.

What if... I did make a dirndl out of my own fabric?

I imagine it looking like this!  I used Burda's Dirndl Pattern 8448 as the basis for this visual mock-up.


I think that would be really unique to wear to Oktoberfest 2015!

Please note that I do not have any affiliation with Burda or their patterns, and I do not represent Burda or their parent company in any way.  Just an illustrator and DIY-er here.

Friday, May 9, 2014

3 Hours Past's Blank Canvas Tee: Maternity Hack

During Me-Made-May 2014 I'd like to share some of the me-mades I've made in more detail.  In order to see if I could replicate a maternity/breastfeeding top that I love, I tried my hand at drafting and here are the results!


If you're just starting out sewing with knits, a great place to start is a simple dolman sleeved t-shirt like the Blank Canvas Tee from 3 Hours Past the Edge of the World's Blog.  If you're past that, are ready to try some drafting, and would like to make yourself a breastfeeding or maternity top, then this is the mod for you!

Start with the Blank Canvas Tee from 3 Hours Past...

Added Materials

  • additional fabric because the length of the T-shirt is extended.
  • 1 piece of elastic - soft baby elastic or elastic about 1/4" wide that suits your fancy in the width of your t-shirt + 2" or so.

Extra Skills

  • sewing with elastic

Special Tools

  • twin needle
  • stretch needle 75/11  (a whaah?  Here's a needle guide from Schmetz)
  • pencil and ruler
  • maybe tracing paper if you don't want to write on your pattern
Inspiration: From boob design, this short sleeve maternity/nursing top is one of my faves.  It fits really well and the split top allows for belly room.


Okay.  Ready to make your own?
First print and assemble your pattern pieces from 3 Hours Past... Then, here's our goal: we want to create two pieces for the front that overlap by around 5" / 13cm for the smaller sizes.  You'll likely need a bit more overlap for the larger sizes or if you usually find yourself doing large bust adjustments.

The goals.
Measure from just below the armpit curve to your goal overlap length, then add 1" / 2.5 cm so you have enough to turn up a hem.  Trace what you have onto your fabric, or onto tracing paper to make pattern pieces.  I've highlighted what I did to the pattern in the photo below.


See the red highlight?  That's the top front piece.  The blue highlight shows where the the bottom front piece would be.  For the bottom, I took the design line straight up and did not taper in like the pattern - it's housing a big belly at the moment, and I thought it would be advantageous to have a little leeway.

The other change I made here was adding length.  Add what you will.  My goal was to have a t-shirt around 28" so I added a few inches to the bottom of both the back and front bottom pieces to achieve that.  I just followed the design lines to my goal length. To calculate length, I measured from the peak of the shoulder, parallel to the fold line.

Alright, you've traced and cut your 3 pattern pieces.  Do you have your edging pieces (no change from pattern) cut, too?  And those two strips of interfacing for the shoulders?  What interfacing? I used Vlieseline G785 since it's stretchy, lightweight, and works with knits. Everything cut? Great! Let's get these pieces ready to put together.

Assembly:

  1. Step 2 from pattern: Iron on interfacing to WS of back piece shoulder edges
  2. Front top piece - finish bottom edge with zig zag stitch or serge, turn up and twin needle the hem from the right side
  3. Front bottom piece - add elastic to top RS edge using a triple zig-zag stitch.  How?  I simultaneously slightly stretch the elastic while guiding the main fabric under the presser foot.  I do not stretch the main fabric.  Right hand for elastic, left hand for guiding fabric.  I do this 2" at a time so I don't lose my nerve.  Then, I fold over the elastic so I only see the final fabric, and straight stitch the bottom edge of the elastic.
  4. Overlap the two front pieces- With RS facing you, make sure the front top is on top, and the front bottom is behind it.  Make sure the overlap is what you desire and pin.  Stay stitch within the seam allowances (so ~1/8" from the edge) to secure the overlap.
  5. Step 3 to 9 are the same as the original pattern.
And there you have it!  You've made a maternity/breastfeeding t-shirt!  Feel free to change the neckline and make it a scoop neck like in the inspiration photo.  I like crew necks so I kept the pattern as is.  But, I think I'm going to try and make a tank or sleeveless v-neck.  We shall see!

Monday, May 5, 2014

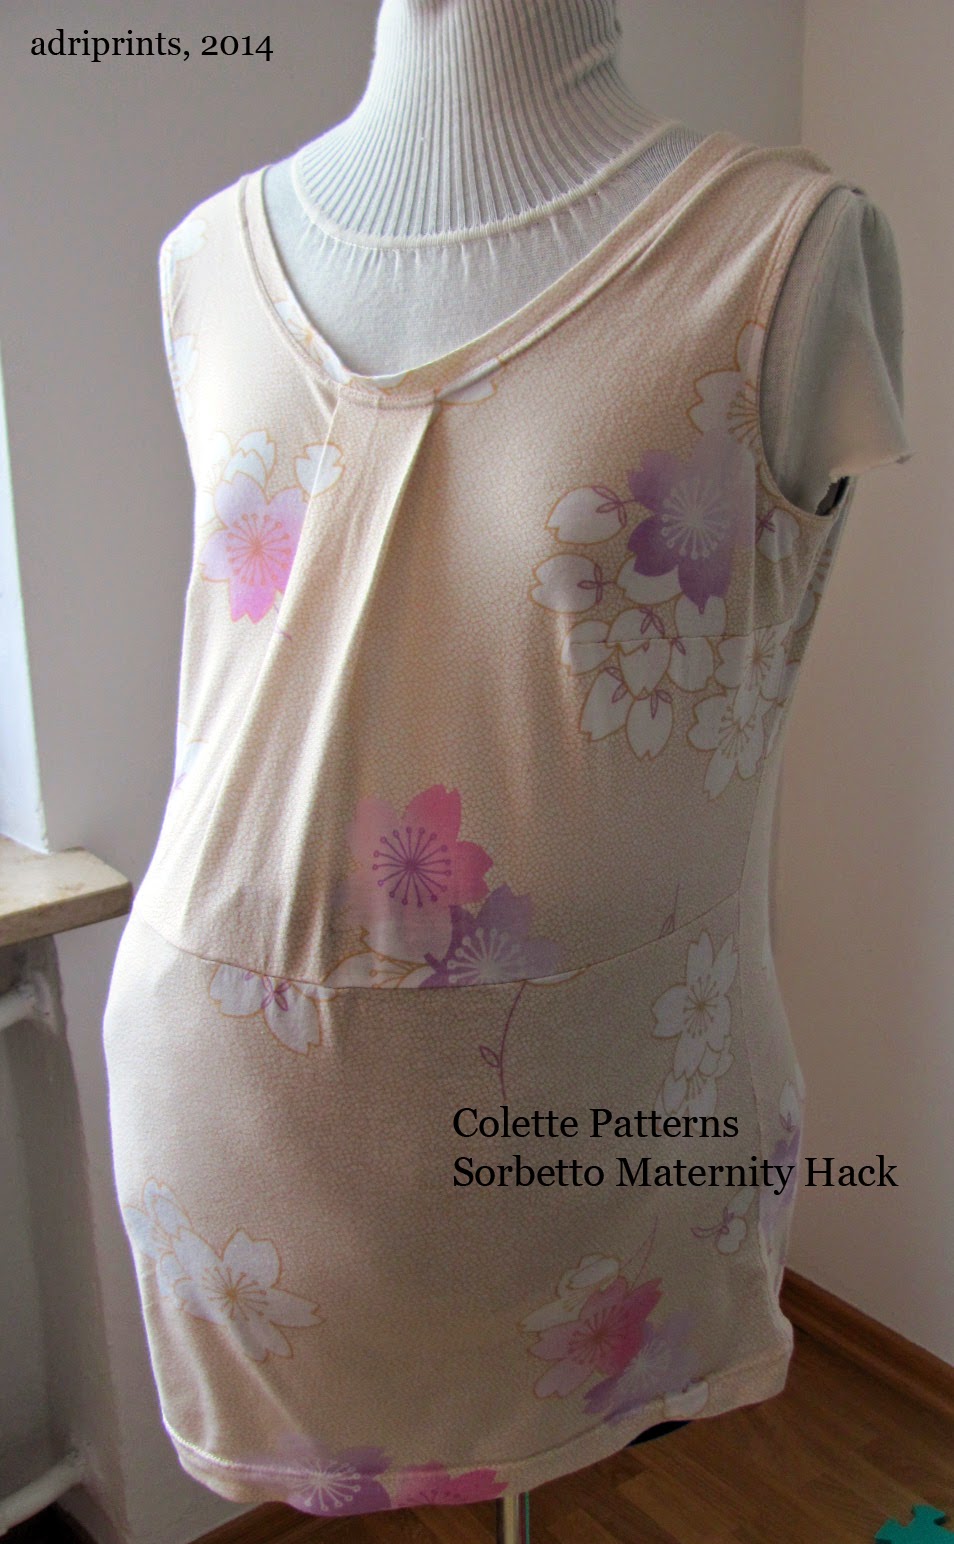
Colette Sorbetto: Maternity Hack

During Me-Made-May 2014 I'd like to share some of the me-mades I've made recently.  For week #1 of MMM14, I've been wearing this particular garment almost daily ((or rather, nightly))!  It's a maternity pajama based on Colette's free pattern, Sorbetto...


During this pregnancy, I've inherited so many things from friends.  One of my favorite items was a Sorbetto top I helped a friend make for her first pregnancy.  I took her measurements and devised a way to use the pattern to make her a top.  We learned that by leaving the bottom part of the pleat open, you get a lot of room for a belly.  We also added 5" of length at the waist for extra coverage.


One of the drawbacks of the first prototype, though, was that it was made out of plain cotton and so it did not allow for freedom of movement or stretch should you want to sleep in it.

So, when it was my turn, I thought about improvements that could be made to last year's prototype.  Firstly, I made the decision to try a single knit jersey.  I had a big chunk of single jersey fabric from my attempt at this "wrap dress pattern" from Burda... There was no way that dress was going to work for me, and so I was happy to chop it up for this Sorbetto Maternity PJ top.

Yes, that's my dressform with a bag of fabric scraps stuffed into a belly band
to simulate my enormous pregnant belly.  It's a little lumpy, but you get where I'm going.
I had to patch 2 pieces together for the front piece since I didn't have any pieces wide enough to trace the pleat at the front.  I once again added the 5" at the waist, and I only sewed the top 5" of the pleat down the front.

Secondly, all the edges were finished with self-fabric so they're stretchy.  This was done by cutting 1.5" strips and folding them in half, then using the serger to attach them to the edges before the shoulder and side seams were sewn.


So, if you're attempting this at home... 

Colette Patterns Sorbetto is your base pattern.
Drafting: Add 5" length to the waist of front and back piece (or more if desired).
Cut 4 strips of 1.25" self fabric or knit rib with max stretch going with the long edge: 1x strip @ 2" longer than the front neck circumference,  1x strip @ 2" longer than back neck, 2x @ 2" longer than the total armhole circumference.
  1. Make bust darts as written
  2. Sew only top 5" of pleat, stay stitch pleat at neck edge
  3. Attach edging to front and back neck edges (fold edging strip in half, 3 raw edges together, serge)
  4. Sew shoulders
  5. Attach edging to armholes
  6. Sew side seams
  7. Turn up hem, press
  8. Twin needle finish for neck edge and hem, single needle top stitch for armholes 

And that's pretty much it!  You can stabilize the shoulders if you want, but mine is a pajama so I don't really care, and it hasn't rippled even after washing.  The front neck edge could be tighter if I had used ribbed knit fabric.  And, that's it for now!

Wednesday, March 26, 2014

WIP: Zig Zag Quilt & Mitered Cardi

This past weekend, I made so much progress, but alas, I did not finish the quilt.

I do have the quilt sandwich ready to go, and am strongly considering a straightforward quilt-job instead of FMQ'ing.  See, the sewing machine shop sold me a FMQ'ing foot for my new machine (more on that later), but I could not for the life of me figure out how to install it.  I don't think it actually fits my machine.  So, I'll go check on that sometime this week.  In the meantime, here's my progress!

I finished piecing the top...


Added a border and pin-basted it to the batting and back...


All I need to do now is quilt!

As for the second Mitered Detail Cardi, here's where I'm at...


I've got to sew the side seams, knit one more sleeve, and add the edging!  So close!

P.S. If you haven't already entered, there's a giveaway in the previous post!  Feel free to enter and win a quilted fabric pouch.

Tuesday, January 14, 2014

A Simple Sock and a Side of Crepes

Compared to last week, these are some underwhelming makes I present to you, but nevertheless they are worthy things (to me at least).


Firstly, a sock.  Yes, a single sock.  Every year I make my husband a single sock, and I use the chance to try out different techniques.  None of the handmade socks I make him match, but he wears them just the same.  This one's a tad bit late, but it was worth it.  He actually said this was his favorite sock ever.  It's a completely bespoke sock!  He actually said, "any new socks you make for me, make them like this one."  This is a first for him, and for me.  Alrighty!  Will do!  He's never actually expressed any opinion about the socks I've made him previously, but he's always worn them.  It's nice to know he liked this one!


So, how did I make this sock?  It started out easily enough by using a figure 8 toe-up cast-on such as the one in this video here.

Then, after increasing to 64 sts, I knit even in stockinette for several inches.  Next, I increased for the gusset at the instep of the foot (where the arch is), and this is where it got a bit goofy.  I ran out of yarn.  I finished the increases with just enough of the grey-brown yarn, and then picked up where I left off with a dark purple-brown yarn.


And here it gets even goofier.  I tried out about four different kinds of heels.  Somewhere in the six months I used to complete this project - dropping it for the big projects you saw last week - I made a nubbin at the back heel. This nubbin looks like a nipple, and I still don't know how I did it.  Despite the request for future socks to be identical to this one, I think I will omit it from future versions of the sock.  The last note I made about the heel was that I would next try a short-row heel.  I worked every stitch of the heel in wrap/turn short rows and then picked up all the wraps and decreased all the sole sts.  Then I knit in stockinette followed by a 2x2 rib.  Simple as that!

I will share a refined recipe for the sock if only to clean up my notes and have an exact pattern for me to follow for this year's sock.  You interested?

And now for something completely different...

A Side of Crepes Recipe:

1 cup of flour
pinch of salt
pinch of sugar
1/2 cup of water
1/2 cup of milk
2 eggs

You know the rest (mix dry ingredients, add wet ingredients, etc. etc.)
Spread batter thinly on a hot buttered skillet.  Brown. Flip once. Light brown.
I topped these with bananas and nutella, apples and nutella, crushed nuts and apples and bananas and nutella... photos next time I make them.  These were snatched up right quick.

Wednesday, January 1, 2014

2013, A Year in Review

This past year's work collage:


So, what *did* I do last year?  And, did I meet my resolutions from 2013? Let me revisit my resolutions, and let's see how faithful I was to them...
"And, my 2013 New Years Resolutions...knitting- publish a few more patterns, learn brioche knitting. Crochet - do a bit more of it. Sewing- sew a pair of perfectly fitting jeans/trousers, drape 1 dress or outfit. Quilting- finish quilting the 2 quilts from last year and make 1 quilt. Design - learn more about WordPress to create an online shop"
Knitting - I definitely published more patterns than I was expecting: Lustig Hat and Gloves, Squishy Cabled Vest, Easy Lace Loop/Cowl, Rosita Hat and Mittens, Bow Slouch, Columbina Camisole, Tyrian Loop, and Laren Fingerless Mitts... phew!  And, two projects still aren't published... more about that in the near future.

Rosita Hat & Mittens, photo copyright Knitscene/ Harper Point
Brioche knitting - I signed up for a class, and started learning, but then forgot to finish the online course!  Oops.  Let's give that one a try again this year.

Crochet - I used it more frequently this year, and I made a few amigurumi gifts and used crochet as a border in some of my own projects.


Sewing - I did manage to create a pair of jeans that fit me really, really well!  BUT... then I grew out of them, and more on that in the near future.  I loved participating in Me Made May, and hope to do it again next year if possible.
((Confession.)) I still haven't draped anything!! I failed here.  I did start drafting skirt and bodice slopers, but definitely no draping!  ((Ugh.  Guilty feelings here.))

Quilting - I did way more quilting than I thought I could!  I learned to free-motion quilt and I finished a bed-sized brown quilt, a mini lap version,  the blue sampler quilt, a baby quilt, and a double-wedding ring quilt for a friend.


Design-  I finally got my portfolio site transferred to WordPress, but I still haven't created an online shop.  Anyone have advice on easy PDF distribution systems with templates on WP?  Also, I redesigned my crochet font StitchinCrochet(PRO), and released it!


2014...  Truth be told, I don't know what resolutions I should make.  I am anticipating some big changes in my life, and the only things I can hold onto at the moment seem very vague...

1) make some art:  get back into pen and ink, finish digital illustration commissions
2) make some things with yarn: finish hand-knit projects, use machine to stash bust
3) make some things with fabric: continue on the quilting and sewing goodness track
4) blog more efficiently and step away from the internet traps (facebook and cheesy news sites)

Happy New Year!
Cheers to the new year!

Thursday, December 26, 2013

New Pattern: Laren Mitts!

I hope everyone is enjoying their holidays!  Earlier this week, this sneaky pattern was published without me even realizing it!  :D  ((Cheeky chevrons, getting all published while I was holiday daydreaming... ))

photo: copyright Harper Point, Knitscene 2013


Anyway, Laren Mitts pattern is now available in the Spring 2014 issue of Knitscene!

photo: copyright Harper Point, Knitscene 2013


photo: copyright Harper Point, Knitscene 2013

They make a great stash buster and gift since they knit up so quickly!

Details:
-Sizes 6¾ (7¼, 8)" palm circumference; shown in size 7¼"

Supplies:
-Yarn Zitron Finest Royal Alpaca (100% alpaca; 109 yd [100 m]/50 g):
• #6057 kitten grey (MC), 1 (2, 2) skein(s)
• #6059 porcelain (CC), 1 skein

Gauge: 24 sts and 27 rnds = 4" in Chevron patt on larger needles

Tools
• Size 6 (4 mm): set of double-pointed needles (dpn)
• Size 4 (3.5 mm): set of dpn
• Markers (m)
• Stitch holders
• Tapestry needle

Monday, August 26, 2013

Columbina Camisole, knitted top pattern

Here's a new pattern out for August, my birthday month!


The Columbina Camisole was named for the delicate two-colored flower, and this simple two-colored camisole with lace edges is perfect for summer picnics. It’s also a nice travel project as it is worked flat from the bottom up. Lace is added from a provisional cast-on down to the bottom edge, and upward from open stitches. The lace edging is easy to memorize and can be blocked as rounded scallops or soft waves.


Skills required to complete the project:

  • provisional cast-on
  • knitting
  • decreasing/increasing
  • picking up stitches


The pattern does contain links to resources on how to do the provisional cast-on among other techniques.  And, if you'd like to know more about it, or purchase the pattern to make it yourself, it's here on Ravelry, and soon to be on Craftsy and Patternfish too.

The main knitting is very machine knit friendly, and lends itself to a very quick machine knit, and then the finishing lace can be completed by hand.

Happy Summer!