Showing posts with label baby. Show all posts

Friday, October 27, 2017

New gallery, New exhibit!


At the end of the summer, I secured a spot in a local co-op gallery, Carolyn Seiler & Friends in Cocoa Village.


So now some of my original paintings and giclee prints are available for sale, and you can come see my stuff in person if you're in the area! I also have an upcoming exhibition at the local library, the Merritt Island Library starting November 2nd! 


I'm very excited to show my latest paintings!


If you're further away, I now have an online shop so you can see my work and buy it if you would like a print! I'll post once it's open. It's OPEN!

In the meantime, if you'd like to buy my cards, I now have two retailers where you can always find them: 


And lastly, I'll be moving my blog to my website at www.adriprints.com/blog!
Have a great week and Happy Halloween!

Thursday, March 10, 2016

Surtex Prep!

Here at the studio, I'm in full-out Surtex prep mode!  Yes, it's only March, and Surtex is in May, but I hate leaving things to the last minute.  I tend to avoid last-minute frenzies and prefer instead to work at a steady pace...

So that's where I've been... in Surtex preparation!  (Ahem... getting ahead of myself, eh?) Ah yes, I should explain. 
What is Surtex?  It's a tradeshow for licensing illustration and artwork.  
What do I mean by licensing? That's when you rent your work out to different industries that need visuals for their products.  And, that's my aim along with meeting art directors interested in collaborating with me and asking me to illustrate people or flora and fauna for them!

My top three areas of focus are...

1) Surface design for apparel / home decor / gifts


2) Illustrations for children's literature


3) And greeting cards and stationery


I'm getting so excited!  I just sent my files to be printed as fabric swatches and I cannot wait to SEW with my own designs!!  I made my first prototype for what I'll be wearing during Surtex today, and I might very well be bubbling over with excitement!  (bubble bubble bubble)

Oh, are you going to be at Surtex too?  Let me know!  I'll be exhibiting as part of my art collective, Finch & Foxglove at Booth #543!

Wednesday, November 4, 2015

A Group of Charming Cuties

Last week, I had something very interesting happen.  I had a kind of cute-splosion.  I started illustrating for the children's apparel market so I can begin to pitch my work.  I did some short research by looking at my son's clothes and picking out my super-top favorites.... and then it all just flowed.

It was remarkable.  I just worked on Illustrator and out came these characters and their back-stories and little lives.  I kept wanting (and still do) to keep on drawing them and their accessories and interactions...


Next, I want to develop each character on their own!  What do you think?

Wednesday, October 14, 2015

Looks Like We Made It

We did it!  We made it to California, the baby and I, and all in one piece thankfully!  The first flight was a real doozy with lots of crying, squirming, and screeching, but the second flight went very smoothly.  It's our third day here and we're living amongst cardboard boxes and half-empty rooms, but it's really cozy nonetheless.

Our new place is a cottage.  It's the first time we've lived in a house-type dwelling with a yard as a family.  Before now, we've only ever lived in apartments.  It's very nice having a back yard.  And this yard has a beautiful towering avocado tree that's full of Hass avocados.  There are also a few citrus trees alongside it - one's a blood orange, but I'm not sure of the others... must study them.

Today we received a lighter/smaller kitchen table and chairs than the ones that are coming from Germany and so we finally have a place to sit.  We also had our gas turned on so we can bathe with hot water!  Yay hot water! So, things are looking up.


So what's with the rose finch? I've been working really hard on getting my art collective Finch & Foxglove off the ground, and so far we're off to a good start.  There are 8 of us from around the world and we've banded together in order to exhibit as a group at Surtex 2016.  I'm so very excited.  We are very supportive of one another's work, and we also give each other feedback and push our work so that we're showing our best.  It's nice to feel like you're not "going it alone" in the world.

I've uploaded some new work to the Finch & Foxglove site and will be updating my site too!  Here's a sample...


Monday, June 1, 2015

Feeling Crabby

Our little guy has been having lots of teething days.  On those days, he moans and groans and drools.  He is so sad and gloomy.  I suffer with him.  Teething sucks.   That inspired me to illustrate this one...


I learned tons about combining Illustrator's vector shapes with textures in Photoshop in this Skillshare class by Matt Kaufenberg.  I started out with a pencil and marker sketch.


Then, I found something that has been so freeing to me... sketching in Photoshop.  I know it's a weird hang-up for a traditional illustrator, but I hate wasting paper.  And, when you sketch a lot, you inevitably end up using loads and loads of paper.  And, no matter how cheap it is, you kind of feel the weight of how many trees you've decimated on your creative journey.  Okay, maybe it's just me.  In any case, it doesn't pain me to do sketches on layers in Photoshop.  Not. one. bit.  So, off I went!

I started off using traditional shapes for figure drawing (can't help my training!)...

 I knew I didn't want to go this route.  I have had a kind of artist's block when it comes to drawing babies.  Every time I attempted to draw my son, it came out so weird!  I wasn't happy with any of the results, so I just focused on expressions he makes when he's in a funk...

I had a breakthrough with that big head up top.  I then pushed the exaggeration of the size of the head even further.


After drawing the top one, I said out loud, "aww."  And that's when I knew I was onto something!  So, off I went using the techniques from the Skillshare class, and the end result is the first photo from this post.

Sunday, May 17, 2015

Toddler Streaky Legs & Moneta

That felt really weird typing the title to this blog post, but yes, admittedly my son is now a toddler and most definitely not a squishy baby anymore!  I finally finished one of his "Streaky Legs" poofy pants this weekend!

The Facts
⁃ Fabric: <1m single jersey, <0.3m ribbing for cuffs
⁃ Pattern: Ottobre "Streaky Legs" pattern
⁃ Year: 2014?
⁃ Notions: waistband elastic
⁃ Time to complete: 1 day for tracing and cutting, an hour for sewing
⁃ First worn: May 16, 2015
⁃ Wear again?  He has no choice! hahah!
⁃ Mods? Nope, they fit great on him.

and I finished Moneta from Colette Patterns for me!


The Facts
⁃ Fabric: 3m soft interlock, maybe french terry in turquoise
⁃ Pattern: Colette Pattern 1028 Moneta
⁃ Year: 2014
⁃ Notions: Framilon clear elastic
⁃ Time to complete: 1 day for tracing and cutting, 1 day for sewing
⁃ First worn: May 17, 2015
⁃ Wear again?  YES!
⁃ Mods? Yes, I would like to make the shoulders wider so it doesn't fall off my shoulders... or expose my bra straps to everyone.

Saturday, May 2, 2015

Funky Fresh Hat

My son finally fits into the hat I made him last year!

Remember the yellow and blue reversible hat (letter E in the photo)?
It was from the Hat Shop book, and was a great way to use up scraps.


It took nearly a year after his birth, but it finally fits...


We certainly make a funky fresh duo!

Monday, April 13, 2015

Working on Magic

Something clicked for me after MATS A, and that's the concept of joy in one's work.  I connected it finally with the idea of creating magic in an illustration. It's something I have struggled with for a long time, and am always working on.  So, this past week, I made it a point to focus on this element and re-work some past illustrations.

I started with my sketches from the Global Talent Search back in 2013.  I loved my sketches for this project, but ended up submitting something completely different and kicked myself afterward.

Anyway, I worked with this palette which I used for the competition and that I love, and it helped me focus on just having fun and making a sweet little repeat.

revamped repeat

original illustration from 2013

Next, I thought of a different concept with the playground scenario.  What if the playground animals came alive at night and had fun jumpin' around in a magical firefly forest after dark?  So, I re-inked the original sketches, illustrated all-new spring animals, and created a night-time palette to help me focus on illustrating.  Here is what I came up with:

alternate night time theme, 2015


Wouldn't it be so cool if it came in actual glow-in-the-dark fabric?  I keep thinking of a pajama set for my little guy that glows in the dark!  That would be neat!

Wednesday, October 15, 2014

Upcycling for Baby

We're slowly running out of the really small baby clothes, and after noticing a few gaps in the little dude's wardrobe, I decided to supplement with hand-sewn items.

A beautiful cashmere blend Christmas sweater that was mistakenly felted in the wash + scrap hemp fabric from cloth diapers + an Ottobre pajama pattern = a really warm romper for the baby!

I just placed the pattern pieces over the old sweater and added the gusset.  The ribbed knit provides a nice trim and a place to attach open-ring snaps for closure at the shoulders.

patches for the knees even though the little guy just learned to turn over

detail shot: crotch gusset and cowboy socks just because


An old favorite polo shirt that's too small + scrap jersey + Ottobre romper pattern = a new romper for baby!  This used the same principle.  I just traced the pattern over the old shirt at the shoulder level, and then filled in the missing elements with scrap fabric.  It worked out pretty well!  The scale of the collar is a bit silly, but it's nice to see my old shirt back in action.

polo shirt collar and placket saved

bottom hem conserved, ribbed knit and open-ring snaps added for closure


Thursday, October 2, 2014

Sewing for Baby, Ottobre's Spring Bird

Pattern: Ottobre 01/2014 Spring Bird
Fabric: double knit stripe from Stoff & Co. and double knit giraffe from another sewist
Modifications: truly double sided, buttons are on both sides of the fabric and snaps are too.


And, the LD finally wore it last week!


Wednesday, September 10, 2014

Adventures in AIO's (all-in-ones)

My latest experiments with cloth diapers have been with sewing all-in-ones (AIO's).  The advantage to this style of diaper is that you don't have a separate insert- the cover and insert are actually "all in one".


The disadvantage is that AIO's typically take a long time to dry.  This AIO is based on the TotsBots "BOB" (best of both) Easy Fit model here.  I love their diapers, but the latest version 4.0 only comes with velcro waist adjusters...


Why snaps?  Now that I've been cloth diapering for a few months, I have come to dislike sorting out anything with velcro (hook & loop) in the laundry.  So I went with snaps (poppers).  I've already had two separate incidents where super-strong velcros from baby's bibs snagged onto clothes and diapers. It's very sad to see scuffed and pilled clothing just because of an errant piece of velcro in the wash.  Grr.

After using these for a month I can say they work!  They also dry fairly quickly - not as quick as the TotsBots, but much faster than some of the other AIO's I have.

How these were made...
before sewing the outer/inner together... don't use pins

Pattern:

  • This video from Little Bundas for general techniques.
  • This pattern, 3x3 AIO round tab from Arfy of Prefold2fitted Blog
  • These written instructions from Tutu Mafia/Cloth Revolution's Sewn-In Diaper here.  These instructions plus the video above were crucial for me to get a good end result.  I also had the TotsBots diaper to look at for help.

Improvements for next time...
I need to fold over the edge where the suede cloth and the PUL edge overlap.  I left the PUL edge raw and it's stretching a bit thin.  I also think I'm just gonna do suede cloth and the insert inside (instead of PUL on the inside).  And, lastly, I've got to better reinforce the sizing snaps at the front center with more PUL.


Materials:

  • outer is Eco-PUL from Diaper Sewing Supplies this pack here.
  • Alova suede cloth for the back flap also from Diaper Sewing Supplies
  • the built-in insert is 1 layer velour (closest to the baby butt), 1 layer bamboo terry, 1 layer hemp with PUL at the front

chalk markings for centering snaps


Saturday, August 16, 2014

Knittin' for Baby: Striped Coverall

And, another project completed just fast enough to wear once.  Ah well.  At the very least, it made for some nice photos.


Can I also recommend a little something to knitters who follow in my footsteps and think that open-ring snaps are the way to go?  Here's my advice... reinforce the knitted fabric with some kind of backing.  Either a thin strip of jersey or something.  The prongs are kind of ripping into the button bands.  Argh.  What was I thinking?!  Oh... I wasn't.  I just wanted to "get 'er done."  And so it goes...


Project: Striped Coveralls for the little dude
Pattern:  All-In-One in Deramores Baby DK (1009) by Deramores Retail Ltd
Yarn: Debbie Bliss, Baby Cashmerino in Dark Green and Grey (1.5 skeins of both colors)

Modifications:

  • Solid color sleeves
  • Shortened sleeves to prevent the LD from eating the cuffs.
  • Added a crotch gusset as seen below... because there was no way they would fit over cloth diapers or at 3 months... and the LD is kind of an average sized 3 month old.


Saturday, August 9, 2014

Two-Part Nappies Revisited: Part 2

A quick tutorial on how to make your own diaper inserts using my pattern (or your own drafted pattern).
These diaper inserts require an outer waterproof cover of some kind, and will fit from newborn to 6kg+ (at least they're still working for us!).

the absorbent inserts inner flannel / outer terry cloth
Materials
  • Absorbent fabric (German term in parentheses) such as flannel (Flanell/Molton), terry cloth (Frottier), hemp fleece (Henf), or jersey, etc...  Feel free to recycle materials you already have; like an old flannel blanket, an old sweatshirt, or a towel.  I use terry-cloth on one side because I like to use Snappis and avoid hook & loop closures, but feel free to use whatever closure method you want.
  • Elastic (I used 1/4" wide elastic that is resistant to high heat)
Instructions
1- Place the paper pattern on the fold, and cut your materials for the diaper insert.  Don't forget to transfer all markings to your fabric.


2- Cut fabric for center pad (it's that center rectangle with the dotted line in the pattern).  I cut 2 layers of bamboo terry-cloth.
3- Layer the 3 elements as follows: absorbent material #1, pad rectangle(s), absorbent material #2.


Center the pad, and secure all three layers with pins.


4- With the smoothest fabric facing up, sew 1/8" to 1/4" within the four edges and across the center of the pad to secure it in place.


5- Measure the elastic band for the sides and top, then cut elastic 2-3” shorter than the measured length.
6- Tack both ends of the elastic where indicated and pin at the center.  Make sure to leave a little space on the outer edge for finishing the fabric.
7- Use a zig-zag stitch to attach the elastic on the back of the insert and the leg openings, stretching the elastic between the two outer layers as you go.


8- Use a zig zag stitch or overlock around all the outer edges to finish.  I stretch out the back and sides while feeding it through the overlocker.  I do not serge over the crinkled/gathered edges.

Wash a few times, and then let baby poo all over your work! Hahah!

Friday, August 8, 2014

Two-Part Nappies Revisited: Part 1

This post covers lessons learned in making diaper covers at home.  In cloth diapering, the outer cover is a waterproof barrier that prevents leakage.  These can also be used over regular disposables to prevent leaks, or just because they're really cute.


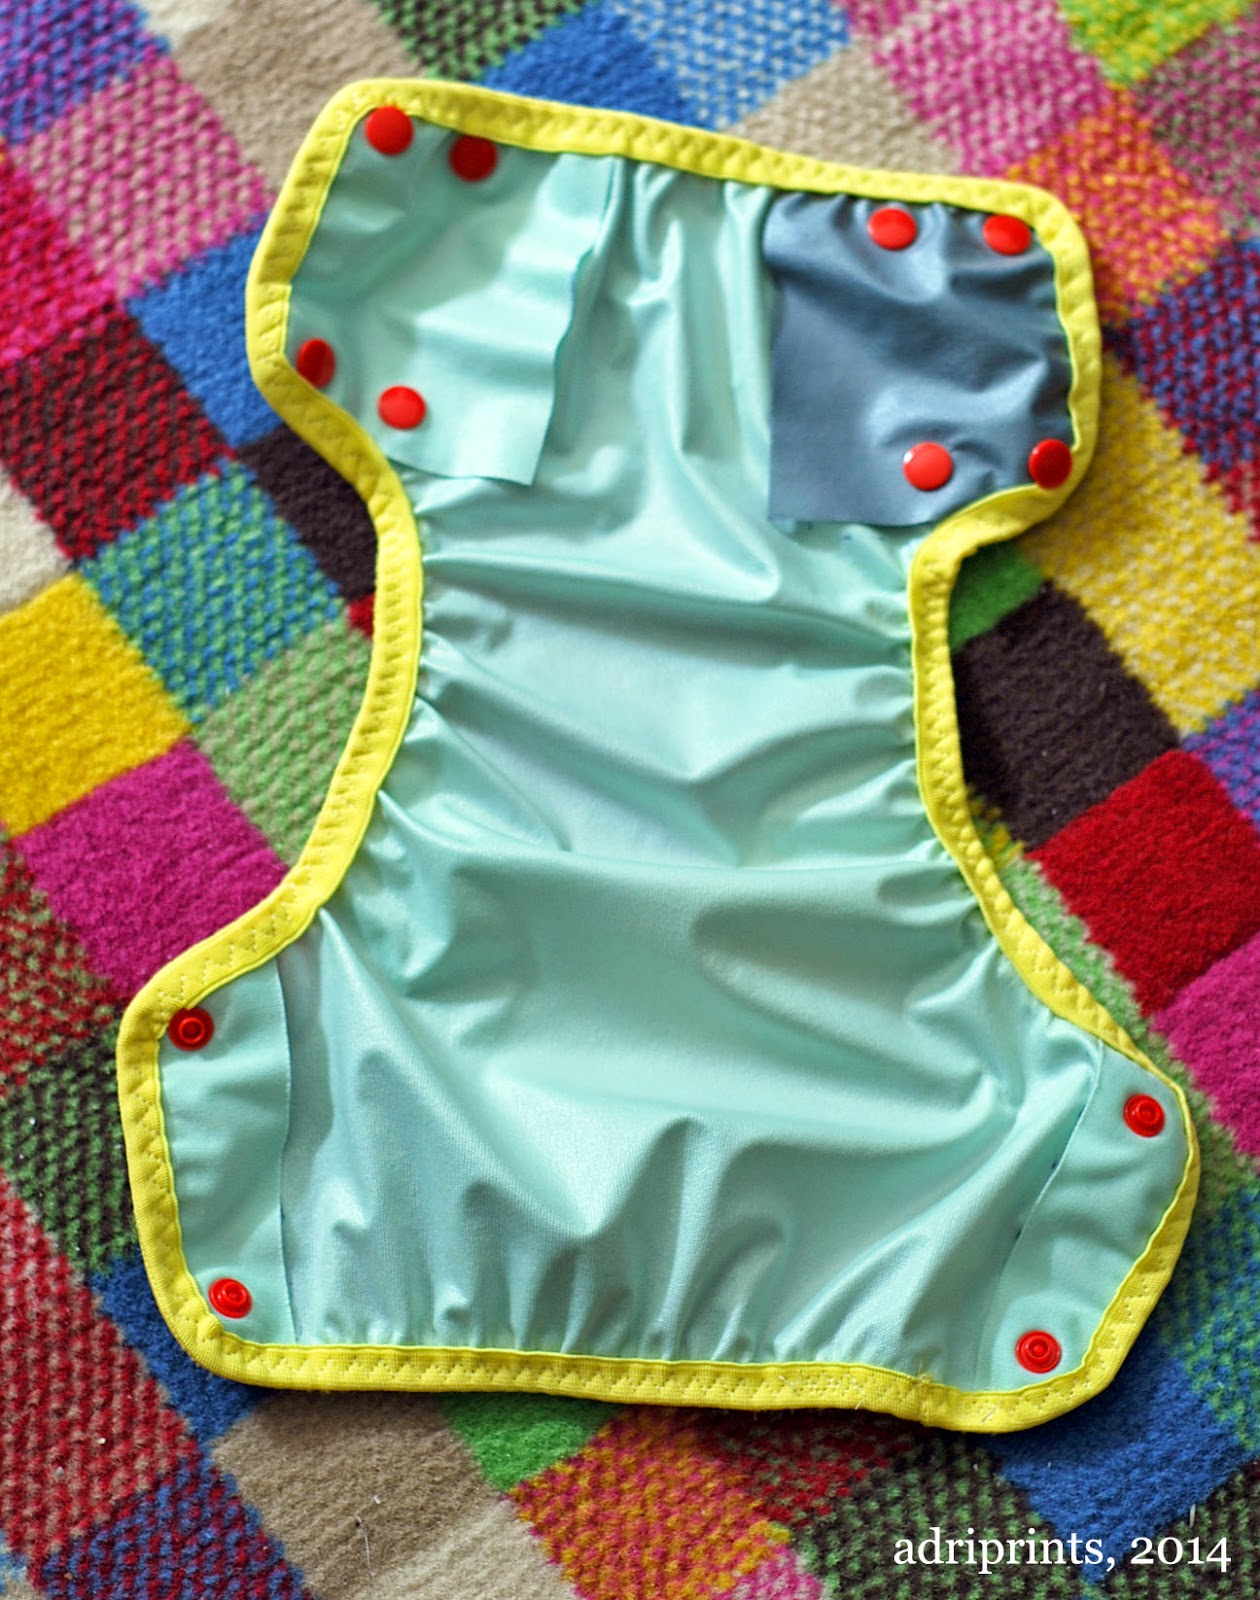
After a few mishaps and lots of leaks, re-purposing PUL, and studying more cloth diapers, I think I've found a few types of cloth diaper systems that work for the little dude.  This particular diaper cover is a homemade version of Motherease's diaper cover the Air Flow.  It works really well with the diaper inserts I make at home (more on that later).  These are not easy to come by here in Germany, so to me it's worth the effort of making more of them.

What I've learned so far:
FOE - fold over elastic goes on a LOT easier if you use a triple zig-zag stitch.  This video was key.
detailed photo of the inner wing of the diaper cover


KAM snaps - these snaps make a better seal with the Eco-PUL I bought from Diaper Sewing Supplies when there are 3 layers, and it's been exposed to warmth (i.e. it's been through a 60* wash and tumble dry).  That's it!  That is what was missing last time.  I didn't wash/dry the cover before trying out the snaps, and it was too thin.  Now I'm kind of sad I chopped up the grey & yellow cover before washing/drying.  It may have been salvageable.  Oh well.


With my latest effort, I went with a retro color combination!  Aesthetics aside, they work really well.  No leaks or poo-splosions yet!


As for the diaper inserts (the absorbing inner part of these two-part systems), I've drafted a pattern for anyone who wanted to try it on their own!  You can download it from the Google-Drive link here.

Come back this weekend to see the photo-tutorial on making your own diaper inserts!