Thursday, January 21, 2010

Tutorial: How to Knit a Beaded Butterfly Stitch

I've been working on writing a vintage-inspired top pattern for a while, and I've been waiting to publish it here because I've submitted it to an online knitting magazine.  As a result, I'm waiting for their response and didn't want to violate the soft terms of submitting a pattern proposal. But, in the meantime, I will explain the star technique used in my upcoming pattern:  the beaded butterfly stitch. It's the feature stitch in my upcoming pattern currently named "Social Butterfly". So, for those of you who are interested in learning how to knit this very cute stitch, here we go...


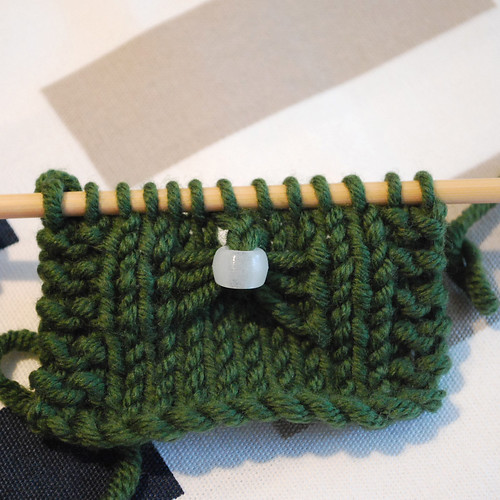
Notes: All slipped stitches (as in rows 1,3, and 5) should be on the right side of garment, final stitch (row 6) is worked from wrong side if knitting flat and includes the bead for the center of the beaded butterfly stitch...

Rows 1, 3, and 5: Knit to start of butterfly stitch.  With yarn in front, slip 5 stitches purl-wise and return yarn to back and knit however many stitches to your next butterfly stitch.  Repeat to end of row...turn work.  Rows 2 and 4: Purl, keeping stitches a little looser where the slipped stitches are located.


Row 6: Working on the back side, Purl to center stitch of slipped stitches (stitch 3 of 5).


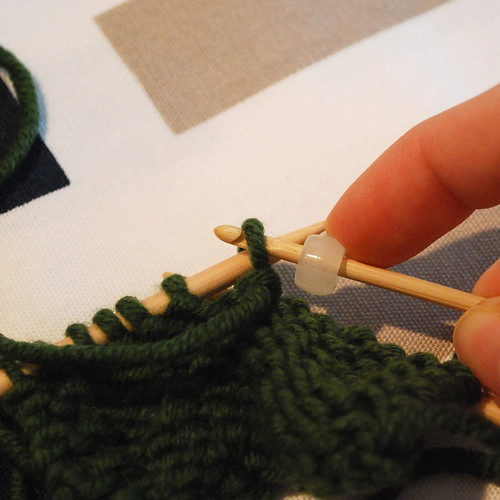
Place the last worked purl stitch back on the non-working needle and use a crochet hook to slide a bead onto the stitch.

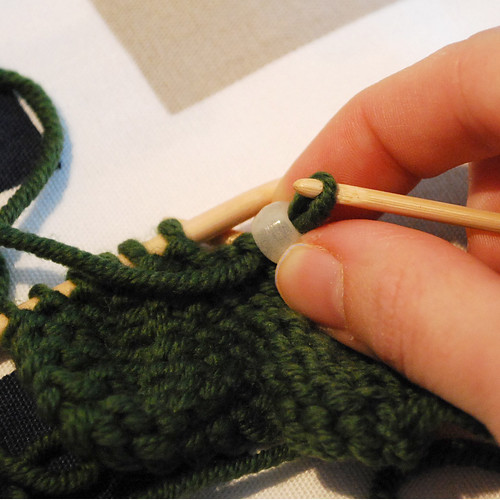
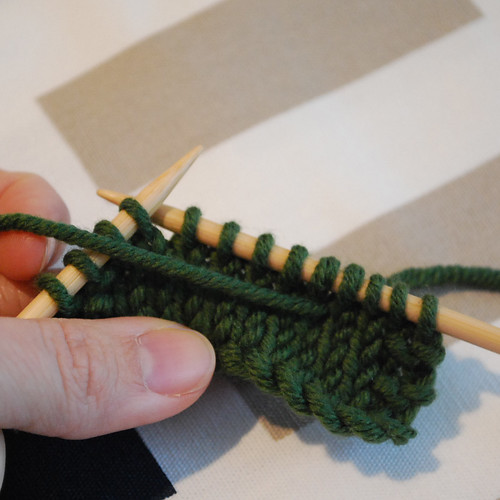
Take the right needle and from bottom to top, scoop up all three rows of slipped yarn from the RS of garment.


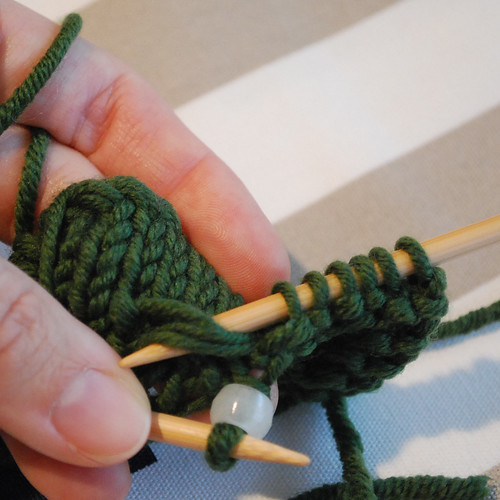
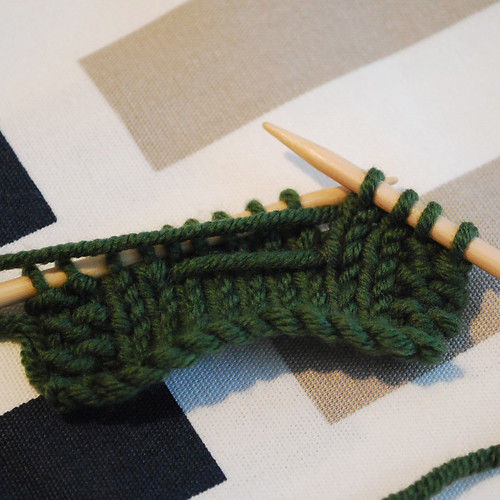
Pass the last worked purl stitch (the one with the bead) to the working needle, and guide it underneath all three rows of slipped stitches whilst keeping things loose.

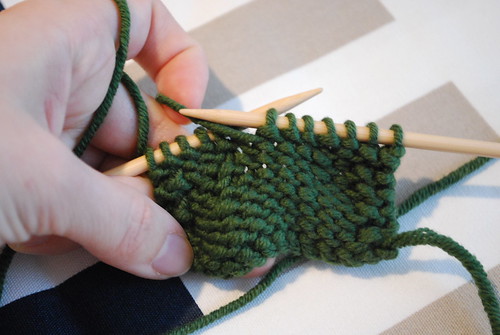
Place this purl stitch back on the non-working (left for me) needle and purl it again to secure the butterfly stitch. Continue in pattern...
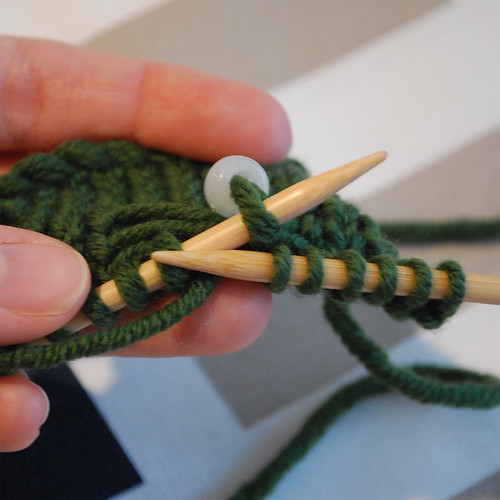

There you go!

Wednesday, January 13, 2010

New Yarn: Wabi Sabi Yarns are here!

It's here! The Wabi Sabi Yarn direct from yarn artisan Lisa in Boulder, Colorado (aka Wabi Sabi Yarns and/or Poppy Flower Fibers) has arrived. I'm so excited! The package arrived whilst I was barely awake, but now that I'm fully conscious I am totally appreciating these colors. Thank you, Lisa!!!

"Jaded" is much more intense and richly colored in person than what is pictured. Somehow the camera just does not absorb the deep green tones. The color reminds me of ancient jungle temple ruins. I think my mom will love this! Absolutely beautiful yarn and color. I hope my knitting will do this yarn justice.


"Dark Mocha" is a superwash merino & sea cell mix and it really does "glisten" as the yarn's description says it does. I have plans for this beautiful yarn... I think it will be a tunic of some kind, something like the "zickzack tunic" from Interweave Knits Spring '09.

Monday, January 11, 2010

Textile Design: Toile de Jouy

For the upcoming Spoonflower contest, I illustrated several vignettes and put them all together in the style of a Toile de Jouy motif...

My theme centers on animals taking on human roles, but it is somewhat frivolously taken on as a theme because you still have birds nesting and flying, and sheep still grazing. I had lots of fun drawing it! I love drawing in this style. It brings me back to my printmaking days...

See more colorways here.
A little about toile de jouys... Turns out that these types of prints (printed textiles) have been around since the 1700s and originated in France in a small village near Versailles by a German-born entrepreneur(Christophe-Philippe Oberkampf). The designs were at first mainly floral textile motifs printed on cotton using wood-block printing techniques.
When I read about toiles, I marveled at the fact that it was stamped by hand, and the factory produces thousands of these wood blocks until turning to copper as their printing method of choice. Crazy. Makes one appreciate the marvels of modern digital printing. BUT, I still love the process of printing by hand... Hmm. I still have my silkscreen...


Thursday, January 7, 2010

Printed Textiles

I just wanted to share the printed samples of my printed textile designs...


They're available for purchase through Spoonflower, a fabric printing website, here.


Monday, January 4, 2010

Finished Objects: Bond


One of the easiest patterns I've ever knitted, and one of the most satisfying. It's a very practical, comfortable, and lovely design, and I hope that some of my work ends up in this category.

This is "Bond" designed by Kim Hargreaves. Her work is often featured in Rowan knitting as she was a designer for Rowan for over twenty years. The original "Bond" is supposed to be long-sleeved or 3/4 sleeves, but seeing as I had 20 grams of yarn left after finishing the bodice and collar, I improvised with cap sleeves and the end result is exactly what I wanted.

I'm so pleased with it, and I offer my adaptations to anyone else with a short torso and not enough yarn:

I used Alpaca with a Twist's "Baby Twist" Jumbo Hank in Carnival Red.

I skipped an inch of knitting after the waist decreases. Then, I modified the front curve of the slash neck. I followed initial directions for slash neck shaping:

-Knit 14 sts onto needle, but then…

-Dec 2 at neck edge (i.e. right-front - K to 5sts remaining K2tbl K1 K2tbl) and continue decreasing two sts on every alternate row until 6sts remain on needle.

-Dec 1 st on neck edge (i.e. right-front- K to last 2 and K2tbl) every alt row until 3 sts remain.

-Work 1 row, then bind off remaining 3 sts.

Knitted only 1.25” for collar.

I also knitted cap sleeves instead of long sleeves or 3/4 length sleeves.

For cap sleeves:
CO 18 sts with 4mm needles and on every RS row, inc 1 st on each end (i.e., +2sts every RS row). I used the knit through front and back loop method to increase on the ends.
When piece measures about 4” from cast on row, switch to 3.5mm needles and K3,P3 rib for an inch to match collar. Bind off.

If you have more yarn than I did, but wish for short sleeves, I recommend following the instructions for the sleeves here. The pattern is in German, but you can see the diagram at the bottom (in cm) to get the idea.