Street Hanger's Vanessa Borge and I worked up some updates to bring a fresher look to the blog header, along with some major changes to the background, fonts and color. We brought back some of her original ideas of having a really colorful background, and I drew up some accompanying illustrations to bring a bit of flourish and to add some weight and presence to the header.
It's a cool site content-wise... Street Hanger is a consortium of all sorts of fashion forward "this and that-s" and I'm glad I got to work on it. You can check it out here.
A few weeks back a friend of mine, Diana, started some "Amish Friendship Bread" also known as Herman Bread Dough. All the recipes that came with it seemed so strange, included pudding or lots of oil, and after one not-so-tasty experience with my first batch, I decided to come up with a better solution...
Here are my Amish Starter Chocolate Chip Muffin-cakes:
I had about 500g of starter (1/3 milk, 1/3 sugar, 1/3 flour), and to that I added...
200g butter, softened and in pieces
(Want less fat content? substitute 50 to 100g with applesauce)
3 large eggs (at room temperature)
1 cup flour (~225-250g)
2 tsps baking powder
1/2 tsp salt
1 1/2 tsp vanilla (or vanilla sugar)
150g of chocolate chips.
Preheat oven to 350F or 170C.
It's tough because you're starting with wet ingredients and adding dry ingredients, but I'd start with a bowl of your Amish/Herman dough. Then add the eggs, one at a time and use a hand-mixer or a whisk to get it all blended. Then add the butter in softened pieces, and blend some more.
Combine all dry ingredients (except the chocolate chips) in a separate bowl. Add the dry into the wet ingredients until just combined, then stir in 100g of the chocolate chips reserving some for sprinkling the tops of the muffins once their poured in their respective spots.
Pour a few tablespoons of batter into each baking cup (until it was a little more than half full). Then, sprinkle the remaining chocolate chips over the tops of each muffin cup so everyone gets at least a few initial chocolaty bites.
Bake for 13 to 18 minutes or until a toothpick comes out clean from the center. Make sure you place your tin in the center of the oven (away from the edges) an on a baking rack (not cookie sheet- unless you're using individual silicone baking forms) so it can get even air circulation from all sides. If said toothpick doesn't come out clean, then try again in 3 to 5 supervised minutes. My oven cooks very quickly, but watch for some light browning around the edges.
I just had the pleasure of working with Vanessa over at Street Hanger, a lifestyle blog. She asked me to re-do the blog header and styling, and it was lots of fun. Here's what I came up with for the header...
She wanted a simple, stylish header to match her aesthetic, and I think whilst working together, we came up with something pretty pretty. Go team!
Next, I think I'm going to work up a background image to match... still visually a work in progress, but you can check out her blog here.
My Christmas present from my mom this year included this beautiful 50/50 silk/merino blend from Malabrigo in Raspberry. I knew I wanted a scarf and I knew I wanted something ruffly. The perfect pattern combination was found in Laura Chau's Cosmicpluto Knits: "Just Enough Ruffles".
Here's my adaptation... I used a thinner yarn, worked less amount of wrapped stitches, and an alternative bind-off. It's real pretty, I think.
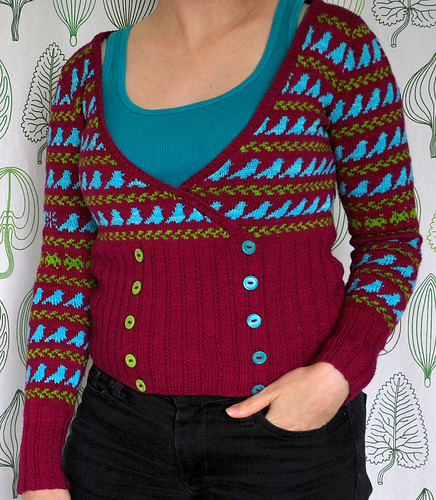
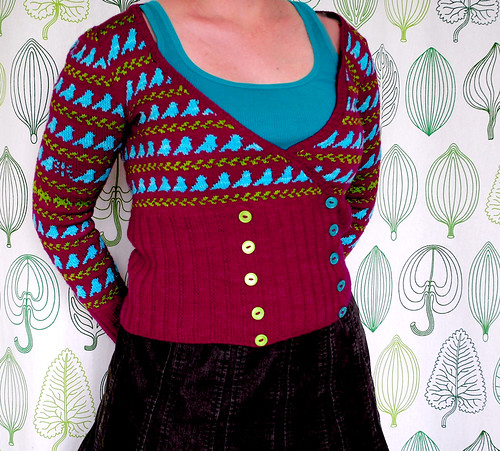
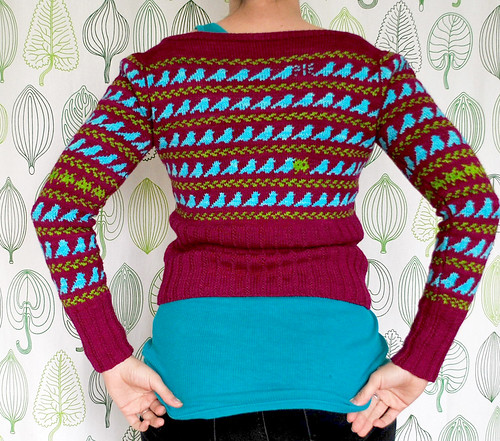
I began knitting Little Birds about two months ago, and I learned a lot about garment construction whilst knitting it. The pattern uses a steek down the center/diagonal opening to allow for continuous knitting on circulars despite the eventual need to separate the piece eventually. The pattern does have it's blips. For example, Twist Collective editors must have had a mix-up because schematics give the final sleeve length as ~19" which is a full-sleeve length, but the charts contained within the pattern are actually for a 16" sleeve (3/4 length sleeve).
Wanting a full-length sleeved cardigan, I opted to add an additional row, which I was happy to do in the form of some very hungry space invaders. I also added quite a bit of length to the ribbed cuffs in order to compensate for the still too-short-arms. I love the ribbing and everyone loves the beaded ribbing effect. In fact, I've had more compliments on that than my hungry space invaders and exploding birds. Go figure. :)
Other mods to the pattern: the bird's head is actually smaller than the charted one, I made the back less wide at the arms, and I sewed the buttons on, but then also sewed the overlapping fabrics together as they were tugging in a funny way. I also chose to do a ribbed collar instead of a garter stitch one as specified in the pattern. I'm happy to be done and loving it enough to have worn it three days in a row.